Alright, let’s just forget fancy blog posts for a minute. You and me? We’re just gonna chat about Tiramisu. Because honestly? It’s probably one of the best desserts on the planet. That first spoonful… cool, creamy, coffee-soaked heaven. Right? It hits different. It feels like pure comfort but also kinda special occasion-worthy. I swear, I could eat it any day of the week.
Maybe you’ve got a memory of your grandma’s version – that perfect, classic Tiramisu recipe – or maybe you’re seeing all these wild new takes everywhere and wondering what’s up. Doesn’t matter. We’re gonna figure out how to make one that’ll make you want to hide in a corner and eat the whole thing yourself (or, you know, share it… maybe). And spoiler: it’s way easier than it looks.
Why You’re Gonna Get Hooked On Making This:
- No Oven? No Problem! This is maybe the best part. Zero baking required. Seriously. Makes you feel like a culinary rockstar without actually having to deal with oven temps or burnt edges. Pure genius, especially when it’s warm out.
- Italy in a Bite: That combo… strong coffee, luscious mascarpone, hint of cocoa… it’s just right. It tastes like nostalgia, even if you’ve never been to Italy! It’s magic.
- Roll With It: Got dietary stuff going on? Vegan? Gluten-free? Low-carb? Tiramisu is surprisingly adaptable. We can totally figure out swaps so everyone gets a slice of happiness.
- Looks Fancy AF (With Zero Effort): Those layers just scream elegance. People will think you slaved away for hours. Let them. We know the truth.
So yeah, if you’re tired of searching for the one, the Tiramisu recipe that just clicks? Let’s just do this. We’ll stick mostly to tradition but keep it real. Sound good?
The Important Bits (But Don’t Sweat It!)
- Active Time: Genuinely, maybe 20 minutes of actual work. Tops.
- Fridge Time: Okay, here’s the catch. It needs to chill. Like, really chill. 4 hours minimum, but overnight? Chef’s kiss. That’s when the real magic happens. Patience is key! (I know, it’s hard!)
- Stress Level: Basically zero. This is fun, promise.
It’s just a few simple things, but good things, coming together. If you love coffee, you’re golden. If you love creamy desserts… well, you’re about to be very, very happy.
Let’s Go Shopping (Mentally, or For Real!)
Okay, what do we need for these knockout Tiramisu recipe?
- The Non-Negotiables:
- Really good, strong coffee (about a cup’s worth). Espresso is king, but strong brewed works too. CRITICAL: Let it cool down completely. Like, stone cold. Don’t risk warm coffee mushiness!
- Mascarpone cheese (a tub, about 250g or 1 cup). Okay, listen. If you can splurge a tiny bit, get proper Italian mascarpone. It’s richer, creamier… it just is. Makes a HUGE difference. Trust me.
- 3 large eggs. We gotta separate the yolks from the whites. Don’t panic!
- Sugar (about half a cup). Just plain white sugar works fine.
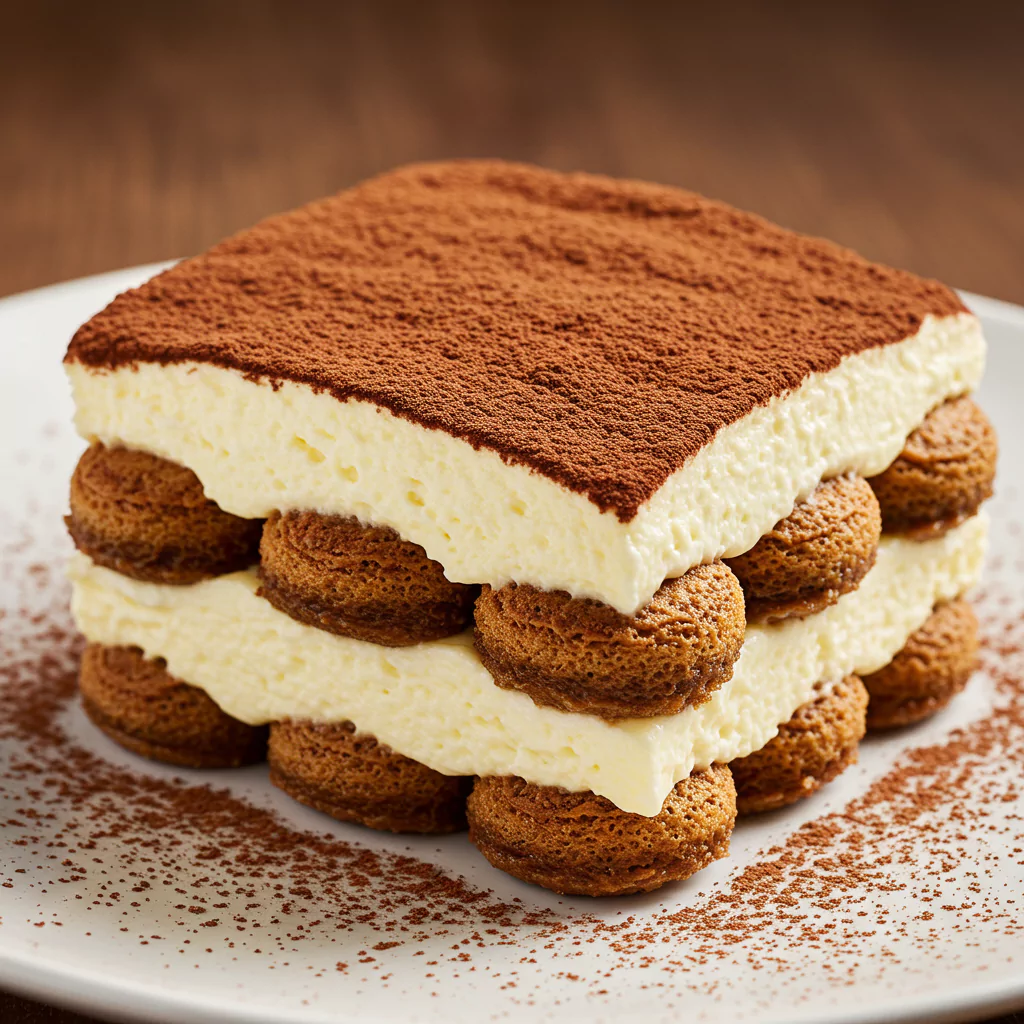
- Ladyfinger cookies (savoiardi – you need about 24). Those dry, slightly sweet spongey biscuits. They’re the building blocks!
- The Pretty Bits:
- Unsweetened cocoa powder (a couple of tablespoons). Absolutely not hot chocolate mix. We want that slightly bitter contrast.
- Chocolate shavings? Why not! Grate some dark chocolate over the top if you’re feeling fancy. Looks lovely.
Can’t Find Something? Or Need a Swap? Easy.
- Vegan Pal? Totally possible. Vegan mascarpone is a thing now! Use the magic goo from a chickpea can (aquafaba) for egg whites, maybe a vegan yolk powder, and hunt down some vegan ladyfingers. You got this.
- Gluten Issues? Just find gluten-free sponge cookies or ladyfingers. Simple swap!
- Low-Carb Life? Use your fave sugar sub (erythritol, monk fruit, whatever) and look for keto-friendly ladyfinger recipes or store-bought ones (they exist!).
- Wanna Play? Go for it! Tiny bit of vanilla in the cream? Yes. Pinch of cinnamon in the coffee? Delicious, especially in winter. Orange zest? Adds a lovely brightness! Don’t be afraid to tinker once you know the basics.
Right, Let’s Actually Assemble This Thing!
1. Coffee Station: Got your cold coffee? Pour it into something shallow-ish. Now, the ladyfingers. This is lightning fast. Dip one side, flip, dip the other side, OUT. Seriously, one second per side is plenty. Think moist, not soggy. Line ’em up in the bottom of your dish (an 8×8 glass dish is kinda classic, but anything works!). Snug them in there to cover the bottom.
2. Make the Cloud Cream: Okay, deep breath. In a bowl, beat the egg yolks and sugar together until they’re pale, thick, and lovely. Like sunshine custard. Now, gently fold in that glorious mascarpone. Mix just until it disappears. Be nice to it! Now, the whites. In a super clean bowl (no grease allowed, or they won’t whip!), whisk the egg whites until they hold stiff peaks. You know, when you lift the whisk, the peak stands up straight and doesn’t flop over? Like a little snowy mountain. Gently, gently, FOLD these into the mascarpone mix. Don’t stir! Use a spatula and go down, across, up, and over. Do it in maybe three batches. We’re trying to keep all that lovely air in there! Seriously, don’t beat the air out! That airiness is what makes it Tiramisu and not just pudding.
3. Layer Up, Baby! Spread about half of that fluffy cloud cream over your first layer of ladyfingers. Gently smooth it out. Now repeat: another quick dip for more ladyfingers, arrange them on top, then cover with the rest of the cream. Smooth the top so it looks pretty (or don’t, rustic is good too!).
4. The Agony of Waiting: Cover the dish tightly with plastic wrap. Push it right down gently onto the cream surface if you can – stops a weird skin forming. Shove it in the fridge. And now… you wait. At least 4 hours. Honestly? Make it the day before you want to eat it. Overnight is where the real flavour fusion happens. Go watch a movie. Distract yourself. Don’t peek!
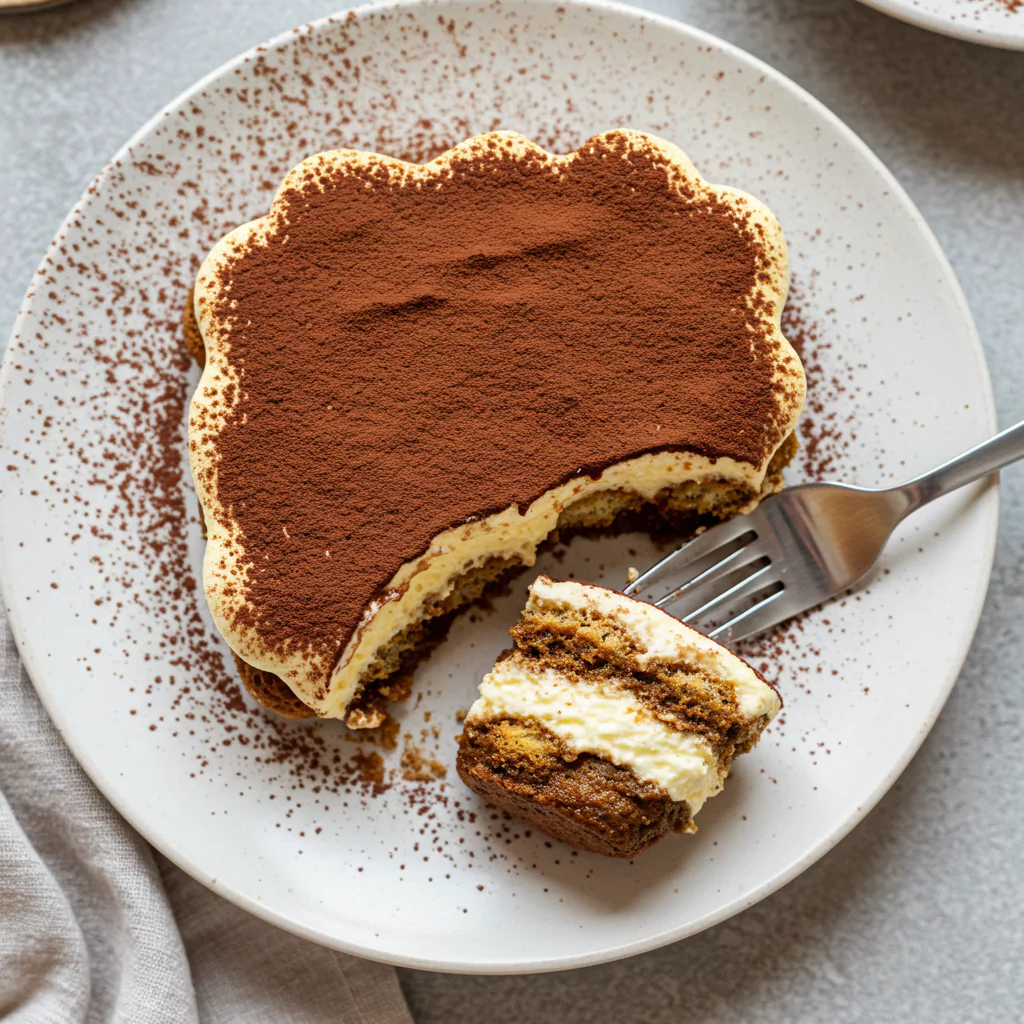
5. The Big Reveal! Okay, it’s time! Just before serving, grab your cocoa powder and a little sieve. Dust it generously all over the top. Stand back and admire your work. Ahhh. Slice that beauty up (dip your knife in hot water and wipe it between cuts for cleaner slices!) and serve it chilled. Get ready for happy sighs.
Want Bonus Points?
- Individual Pots: Little glasses or jars look adorable and make serving dead easy.
- Cocoa Flair: Use a fork to make lines, or cut out a simple paper heart stencil. Instant fancy pants. A few chocolate curls? Always a good idea.
- Gift It: Layer it in little jars, tie a ribbon around it? Best. Gift. Ever.
Got Leftovers? (Seriously? How?)
- Fridge: Keep it covered tightly. It’ll be good for 2-3 days. Some say it’s even better the next day.
- Freezer: Yep! Assemble without the cocoa on top. Wrap it like you’re protecting treasure (plastic wrap AND foil). Freeze for up to a month. Thaw overnight in the fridge before dusting with cocoa. Works like a charm.
- Heating? No. Just… no. Cold dessert only!
Feeling Brave? Riff On It!
Once you’ve nailed the classic Tiramisu recipe, have some fun!
- Chocoholic Dream: Cocoa in the cream? Melted chocolate drizzle between layers? Yes and yes.
- Berry Blast: Fresh raspberries or sliced strawberries between the layers add a lovely tang.
- Spiced Up: Cinnamon or nutmeg in the coffee dip? Cozy vibes activated.
- Nutty Professor: Toasted chopped hazelnuts or almonds sprinkled between layers? Texture heaven!
Made It? Loved It? Tell Someone!
Honestly, I really hope you try making this and love it as much as I do. If these Tiramisu recipes bring a little joy, maybe pass the link along to a friend who deserves a treat. It’s just such a satisfying thing to make – minimal stress, maximum deliciousness. Go enjoy that slice – you earned it!
Recipes You May Like
There are no reviews yet. Be the first one to write one.