Alright, confession time. If you know me at all, you know my world kind of spins on two axes: truly fantastic, strong coffee (like, the kind that makes you sigh happily) and proper, dense, moan-worthy cheesecake. For the longest time, these two loves lived separate lives. Coffee fueled my mornings, cheesecake was my evening treat. Then, one slightly hyper-caffeinated afternoon, the clouds parted, angels sang (okay, maybe not), and I thought, “Why the HECK haven’t I put these together?!”
And folks, let me tell you, the journey to this espresso coffee cheesecake was… an adventure. My kitchen has seen things. Things involving too much coffee, not enough coffee, cheesecakes that were frankly tragic (poor Fatima next door probably got sick of being my guinea pig!), and one specific incident involving a springform pan, a puddle of batter, and maybe a few tears. BUT! Through sheer stubbornness and an obscene amount of cream cheese, I cracked the code.
This recipe? This is IT. It’s not just ‘coffee-flavoured’. No, no. This is a deep, rich, velvety smooth espresso coffee cheesecake where you taste that beautiful coffee right alongside the creamy tang. It’s the real deal, and honestly? It’s not as scary to make as you might think. You just have to try it.
What You Need to Make the Magic Happen (aka Ingredients!)
Gather ’round, let’s get our ingredients sorted. Using good quality stuff really makes a difference here, trust me.
For the Crust That Won’t Quit:
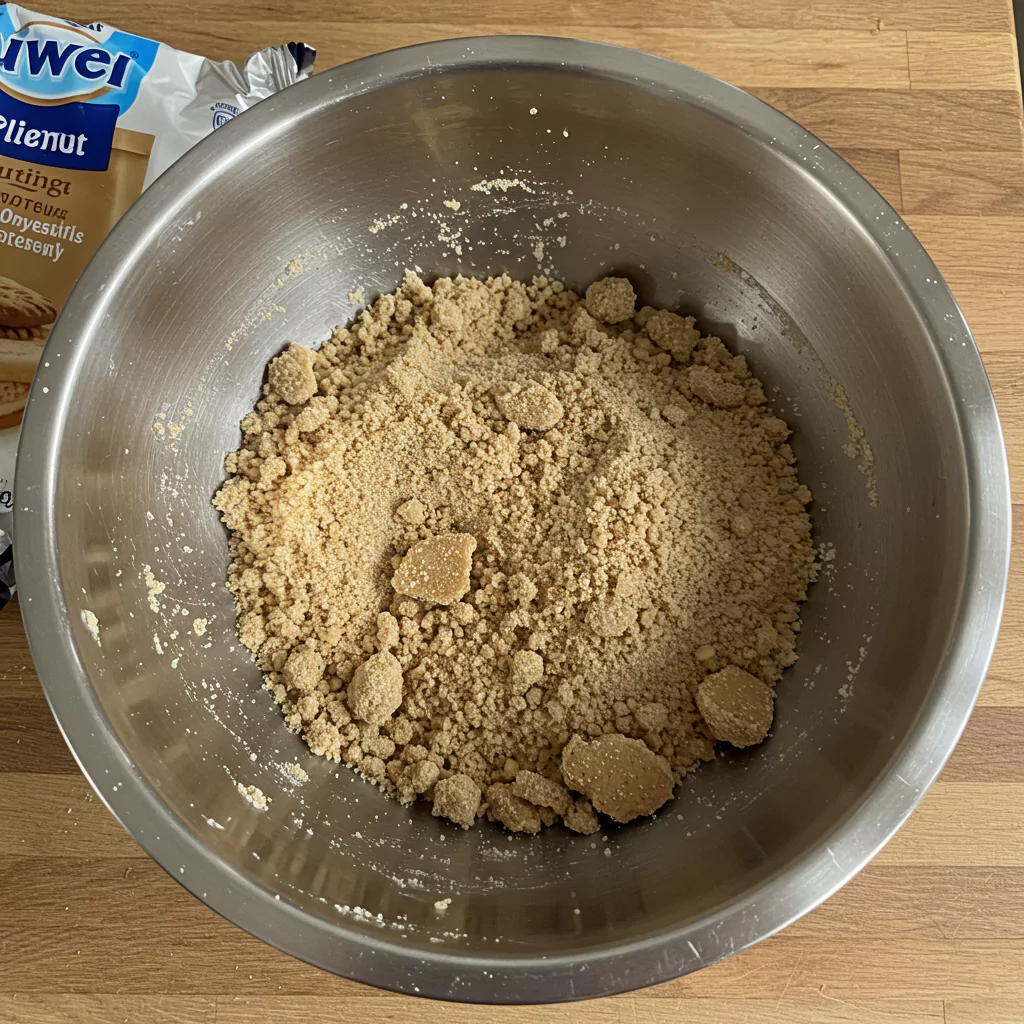
- 1 ½ cups (about 150g) Digestive Biscuit Crumbs: My absolute fave for this. Graham crackers are a solid backup. If you’re feeling wild, Biscoff gives it a lovely spiced note! Just smash ’em up good and fine.
- ¼ cup (50g) Granulated Sugar: Just a little something-something for the base.
- 6 tablespoons (85g) Unsalted Butter, Melted: Liquid gold! This holds our glorious crust together. The smell of buttery biscuit crumbs… chef’s kiss.
For the Unbelievably Creamy Espresso Filling:
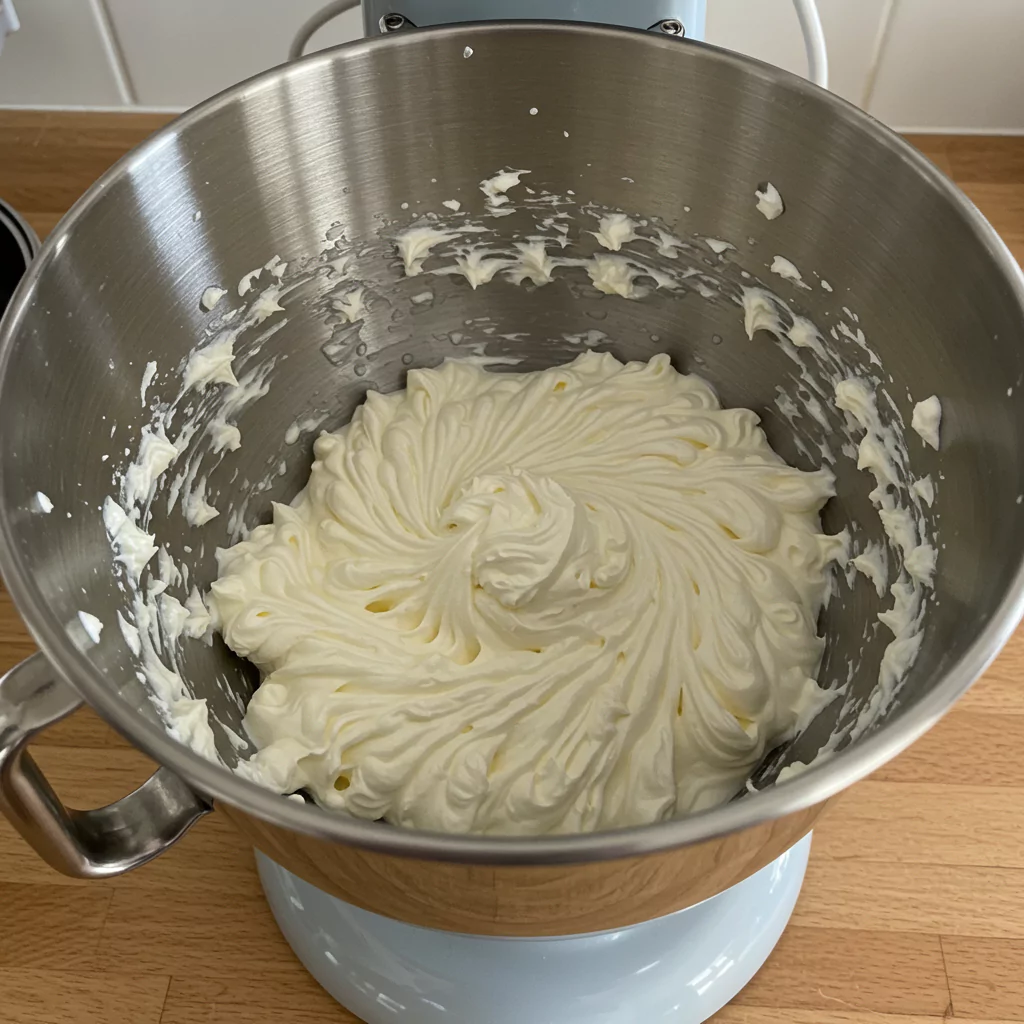
- 32 oz (FOUR 8oz blocks, about 900g) Full-Fat Cream Cheese, SOFTENED: Seriously, leave this stuff out on the counter for hours. Like, properly room temp. Cold cream cheese = lumpy cheesecake = sadness. Don’t even think about low-fat here. We’re making cheesecake, people! Go for the blocks, not the tubs.
- 1 ½ cups (300g) Granulated Sugar: Gotta have that sweetness to balance the tang and the coffee kick.
- ⅓ cup (80ml) Strong Brewed Espresso, COOOLED: The heart and soul! Pull 2 or 3 shots of espresso you actually enjoy drinking. And I mean cooled. Like, totally. Room temp. Hot coffee will cook the eggs. Disaster! Decaf works great too, no worries there.
- 1 teaspoon Pure Vanilla Extract: Get the good stuff if you can. It just rounds everything out so beautifully.
- 4 Large Eggs, Room Temperature: Yep, these guys need to be room temp too. Take ’em out with the cream cheese. They’ll mix in way better.
- ½ cup (120ml) Sour Cream, Room Temperature: For that lovely bit of tang and extra creaminess that just makes it perfect. Full-fat Greek yogurt can work in a real emergency, but sour cream is queen here.

Okay, How Long Will This Take? (Be Honest!)
Making legendary cheesecake takes time. It just does. Think of it as therapy. Delicious, delicious therapy.
- Actually Doing Stuff (Prep): Maybe 25-30 minutes? Crushing, mixing, smelling things… the fun bit!
- Oven Time (Baking): Around 60-70 minutes. Your kitchen will smell AMAZING.
- The Test of Willpower (Cooling & Chilling): This is the hard part. MINIMUM 6 hours in the fridge after it’s cooled down, but honestly? Overnight is the magic number. (Factor in about 1 hour cooling in the oven, 1 hour on the counter, THEN the fridge).
- Total Time Start-to-Finish: Yeah, it’s like 8+ hours. But look, most of that is just waiting around, dreaming about cheesecake.
Real Talk: I know, I KNOW that chilling time feels like an eternity when all you want is to face-plant into that espresso coffee cheesecake. Pure agony, right? But that hands-on time is short and sweet for such a showstopper. And the waiting? It’s what makes it perfectly dense and creamy. Every minute is worth it, I pinky swear.
Let’s Do This! Baking Your Espresso Coffee Cheesecake Step-by-Step
Okay, deep breaths! You can totally do this. Put on some tunes, grab your ingredients, and let’s bake something incredible.
Step 1: Pan Prep & Crust Creation!
Get that oven heating up to 350°F (175°C). Find your 9-inch springform pan. Now, the secret weapon against cracks: the water bath foil wrap. Take two big sheets of heavy-duty foil and wrap the outside bottom and sides of your pan really, really well. You don’t want any water sneaking in! Set that aside. In a bowl, mix your biscuit crumbs and sugar, then pour in that lovely melted butter. Stir stir stir until it’s all combined and feels like damp sand. Tip this into your foil-wrapped pan and press it down firmly on the bottom and a little bit up the sides. Use the flat bottom of a glass – works like a charm! Bake this crust for 10 mins. Let it cool while you get the filling ready. The smell alone is worth it!
Step 2: Coffee Time!
Brew that espresso! Make it strong! Measure out your ⅓ cup and just… leave it alone. Let it cool down completely. Seriously. Walk away. Make another coffee for yourself while you wait.
Step 3: Cream Cheese Mania!
In your big bowl (stand mixer paddle attachment is your BFF here, but handheld works too!), beat the room temp cream cheese on medium-low. Scrape down the bowl OFTEN. Like, obsessively. We want ZERO lumps. Beat it until it looks gloriously smooth and creamy.
Step 4: Sweet Talk!
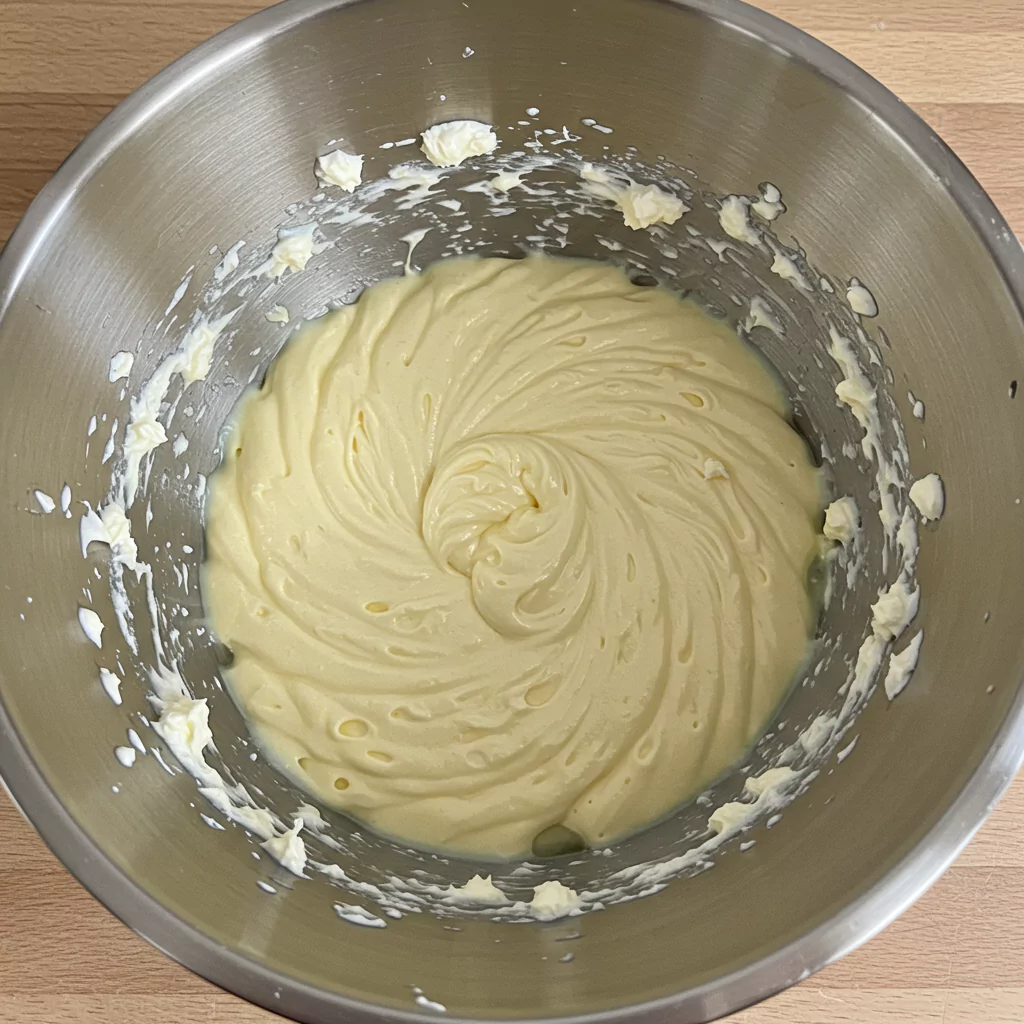
Mixer still on low, slowly pour in the sugar. Mix just until it’s all blended in and looking smooth again. Add the vanilla. Scrape that bowl again! Don’t let any cream cheese hide!
Step 5: Easy Does It With The Eggs!
Okay, low speed. Add the room temp eggs one… by one… mixing just until the yellow disappears after each one. Please, please don’t overmix here. Too much air is the enemy! We want dense and creamy, not fluffy and cracked.
Step 6: The Grand Finale – Sour Cream & Espresso!
Mixer OFF. Spatula time. Gently fold in the room temp sour cream, then drizzle in that completely cooled espresso. Fold it all together carefully until you don’t see any more streaks and the batter is a beautiful, uniform coffee colour. Be gentle! This is the soul of our espresso coffee cheesecake.
Step 7: Pour & Prepare the Spa Bath!
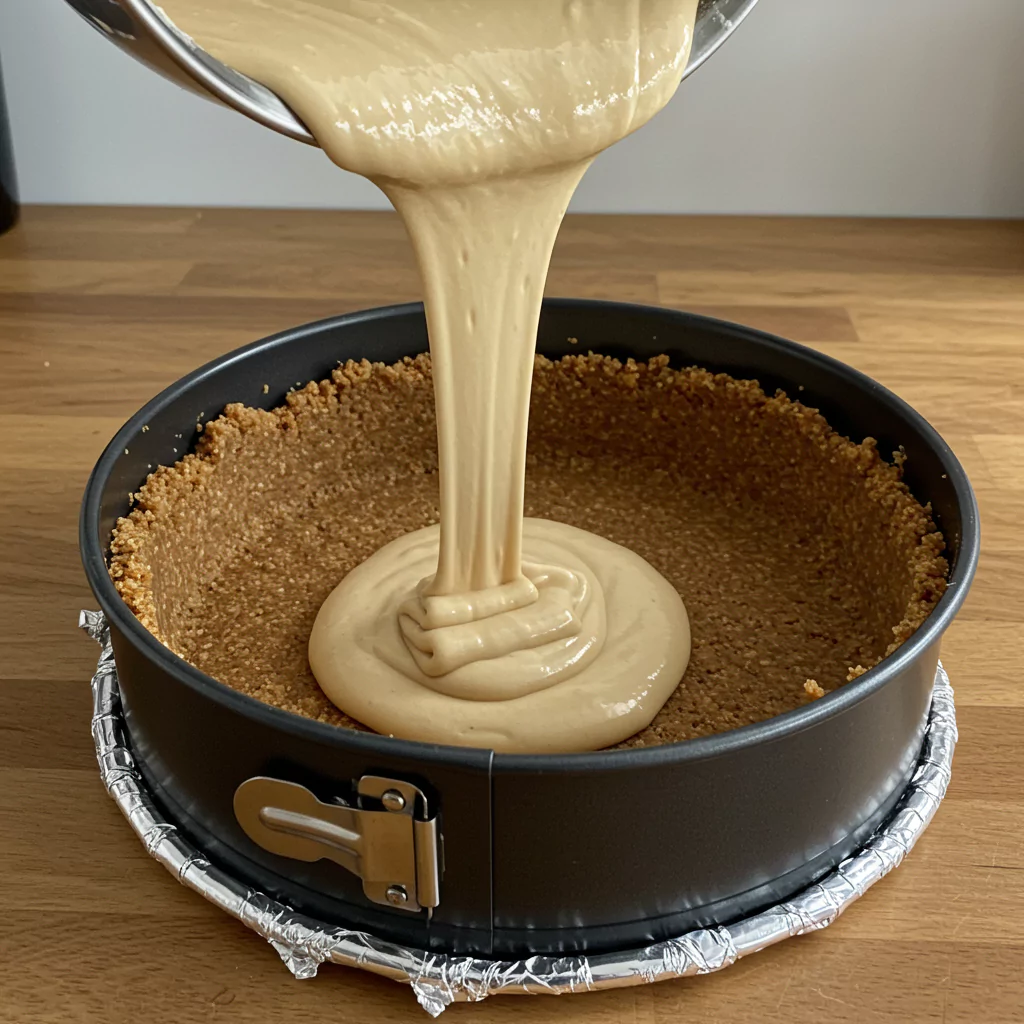
Pour this gorgeous, luscious filling over your crust. Smooth the top gently with your spatula. Now, the water bath. Carefully lower your foil-wrapped cheesecake pan into a larger roasting pan. Pour very hot tap water (not boiling!) into the roasting pan, being careful not to splash. You want the water to come about halfway up the sides of your cheesecake pan. This steamy environment is like a spa day for your cheesecake, helping it bake evenly and preventing cracks. It sounds fussy, I know, but it WORKS.
Step 8: Bake Bake Bake!
Carefully slide the whole contraption into the oven. Now, patience. Bake for 60-70 minutes. Check it around the 60-minute mark. The edges should look set, maybe slightly puffed. The center (a circle maybe 2-3 inches wide) should still have a distinct wobble, like Jell-O, when you gently nudge the pan. If it’s totally solid, you’ve gone too far! A little wobble is perfect.
Step 9: The Slowwwww Cool Down (Don’t Skip This!)
Turn the oven OFF. Crack the oven door open (prop it with a wooden spoon) and just leave the cheesecake in there for one whole hour. Let it come down from the heat gently. Don’t shock the poor thing! After an hour, carefully lift the cheesecake pan out of the water bath (you can take the foil off now, carefully!) and let it cool COMPLETELY on a wire rack on your counter. This might take another hour or two. Let it be.
Step 10: Into the Chill Zone!
Once it’s totally cool (no warmth left!), cover it loosely. Plastic wrap is fine, just try not to let it touch the top (maybe stick a few toothpicks around the edge to tent it?). Or pop a big bowl upside down over it. Now, the final test of patience: into the fridge for AT LEAST 6 hours. Honestly? Overnight is KING. This long, cold nap lets the espresso coffee cheesecake set up beautifully and all those flavours get even deeper and more delicious. You’re almost there!
Lighter Options? (If You Absolutely MUST…)
Look, this is full-fat, full-flavour gloriousness. But okay, if you really want to try and lighten it up:
- Cheese: Maybe try Neufchâtel? It’s lower fat. Some people swap a bit of cream cheese for Greek yogurt, but it will change the texture, making it less dense. Your call!
- Sugar: Baking sugar subs can work, just check their instructions. I haven’t tested them much in this specific recipe because… well, it’s cheesecake!
- Crust: GF cookies or an almond flour crust are easy swaps if you need ’em!
- Coffee: Decaf espresso works perfectly if you want the flavour without the jitters!
Honestly? My advice is make it as written first, then experiment if you must!
Recipes You May Like
Serving This Slice of Heaven
It needs very little, but options are nice!
- Naked & Beautiful: Seriously, a plain slice is divine.
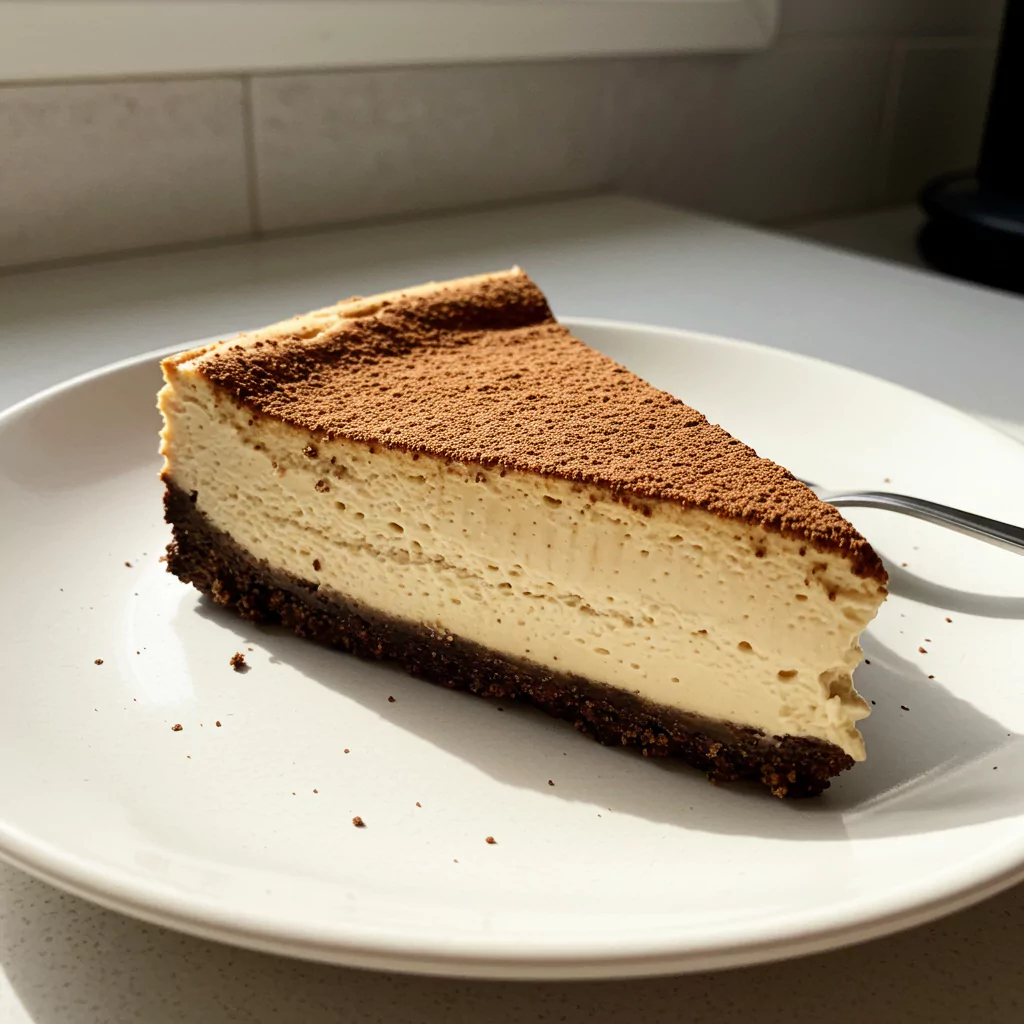
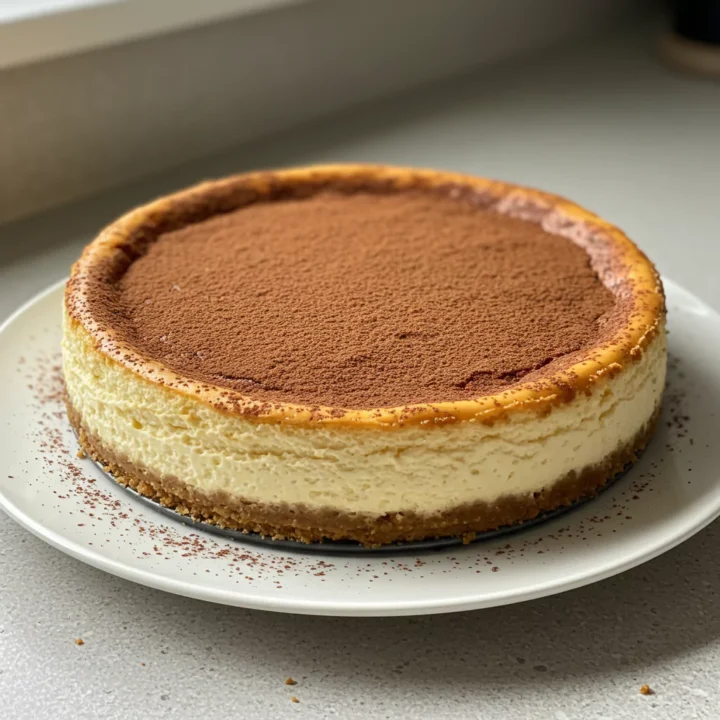
- Dusty & Delicious: A little sift of cocoa powder? Chef’s kiss. My personal favorite. Looks pro, tastes amazing.
- Cloud on Top: Whipped cream? Obvious yes. Especially if you whip a tiny bit of espresso into it!
- Saucy: Caramel drizzle? Go for it.
- Unexpected Zing: A few raspberries on the side look pretty and add a nice tartness against the rich espresso coffee cheesecake.
- The Perfect Partner: Serve with… more coffee! Obviously!
I usually just do the cocoa dusting. Simple, classic, lets that amazing espresso coffee cheesecake flavour shine right through.
How to Keep Leftovers Happy (The Dream Scenario!)
If you find yourself with leftover espresso coffee cheesecake (what magic is this?!), here’s the deal:
- Fridge is Your Friend: Cover it TIGHTLY. Plastic wrap, airtight container, whatever you’ve got. It’ll keep well for 4-5 days. Keep it covered so it doesn’t start tasting like garlic or whatever else is in your fridge! It’s actually amazing cold straight from the fridge the next morning… just saying.
- Freezer Power: Yes! It freezes beautifully. Chill it completely first. Wrap slices (or the whole thing, if you have superhuman willpower) in plastic wrap, then foil, or pop into a freezer bag/container. Thaw overnight in the fridge. Don’t microwave it or leave it on the counter, okay? Treat it nicely. Best enjoyed within a month or two.
Properly stored = happy future you discovering leftover cheesecake.
Okay, For Real, Why I’m Nuts About This Recipe (And You Will Be Too!)
Look, I know I’m gushing, but I truly LOVE this espresso coffee cheesecake. It’s everything I ever wanted – that perfect marriage of tangy, creamy, dense cheesecake and bold, aromatic, honest-to-goodness coffee. It feels fancy, tastes incredible, but it’s totally achievable in a normal kitchen by a normal person (like me! And you!).
There’s just something so satisfying about making it, nurturing it through the cooling, and then finally, finally taking that first bite. Smooth. Rich. Perfectly balanced. That unmistakable espresso hit. It’s just GOOD. Pure, unadulterated, delicious GOODNESS.
Okay, I’m begging you! Please make this! Go on! You deserve it! And when you do, pretty please come back here and tell me EVERYTHING in the comments! Did you love it? Did you change anything? Did your family devour it? I genuinely want to know!
Happy Baking! Let me know how your espresso coffee cheesecake adventure goes!
Espresso Coffee Cheesecake
The ultimate rich, creamy Espresso Coffee Cheesecake recipe! Deep coffee flavor meets tangy perfection. Easier than you think! Treat yourself today.
Ingredients
- 1 ½ cups (150g) Digestive Biscuit Crumbs (or Graham Crackers/Biscoff)
- ¼ cup (50g) Granulated Sugar
- 6 tablespoons (85g) Unsalted Butter, Melted
- 32 oz (Four 8oz blocks / 900g) Full-Fat Cream Cheese, very softened (room temp for hours!)
- 1 ½ cups (300g) Granulated Sugar
- ⅓ cup (80ml) Strong Brewed Espresso, completely cooled
- 1 teaspoon Pure Vanilla Extract
- 4 Large Eggs, room temperature
- ½ cup (120ml) Sour Cream, room temperature
Instructions
Step 1: Pan Prep & Crust Creation!
Get that oven heating up to 350°F (175°C). Find your 9-inch springform pan. Now, the secret weapon against cracks: the water bath foil wrap. Take two big sheets of heavy-duty foil and wrap the outside bottom and sides of your pan really, really well. You don’t want any water sneaking in! Set that aside. In a bowl, mix your biscuit crumbs and sugar, then pour in that lovely melted butter. Stir stir stir until it’s all combined and feels like damp sand. Tip this into your foil-wrapped pan and press it down firmly on the bottom and a little bit up the sides. Use the flat bottom of a glass – works like a charm! Bake this crust for 10 mins. Let it cool while you get the filling ready. The smell alone is worth it!
Step 2: Coffee Time!
Brew that espresso! Make it strong! Measure out your ⅓ cup and just… leave it alone. Let it cool down completely. Seriously. Walk away. Make another coffee for yourself while you wait.
Step 3: Cream Cheese Mania!
In your big bowl (stand mixer paddle attachment is your BFF here, but handheld works too!), beat the room temp cream cheese on medium-low. Scrape down the bowl OFTEN. Like, obsessively. We want ZERO lumps. Beat it until it looks gloriously smooth and creamy.
Step 4: Sweet Talk!
Mixer still on low, slowly pour in the sugar. Mix just until it’s all blended in and looking smooth again. Add the vanilla. Scrape that bowl again! Don’t let any cream cheese hide!
Step 5: Easy Does It With The Eggs!
Okay, low speed. Add the room temp eggs one… by one… mixing just until the yellow disappears after each one. Please, please don’t overmix here. Too much air is the enemy! We want dense and creamy, not fluffy and cracked.
Step 6: The Grand Finale – Sour Cream & Espresso!
Mixer OFF. Spatula time. Gently fold in the room temp sour cream, then drizzle in that completely cooled espresso. Fold it all together carefully until you don’t see any more streaks and the batter is a beautiful, uniform coffee colour. Be gentle! This is the soul of our espresso coffee cheesecake.
Step 7: Pour & Prepare the Spa Bath!
Pour this gorgeous, luscious filling over your crust. Smooth the top gently with your spatula. Now, the water bath. Carefully lower your foil-wrapped cheesecake pan into a larger roasting pan. Pour very hot tap water (not boiling!) into the roasting pan, being careful not to splash. You want the water to come about halfway up the sides of your cheesecake pan. This steamy environment is like a spa day for your cheesecake, helping it bake evenly and preventing cracks. It sounds fussy, I know, but it WORKS.
Step 8: Bake Bake Bake!
Carefully slide the whole contraption into the oven. Now, patience. Bake for 60-70 minutes. Check it around the 60-minute mark. The edges should look set, maybe slightly puffed. The center (a circle maybe 2-3 inches wide) should still have a distinct wobble, like Jell-O, when you gently nudge the pan. If it’s totally solid, you’ve gone too far! A little wobble is perfect.
Step 9: The Slowwwww Cool Down (Don’t Skip This!)
Turn the oven OFF. Crack the oven door open (prop it with a wooden spoon) and just leave the cheesecake in there for one whole hour. Let it come down from the heat gently. Don’t shock the poor thing! After an hour, carefully lift the cheesecake pan out of the water bath (you can take the foil off now, carefully!) and let it cool COMPLETELY on a wire rack on your counter. This might take another hour or two. Let it be.
Step 10: Into the Chill Zone!
Once it’s totally cool (no warmth left!), cover it loosely. Plastic wrap is fine, just try not to let it touch the top (maybe stick a few toothpicks around the edge to tent it?). Or pop a big bowl upside down over it. Now, the final test of patience: into the fridge for AT LEAST 6 hours. Honestly? Overnight is KING. This long, cold nap lets the espresso coffee cheesecake set up beautifully and all those flavours get even deeper and more delicious. You’re almost there!
Notes
Nutrition Information:
Yield: 12-16 slicesAmount Per Serving: Calories: Approx. 550-650 kcal per slice
Tried This Recipe? Share Your Thoughts!
There are no reviews yet. Be the first one to write one.