Alright, friend to friend? My journey with French Onion Soup bordered on obsession for a while there. You know that flavour – that deep, dark, sweet-and-savory thing that makes your eyes roll back a little? Yeah, that. I was on a mission, a full-blown quest, to get that exact feeling in a bowl, but without using any wine or beef broth. Why? Well, I often cook for a crowd – family, friends, neighbours popping over – and wanted something everyone could dive into, no questions asked. Plus, honestly? I wanted to see if I could pull it off!
Spoiler alert: I did. And after making maybe one too many batches (my partner started asking if we owned stock in an onion farm), this is the version that made me stop searching. This is IT. This French Onion Soup recipe is like wrapping yourself in the warmest blanket on a chilly Casablanca evening. It’s proof that simple ingredients + a little patience = pure magic. Forget needing a fancy restaurant; you’ve totally got this. Let’s make some soup!
Here’s What You Need for This Bowl of Happiness (aka French Onion Soup)
Don’t let the fancy name fool you; the ingredients are pretty straightforward. It’s all about letting them shine. Here’s the rundown for our French Onion Soup adventure:
- Sweet Yellow Onions (Loads! Like 6 big ones, or about 2-2.5 lbs / 1kg): These guys are the undisputed stars. Yellow onions just hit that sweet spot for caramelizing. Help, I only have red/white onions! Look, you can use them, but yellow onions really deliver that classic flavour. And yes, you’ll probably cry while slicing them. It’s okay. Think of it as a free emotional cleanse! A super sharp knife really helps, though.
- Unsalted Butter (4 Tablespoons): Gives everything a beautiful, rich start. Can I use oil? Absolutely! Olive oil works great, or do half and half. If you’re vegan, a good plant-based butter or just olive oil is perfect.
- Garlic (3-4 Cloves, chopped up): Because garlic just makes life better, right? Adds that lovely background hum of flavour.
- Plain Old Flour (2 Tablespoons): This just helps thicken the broth slightly so it feels silky, not watery. Gluten-free friend? Easy swap – just use your favorite GF all-purpose flour blend.
- Veggie Broth That Doesn’t Suck (8 Cups / 2 Liters): This is important! Since we’re skipping the beef broth, find a vegetable broth that actually tastes good on its own. Low-sodium is usually my pick so I can salt it just how I like it. Quick Fix for Blah Broth: If your broth tastes kinda watery, simmer it first for 15-20 mins with a bay leaf, a few thyme sprigs, and some peppercorns. Works wonders!
- Fresh Thyme Sprigs (3-4): That smell! It’s just so French bistro. Dried thyme is okay in a pinch (use about 1 teaspoon), but fresh just feels special.
- Bay Leaf (1): Another quiet background player adding depth. Just yank it out before serving – trust me, biting into a bay leaf is weird.
- Salt and Freshly Ground Black Pepper: Obviously! Taste and season as you go along. Cooking is all about tasting!
- Baguette Slices (about 1-inch thick): For our cheesy life rafts! Slightly stale bread is your friend here – it toasts up crunchy without getting instantly soggy. No baguette handy? No worries! Any crusty bread works – sourdough, ciabatta, a rustic loaf. Even gluten-free bread, just make sure it’s nicely toasted!
- Gruyère Cheese (A good handful! 1.5 – 2 Cups shredded): Okay, Gruyère is the classic for a reason. It’s nutty, a little salty, and melts like a dream. It can be pricey though! Cheese Confessions: Swiss, Provolone, even a mix with some sharp cheddar or mozzarella works great too! Use a cheese you love that melts well. And yay for awesome meltable vegan cheeses these days – use ’em if that’s your jam!
- Optional Secret Weapon (Shhh!): Balsamic Vinegar or Soy Sauce (1-2 tsp): Okay, this is my little trick. A tiny splash near the end of cooking the onions adds this amazing depth, kinda mimicking that wine thing without the wine. Give it a try!
How Much Time Are We Talking Here?
Let’s be real, this isn’t a Tuesday night 20-minute meal. Making truly great French Onion Soup takes a bit of time, but honestly? Most of it is just letting the onions do their magical slow-cooking thing while you potter around the kitchen, listen to a podcast, or supervise homework. It’s relaxing, promise!
- Chopping & Stuff (Prep): Maybe 15-20 minutes? The onions are the biggest job. Put on some good music; it helps!
- Stove Time (Cooking): Around 70-80 minutes total, give or take.
- Onion Meditation: This is the longest stretch – 45 to 60 minutes of low-and-slow caramelizing. This is where the magic happens. Don’t rush it!
- Soup Bubble Bath: About 20-25 minutes of simmering to let all the flavours become best friends.
- Cheesy Meltdown: Literally 3-5 minutes under the broiler at the end. Quick but crucial!
- Total Investment: Figure about an hour and a half, maybe a bit longer.
Seriously, for the payoff – that deep, comforting, insanely delicious bowl – it’s SO worth it. It feels way more special than the effort involved suggests!
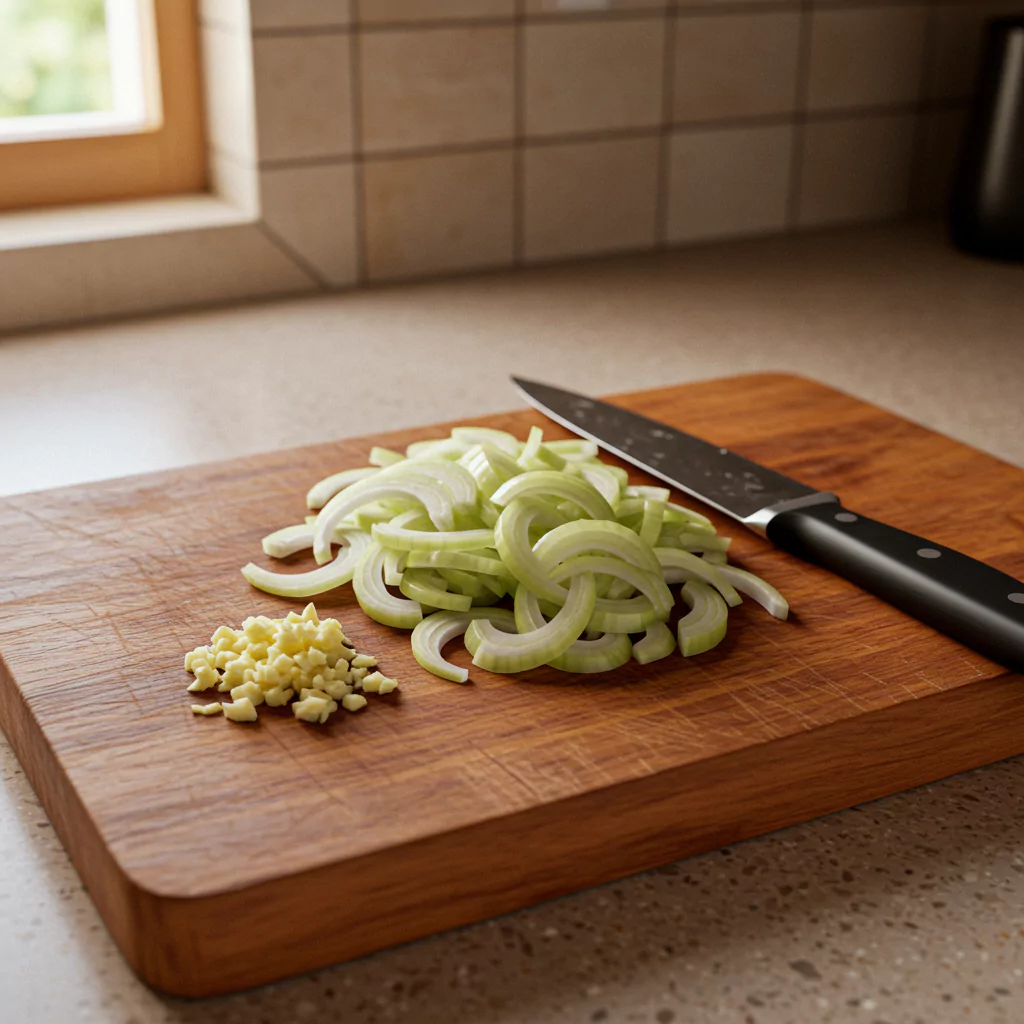
Step 1: Get Those Onions Ready!
- Okay, deep breath! Peel the onions, slice ’em in half root-to-stem, and then slice ’em thinly crosswise (about 1/8-inch). Don’t stress about perfection, just aim for roughly similar thickness. Chop up your garlic.
- My tear-fighting tactics: Chill the onions first, use your sharpest knife, and maybe open a window? Honestly, sometimes you just gotta cry it out. It’s worth it for the soup!
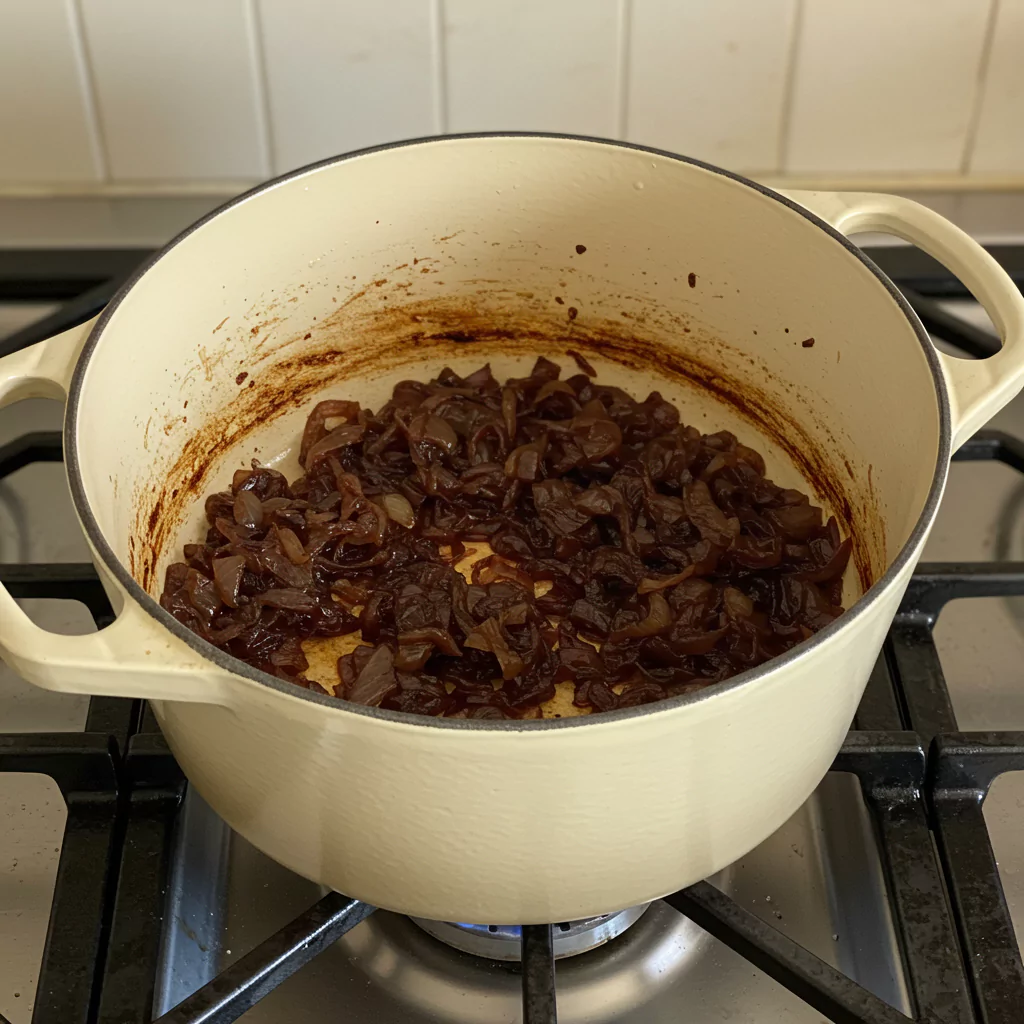
Step 2: The Slow Dance of Caramelization
- Grab your biggest, heaviest pot (a Dutch oven is perfect if you have one). Melt the butter over medium-low heat – emphasis on low. Dump in that mountain of onions (don’t worry, they shrink A LOT) and stir ’em around. Now, just let them hang out. Stir occasionally. For the next 45-60 minutes.
- What you’re watching for: They’ll soften, release water, then slowly, slowly turn golden, then amber, then a beautiful deep brown. They should smell sweet and amazing. Keep the heat low! If they start sticking too much before they’re brown, add a tiny splash of water or broth to scrape up the yummy brown bits from the bottom. This is the heart of your French Onion Soup flavour. Patience, grasshopper!
Step 3: Layering Up the Goodness
- Once your onions look like sweet, glossy, brown ribbons of deliciousness, toss in the garlic. Stir it around for just a minute until you start smelling that amazing garlic aroma. Now, sprinkle the flour over everything. Stir it constantly for a minute or two – this gets rid of the raw flour taste.
- Using the secret weapon? Add that splash of balsamic or soy sauce right before the flour, stir it in quickly.
Step 4: Let it Simmer Down Now!
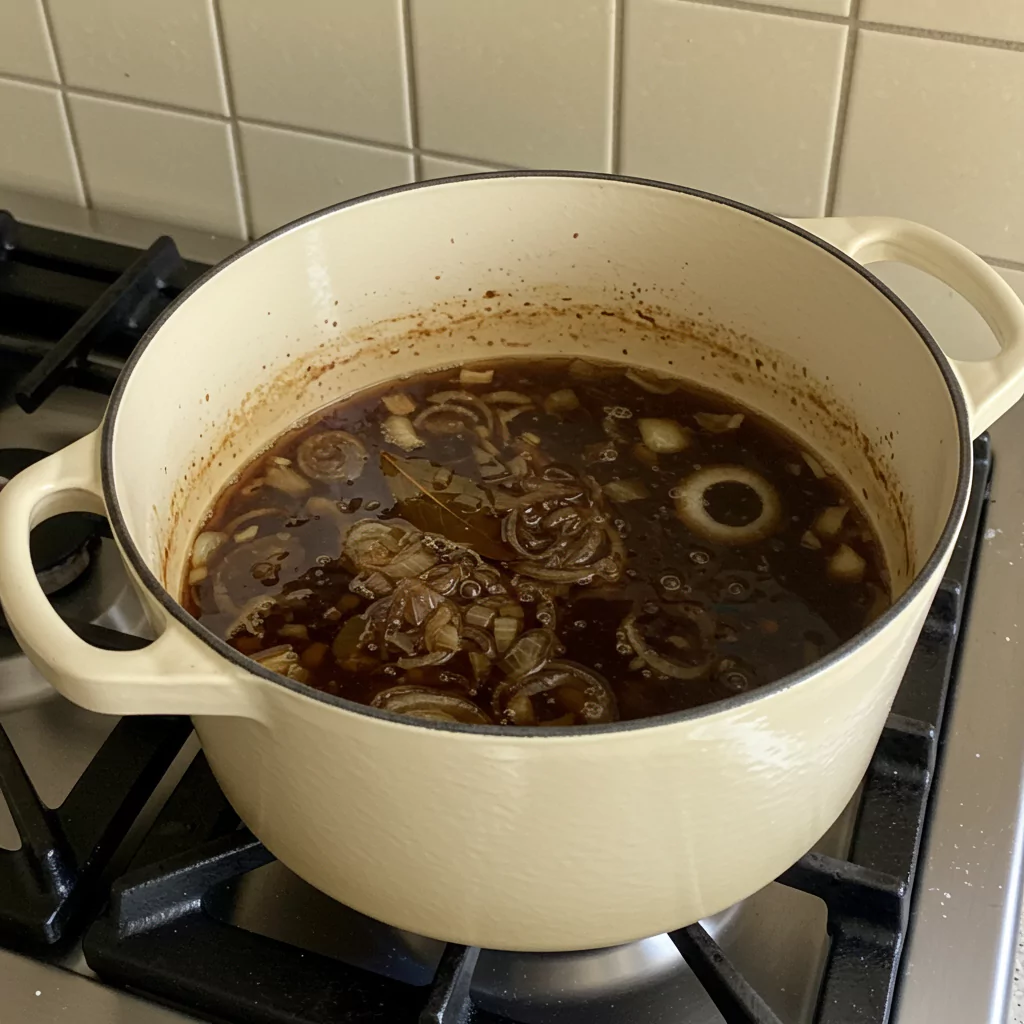
- Time for the broth! Pour it in slowly, stirring as you go, so the flour doesn’t clump up. Add your fresh thyme sprigs (just toss ’em in whole) and the bay leaf. Turn the heat up just enough to bring it to a gentle simmer.
- Once it’s barely bubbling, turn the heat way down low. Put the lid on, but leave it cracked open a bit. Let it simmer gently for at least 20 minutes. Honestly, 30-40 minutes is even better. It just gets deeper and tastier. Now’s the time to taste it! Add salt and pepper until it sings to you. Fish out the thyme stems and bay leaf before you move on!
Step 5: Toast Your Little Bread Rafts
- While the soup’s simmering away, crank up your oven’s broiler (the top heating element). Spread your baguette slices on a baking sheet. Stick ’em under the broiler for a minute or two per side until they’re golden and crispy. Warning: Do NOT walk away! Bread under the broiler goes from perfect to charcoal in like, 5 seconds flat. I’ve learned this the hard way.
- Level up: Rub the warm toast with a raw garlic clove. YES. Just do it.
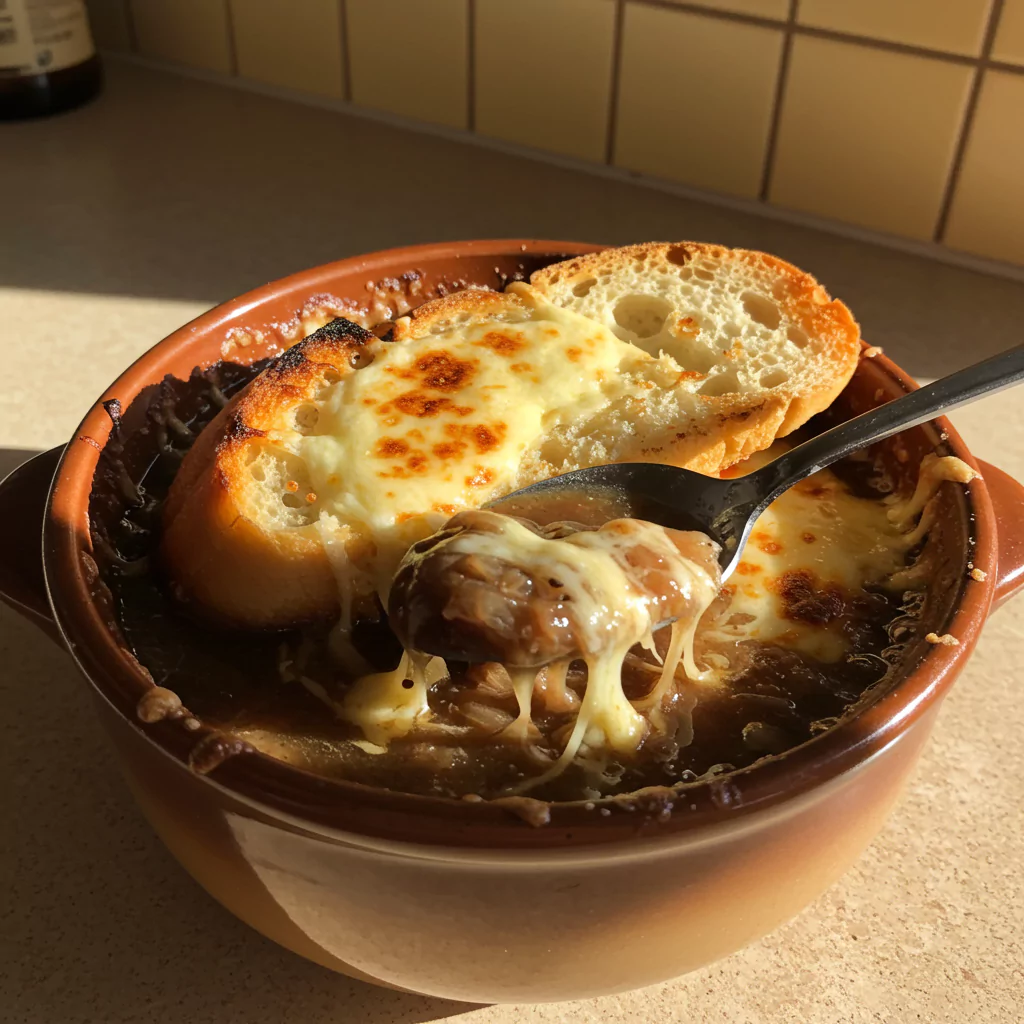
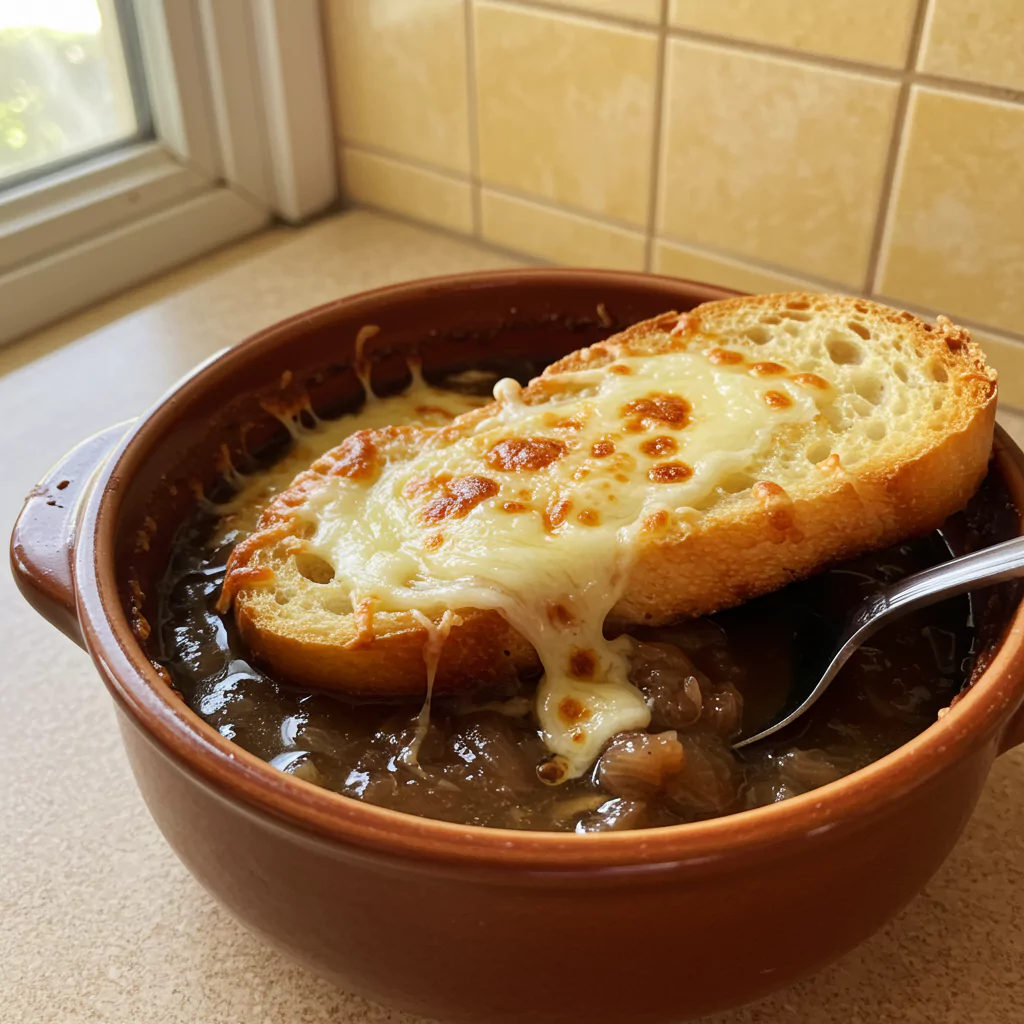
Step 6: Bring on the Cheese! The Grand Finale!
- Okay, you need bowls that can handle the heat of the broiler! Ladle that gorgeous, steaming French Onion Soup into the bowls. Float a piece or two of your toasted bread on top of each one. Now, pile on the cheese! Be generous! This is the crowning glory!
- Carefully put the bowls on a sturdy baking sheet (trust me, it makes handling them way easier). Slide that whole setup under the hot broiler. Stare at it intently! In 3-5 minutes, the cheese will melt, bubble, and turn golden brown. It’s a beautiful sight!
- Safety first! That broiler is no joke, and those bowls are like little lava containers. Use good oven mitts! Let the bowls sit for a few minutes before you let anyone dig in. Molten cheese burns are real!
Want a Slightly Lighter Bowl? Easy Peasy.
Sometimes you want all the French Onion Soup comfort, but maybe just a little lighter? Totally doable:
- Fat Check: Use less butter, maybe mix with olive oil. Go lighter on the cheese, or pick one that’s naturally lower in fat (Provolone is good!).
- Salt Sense: Definitely grab low-sodium broth. That way, you add salt to taste, and you’re in control.
- Wholesome Toast: Whole-wheat or seeded bread makes great croutons and adds a bit more fiber and nutty flavour.
- Veggie Boost: Finely dice a carrot or celery and let it soften with the onions? Why not! Adds a little extra goodness. Sometimes I do this, sometimes I go full classic indulgence!
Recipes You May Like
Serving This Bad Boy Up
There’s just something satisfying about plopping down a bowl of homemade French Onion Soup. Here’s how I like to do it:
- The Obvious Way: Hot, bubbly, cheesy, right out of the oven (after it cools for a sec!). Putting the bowl on a plate underneath is key for carrying and catching drips.
- Salad on the Side: A simple green salad with a tangy vinaigrette is the perfect contrast. It cuts through the richness beautifully.
- Party Starter: Make mini versions in small ramekins! People go crazy for mini French Onion Soups as an appetizer.
- Extra Bread? Always. For emergency dipping situations.
- Pretty it Up: A little sprinkle of fresh parsley or thyme leaves on top looks nice if you’re feeling fancy.
What About Leftover French Onion Soup? (If That’s Even a Thing!)
Okay, if you have leftovers, French Onion Soup is amazing the next day. Seriously, the flavours get even better.
- Fridge: Cool the soup completely (just the soup part, no bread/cheese). Store it in an airtight container for up to 4 days.
- Freezer: Yep, it freezes great! Cool it, pour into freezer-safe containers or bags (leave space at the top!). Thaw in the fridge overnight. Good for 2-3 months.
- Reheating Magic: Warm the soup gently on the stove. To get that fresh-made vibe, ladle into bowls, top with freshly toasted bread and freshly grated cheese, then give it that quick broil again. Don’t try to reheat the soggy bread/cheese version – it’s just not the same!
- Smart Cookie Prep: Caramelize the onions ahead of time! Make the whole soup base a day or two early! Store in the fridge. Then, when you want soup, just heat, top, broil, and BAM! You look like a kitchen superhero.
Okay, Why Am I Raving Like a Maniac About This Soup?
Honestly? Making this French Onion Soup makes me feel incredibly accomplished, like I’ve unlocked some ancient secret to deliciousness. It’s the transformation of simple onions into something so rich and complex that gets me every time. It’s the ultimate comfort food – warm, savory, cheesy, carby goodness. It tastes like effort, but feels like a hug.
And knowing that this version, without any wine or beef broth, tastes this good? It makes me so happy! It means anyone I invite over can enjoy it without worry. It’s proof that amazing food doesn’t need complicated rules.
So, I’m basically begging you… please try it! I really think you’ll fall in love with this French Onion Soup recipe just like I have. If you make it, you HAVE to come back and tell me about it in the comments! Seriously, tell me if you loved it, if you changed anything, what cheese you used – all the juicy details!
Go forth and make soup! You totally got this.

French Onion Soup
Cozy homemade French Onion Soup recipe! Rich, cheesy, easy comfort food without wine. Get tips & discover French flavor!
Ingredients
- 6 Large Sweet Yellow Onions (about 2-2.5 lbs / 1 kg), thinly sliced
- 4 Tablespoons Unsalted Butter (or olive oil / vegan butter)
- 3-4 Cloves Garlic, minced
- 2 Tablespoons All-Purpose Flour (or GF blend)
- 8 Cups (2 Liters) High-Quality Vegetable Broth (low-sodium recommended)
- 3-4 Fresh Thyme Sprigs (or 1 tsp dried)
- 1 Bay Leaf
- Salt and Freshly Ground Black Pepper, to taste
- 6-8 slices (about 1-inch thick) Baguette or other crusty bread (GF if needed)
- 1.5 - 2 Cups Gruyère Cheese, shredded (or Swiss, Provolone, vegan alternative)
- Optional: 1-2 tsp Balsamic Vinegar or Soy Sauce
Instructions
Step 1: Get Those Onions Ready!
- Okay, deep breath! Peel the onions, slice ’em in half root-to-stem, and then slice ’em thinly crosswise (about 1/8-inch). Don’t stress about perfection, just aim for roughly similar thickness. Chop up your garlic.
- My tear-fighting tactics: Chill the onions first, use your sharpest knife, and maybe open a window? Honestly, sometimes you just gotta cry it out. It’s worth it for the soup!

Step 2: The Slow Dance of Caramelization
- Grab your biggest, heaviest pot (a Dutch oven is perfect if you have one). Melt the butter over medium-low heat – emphasis on low. Dump in that mountain of onions (don’t worry, they shrink A LOT) and stir ’em around. Now, just let them hang out. Stir occasionally. For the next 45-60 minutes.
- What you’re watching for: They’ll soften, release water, then slowly, slowly turn golden, then amber, then a beautiful deep brown. They should smell sweet and amazing. Keep the heat low! If they start sticking too much before they’re brown, add a tiny splash of water or broth to scrape up the yummy brown bits from the bottom. This is the heart of your French Onion Soup flavour. Patience, grasshopper!
Step 3: Layering Up the Goodness
- Once your onions look like sweet, glossy, brown ribbons of deliciousness, toss in the garlic. Stir it around for just a minute until you start smelling that amazing garlic aroma. Now, sprinkle the flour over everything. Stir it constantly for a minute or two – this gets rid of the raw flour taste.
- Using the secret weapon? Add that splash of balsamic or soy sauce right before the flour, stir it in quickly.
Step 4: Let it Simmer Down Now!
- Time for the broth! Pour it in slowly, stirring as you go, so the flour doesn’t clump up. Add your fresh thyme sprigs (just toss ’em in whole) and the bay leaf. Turn the heat up just enough to bring it to a gentle simmer.
- Once it’s barely bubbling, turn the heat way down low. Put the lid on, but leave it cracked open a bit. Let it simmer gently for at least 20 minutes. Honestly, 30-40 minutes is even better. It just gets deeper and tastier. Now’s the time to taste it! Add salt and pepper until it sings to you. Fish out the thyme stems and bay leaf before you move on!
Step 5: Toast Your Little Bread Rafts
- While the soup’s simmering away, crank up your oven’s broiler (the top heating element). Spread your baguette slices on a baking sheet. Stick ’em under the broiler for a minute or two per side until they’re golden and crispy. Warning: Do NOT walk away! Bread under the broiler goes from perfect to charcoal in like, 5 seconds flat. I’ve learned this the hard way.
- Level up: Rub the warm toast with a raw garlic clove. YES. Just do it.
Step 6: Bring on the Cheese! The Grand Finale!
- Okay, you need bowls that can handle the heat of the broiler! Ladle that gorgeous, steaming French Onion Soup into the bowls. Float a piece or two of your toasted bread on top of each one. Now, pile on the cheese! Be generous! This is the crowning glory!
- Carefully put the bowls on a sturdy baking sheet (trust me, it makes handling them way easier). Slide that whole setup under the hot broiler. Stare at it intently! In 3-5 minutes, the cheese will melt, bubble, and turn golden brown. It’s a beautiful sight!
- Safety first! That broiler is no joke, and those bowls are like little lava containers. Use good oven mitts! Let the bowls sit for a few minutes before you let anyone dig in. Molten cheese burns are real!
Notes
Nutrition Information:
Yield: 4-6 servingsAmount Per Serving: Calories: Approximately 450-600 kcal per serving
Tried This Recipe? Share Your Thoughts!
There are no reviews yet. Be the first one to write one.