
Okay, full disclosure: my journey to these Honey Garlic Chicken Breasts wasn’t exactly smooth sailing. Let’s just say there were… incidents. Like the time the sauce went from ‘simmering nicely’ to ‘miniature tar pit’ in about ten seconds flat. Or the infamous ‘smoke alarm serenade’ episode thanks to some wildly ambitious honey caramelization. My family were patient guinea pigs, bless ’em. But after all that trial and error (and maybe a few slightly-too-crispy garlic moments), I landed here. On this recipe. The one where the chicken stays ridiculously juicy, and the sauce is this perfect, glistening, garlicky-sweet concoction that you’ll want to put on EVERYTHING. Honestly, these Honey Garlic Chicken Breasts have become my go-to for making it look like I’ve got my life together, even when it’s chaos behind the scenes. And the best part? It’s so much easier than it looks.
The Loot: What You Need for Honey Garlic Chicken Breasts Nirvana
Don’t worry, no crazy scavenger hunt needed. We’re talking basic pantry staples transforming into something truly special.
- Chicken Breasts: Just grab a pack of 4 boneless, skinless ones. The usual suspects from the supermarket chiller. If they look wildly different in size, maybe pick ones that are vaguely similar so they cook nicely together. Chicken thighs more your jam? Go for it! Boneless, skinless thighs are amazing here too, just give ’em a few extra minutes to cook through.
- For Giving the Chicken Some Love:
- Salt & Pepper: The OG dream team. About a teaspoon of kosher salt (or half that of fine table salt) and half a teaspoon of pepper usually does it, but taste is king, right?
- Garlic Powder: A teaspoon just builds that lovely garlic base.
- Paprika: Another teaspoon (the sweet kind) for colour and a whisper of flavour.
- Oil for the Pan: Two tablespoons or so. Olive oil, avocado, canola, sunflower… whatever neutral-ish oil you’ve got works fine.
- For the Star of the Show: That Honey Garlic Sauce!
- Honey: Half a cup. Use one you’d actually enjoy eating! That flavour really comes through. Runny honey works best.
- Soy Sauce: A quarter cup. Low-sodium is my usual grab, gives you more control. Need it gluten-free? Tamari is a perfect swap! Coconut aminos are another option, just remember they’re a bit sweeter.
- Garlic: Okay, deep breaths. The recipe says 4-6 cloves, minced. Fresh is non-negotiable! But… are you a fellow garlic fiend? Because I always add at least one extra clove. Minimum. Let’s be honest, garlic breath is a small price to pay for flavour this good. It’s Honey Garlic Chicken Breasts, the garlic needs to show up!
- Apple Cider Vinegar: One tablespoon brings the tang, cutting through the richness. Essential! Rice vinegar or lemon juice can step in if needed.
- Unsalted Butter: Two glorious tablespoons swirled in at the end. It adds that je ne sais quoi – richness, glossiness, pure magic. Plant-based butter totally works too!
- Cornstarch (Optional): For those who like their sauce extra clingy. Mix 1 tsp cornstarch with 1 tbsp cold water. Use it if you want, skip it if you don’t!
- Red Pepper Flakes (Also Optional): Just a pinch (like ¼ tsp) wakes everything up with a tiny bit of heat. I usually add it.
- For Making it Look Fancy (Zero Effort):
- Sesame Seeds: Toasted ones look great and add a little nutty crunch.
- Fresh Parsley or Green Onions: A bit of chopped green brightens everything up visually and taste-wise. Highly recommend!
Tick-Tock: How Fast Are These Honey Garlic Chicken Breasts, Really?
Okay, the million-dollar question on a busy night: how long is this actually going to take? You’ll love this answer.
- Getting Your Ducks in a Row (Prep): 10, maybe 15 minutes if you’re slow at chopping garlic (or get distracted by your phone, no judgment).
- Sizzle Time (Cook): About 15-20 minutes in the pan.
- Grand Total: You’re realistically looking at 30-35 minutes from fridge to plate.
Seriously! Faster than delivery, faster than arguing over what movie to watch. Walk in the door, feeling frazzled? You can have these spectacular Honey Garlic Chicken Breasts ready before you’ve even properly decompressed. It’s proper fast food, but homemade and infinitely better.
Let’s Cook! Your Step-by-Step Guide to Honey Garlic Chicken Glory
Right then, apron on (optional, but reduces laundry later!), let’s make some magic happen. Making Honey Garlic Chicken Breasts is genuinely fun.
Step 1: Chicken Makeover Time
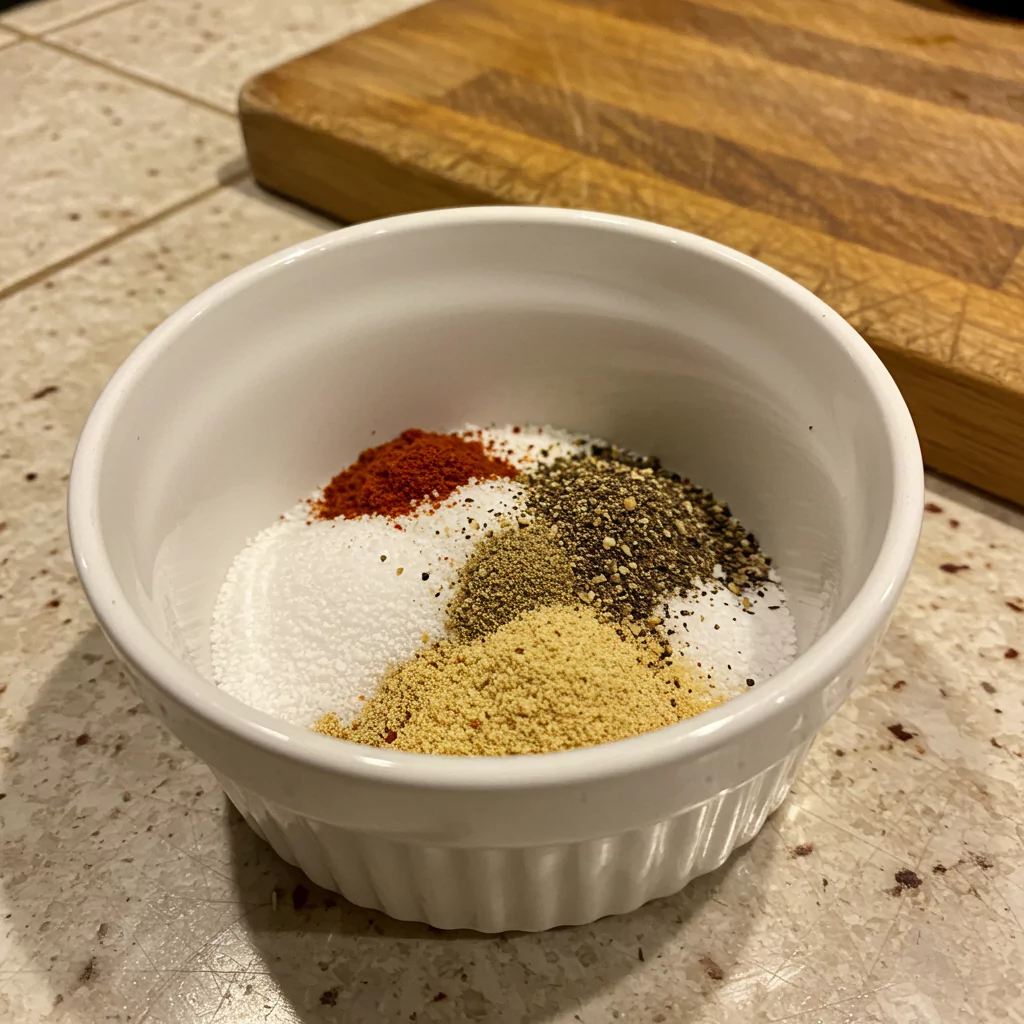
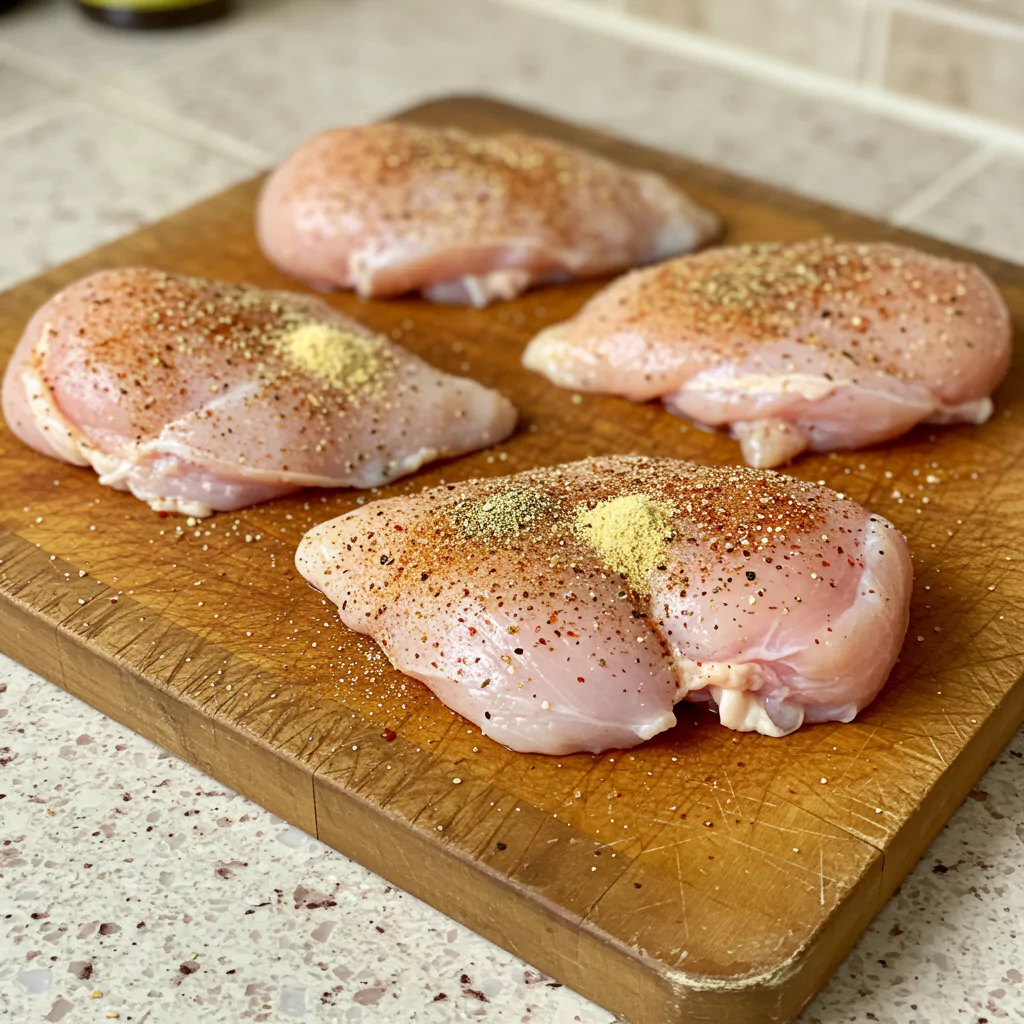
First, let’s sort the chicken. If they’re chunky, giving them a quick bash to an even thickness (aim for ½ – ¾ inch) is a game-changer for even cooking. Use parchment paper above and below to avoid mess! Or slice ’em horizontally. Then – super important – pat them DRY with paper towels. Like, really dry. This helps get that gorgeous golden sear. Mix your salt, pepper, garlic powder, and paprika in a little dish and sprinkle it all over the chicken pieces. Don’t be shy! This first step is crucial for flavourful Honey Garlic Chicken Breasts.
Step 2: Whip Up That Liquid Gold Sauce
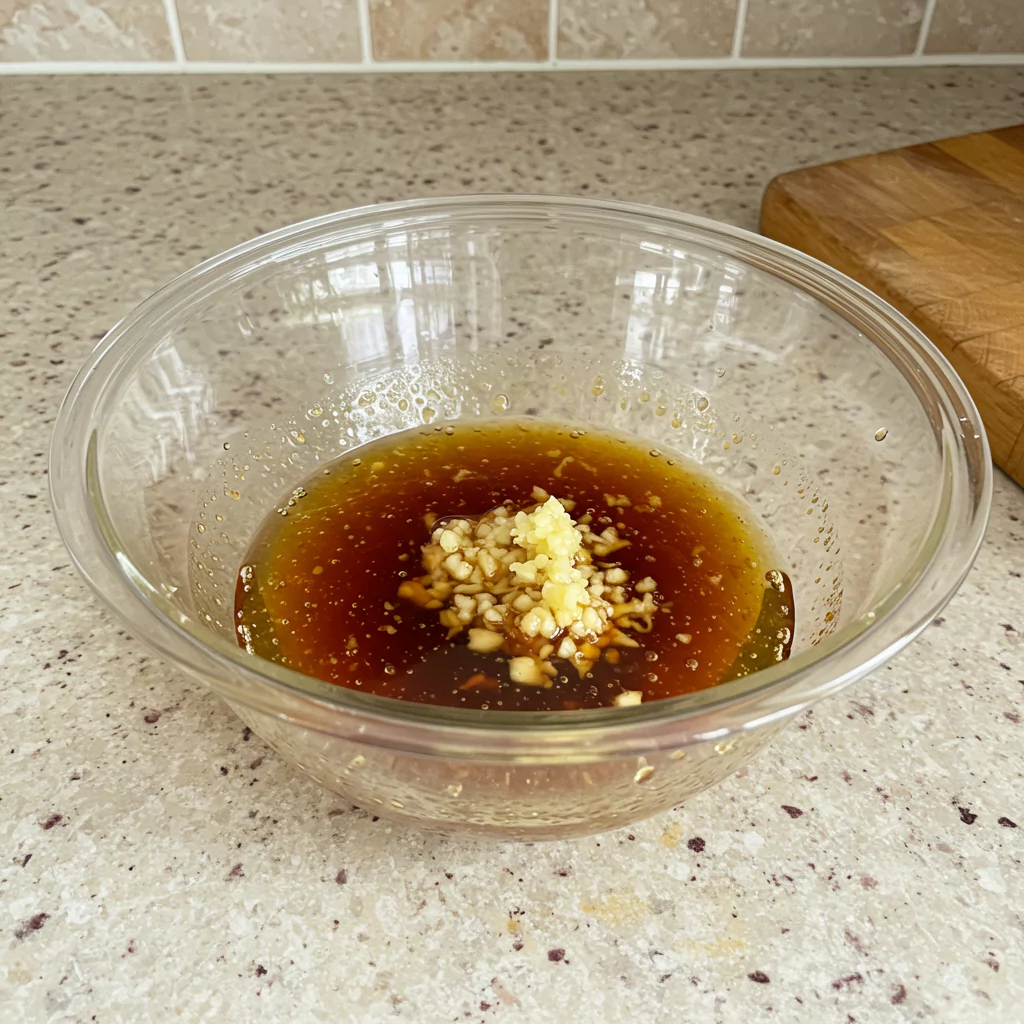
Bowl time! Whisk together the honey, soy sauce (or tamari/aminos), all that glorious minced garlic (yes!), and the apple cider vinegar. Chuck in the red pepper flakes now too if you’re using them. Give it a really good whisk. Pro Tip: Dip a clean teaspoon in and taste it. Need more sweetness? Tiny bit more honey. Saltier? Careful splash of soy. Tangier? Dash more vinegar. Fix it now! Set this yummy sauce aside – it’s the heart and soul of our Honey Garlic Chicken Breasts.
Step 3: Operation Golden Brown
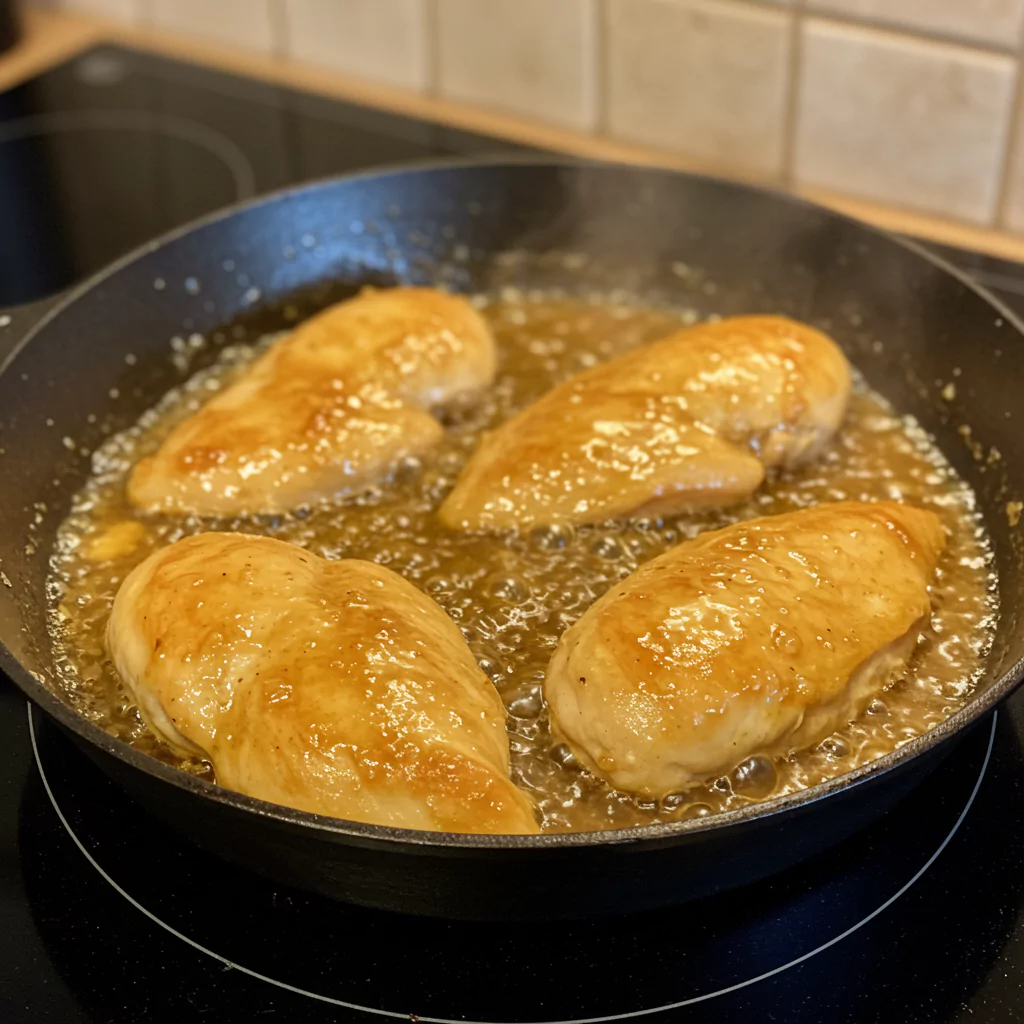
Get your skillet over medium-high heat. Let it get properly hot before adding the oil – you want to hear that sizzle! Carefully lay the seasoned chicken breasts in the hot oil. Hear that? Music to my ears! Give them space – don’t cram the pan, or they’ll steam. Let them cook undisturbed for 4-6 minutes per side until beautifully golden brown and cooked through (74∘C / 165∘F internal temp). Try to only flip them once! That crust is precious flavour cargo for our Honey Garlic Chicken Breasts. Once they’re looking gorgeous, lift them out onto a plate for a moment.
Step 4: Quick Garlic Kiss (Optional, but…)
Turn the heat down to medium-low. If you saved some garlic because you love that extra sautéed flavour (high five!), add it now to the pan drippings (maybe with a tiny knob of butter if the pan looks dry). Stir it around for just 30-60 seconds – sniff the air, it should smell amazing! Heads Up! Don’t let it burn! Burnt garlic is culinary sadness. Be ready with that sauce! This adds depth to the Honey Garlic Chicken Breasts.
Step 5: Sauce Meets Chicken – The Magic Happens!
Pour that beautiful honey garlic sauce straight into the skillet. Oh yeah. Scrape scrape scrape! Get all those tasty brown bits off the bottom of the pan – they’re flavour bombs! Let the sauce bubble away gently for 2-3 minutes. You’ll see it start to thicken and get glossy. Now melt in the butter, swirling it around until the sauce looks even richer. Want it thicker still? Whisk in that cornstarch slurry now and watch it tighten up. Slide the chicken back into the pan. Spoon the sauce over them, turn them gently to coat. Let them bubble together for just another minute or two. Smell that? That’s your Honey Garlic Chicken Breasts becoming legendary.
Step 6: Patience, Grasshopper! (Rest & Garnish)
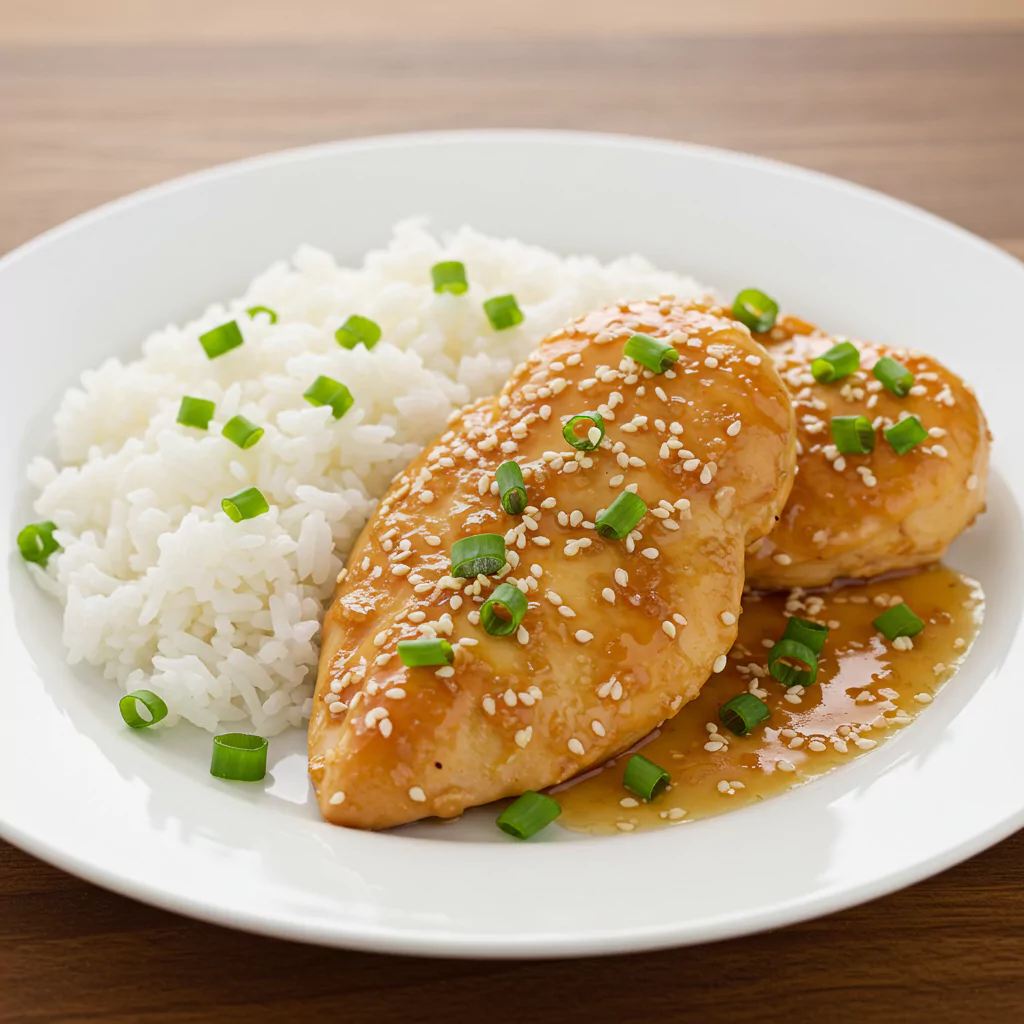
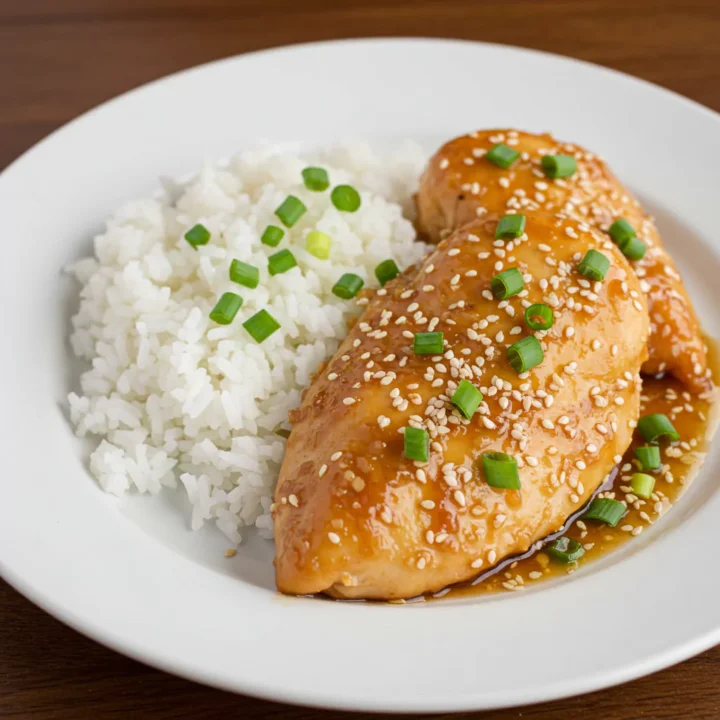
Turn off the heat. Okay, I know it’s tempting to dive right in, but let the Honey Garlic Chicken Breasts rest in the pan for 5 minutes. Seriously. It makes all the difference in keeping them juicy. While they’re resting their delicious selves, sprinkle over the sesame seeds and chopped parsley or green onions. It just makes everything look finished and adds that lovely fresh contrast.
Recipes You May Like
Serving Up Your Masterpiece: Honey Garlic Chicken Breasts Edition!
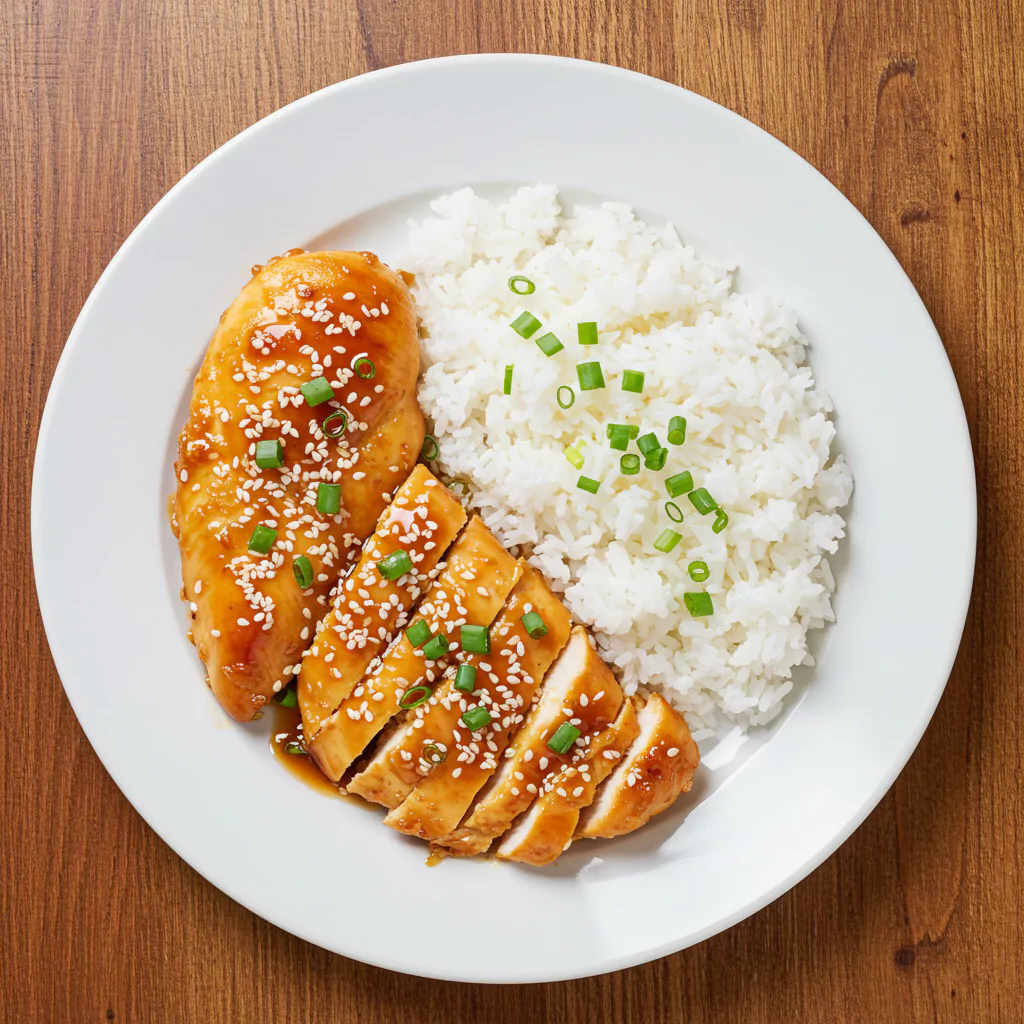
Right, the moment of truth! How to serve these beauties? Oh, let me count the ways… these Honey Garlic Chicken Breasts are total team players:
- The Obvious (and Best?) Choice: Fluffy rice. Jasmine, Basmati, whatever you love. It’s basically a vehicle for mopping up every last drop of that incredible sauce. Add some steamed greens (broccoli, bok choy, green beans) and call it perfection.
- Bowl Food Bliss: Slice the chicken and pile it onto quinoa or brown rice with roasted veggies. Think peppers, onions, maybe some blistered snap peas? Delicious and feels kinda healthy-ish!
- Noodle Night Delight: Toss slices of the chicken and plenty of sauce with cooked ramen, udon, or egg noodles. Utterly slurp-worthy.
- Salad Upgrade: Cool the chicken slightly, slice it, and throw it on top of a crunchy salad. Maybe something with cabbage, carrots, and a sesame-ginger dressing? Lighter, but still packs a punch.
- Wrap Attack: Slice it thin and stuff into lettuce cups or warm tortillas with crunchy bits like shredded carrots or cucumber. Super fun and interactive.
My two cents: Coconut rice is AMAZING with these Honey Garlic Chicken Breasts. And a little bowl of quick-pickled cucumbers on the side? Chef’s kiss! My kids literally fight over who gets the piece with the most sauce pooled around it.
Leftover Honey Garlic Chicken Breasts? Is That Even a Thing?
Okay, hypothetically speaking… if you somehow possess superhuman willpower and end up with leftovers of these Honey Garlic Chicken Breasts…
- Chill Out: Let it cool completely, then stash it in an airtight container in the fridge. It’ll be good for 3, maybe 4 days. The sauce will get pretty thick when cold.
- Warming Up: Be gentle! Nuking it on high will make the chicken tough. Warm slices gently in a skillet over low heat (add a tiny splash of water or broth to loosen the sauce if needed). Or microwave on 50% power in short bursts until just heated through.
- To Freeze or Not to Freeze: Honestly, it’s best fresh. Freezing can make the chicken a bit drier and the sauce might split a little when thawed. But if you must, freeze it airtight for up to a month or so. Thaw in the fridge overnight.
- Smart Prep: Make the sauce ahead! It keeps in a jar in the fridge for a week easily. That way, cooking the actual Honey Garlic Chicken Breasts is even faster mid-week!
Seriously Though, Why Are These Honey Garlic Chicken Breasts My Everything?
I know I sound obsessed, but it comes from a place of pure, unadulterated love for these Honey Garlic Chicken Breasts! Here’s the deal:
- Flavour Overload (The Good Kind): It’s that perfect storm of sweet honey, salty soy, punchy garlic, and tangy vinegar. SO addictive.
- Insanely Fast: From zero to hero in about half an hour. Weeknight warrior status: unlocked.
- Juicy Chicken Promise: No more sawdust chicken! Follow the steps, nail the timing, enjoy the tenderness.
- That Glaze Though: Sticky, glossy, coats every nook and cranny. You will scrape the pan.
- Goes With Everything: Seriously versatile. Rice, noodles, veg, salad… it just works.
- Makes Everyone Happy: From the fussiest eater to the hungriest adult, it’s a universal crowd-pleaser.
Honestly, making a pan of these Honey Garlic Chicken Breasts just feels good. It smells incredible while cooking, tastes even better, and makes you feel like a kitchen rockstar with minimal effort.
So please, PLEASE go make this! You deserve this level of deliciousness in your life. And when you do, I genuinely want to hear about it! Drop me a comment below – tell me everything!
Honey Garlic Chicken Breasts
Juicy chicken breasts glazed with a sweet and savory honey garlic sauce. Easy weeknight dinner idea. Try it!
Ingredients
- 1 tsp salt
- 1/2 tsp black pepper
- 1 tsp garlic powder
- 1 tsp paprika
- 2 tbsp olive oil
- 1/2 cup honey
- 1/4 cup soy sauce
- 4-6 cloves garlic, minced
- 1 tbsp apple cider vinegar
- 2 tbsp unsalted butter
- 1 tsp cornstarch
- 1 tbsp cold water (for slurry, optional)
- 1/4-1/2 tsp red pepper flakes (optional)
- Sesame seeds, toasted (for garnish)
- Fresh parsley or green onions, chopped (for garnish)
Instructions
Step 1: Chicken Makeover Time
First, let’s sort the chicken. If they’re chunky, giving them a quick bash to an even thickness (aim for ½ – ¾ inch) is a game-changer for even cooking. Use parchment paper above and below to avoid mess! Or slice ’em horizontally. Then – super important – pat them DRY with paper towels. Like, really dry. This helps get that gorgeous golden sear. Mix your salt, pepper, garlic powder, and paprika in a little dish and sprinkle it all over the chicken pieces. Don’t be shy! This first step is crucial for flavourful Honey Garlic Chicken Breasts.
Step 2: Whip Up That Liquid Gold Sauce
Bowl time! Whisk together the honey, soy sauce (or tamari/aminos), all that glorious minced garlic (yes!), and the apple cider vinegar. Chuck in the red pepper flakes now too if you’re using them. Give it a really good whisk. Pro Tip: Dip a clean teaspoon in and taste it. Need more sweetness? Tiny bit more honey. Saltier? Careful splash of soy. Tangier? Dash more vinegar. Fix it now! Set this yummy sauce aside – it’s the heart and soul of our Honey Garlic Chicken Breasts.
Step 3: Operation Golden Brown
Get your skillet over medium-high heat. Let it get properly hot before adding the oil – you want to hear that sizzle! Carefully lay the seasoned chicken breasts in the hot oil. Hear that? Music to my ears! Give them space – don’t cram the pan, or they’ll steam. Let them cook undisturbed for 4-6 minutes per side until beautifully golden brown and cooked through (74∘C / 165∘F internal temp). Try to only flip them once! That crust is precious flavour cargo for our Honey Garlic Chicken Breasts. Once they’re looking gorgeous, lift them out onto a plate for a moment.
Step 4: Quick Garlic Kiss (Optional, but…)
Turn the heat down to medium-low. If you saved some garlic because you love that extra sautéed flavour (high five!), add it now to the pan drippings (maybe with a tiny knob of butter if the pan looks dry). Stir it around for just 30-60 seconds – sniff the air, it should smell amazing! Heads Up! Don’t let it burn! Burnt garlic is culinary sadness. Be ready with that sauce! This adds depth to the Honey Garlic Chicken Breasts.
Step 5: Sauce Meets Chicken – The Magic Happens!
Pour that beautiful honey garlic sauce straight into the skillet. Oh yeah. Scrape scrape scrape! Get all those tasty brown bits off the bottom of the pan – they’re flavour bombs! Let the sauce bubble away gently for 2-3 minutes. You’ll see it start to thicken and get glossy. Now melt in the butter, swirling it around until the sauce looks even richer. Want it thicker still? Whisk in that cornstarch slurry now and watch it tighten up. Slide the chicken back into the pan. Spoon the sauce over them, turn them gently to coat. Let them bubble together for just another minute or two. Smell that? That’s your Honey Garlic Chicken Breasts becoming legendary.
Step 6: Patience, Grasshopper! (Rest & Garnish)
Turn off the heat. Okay, I know it’s tempting to dive right in, but let the Honey Garlic Chicken Breasts rest in the pan for 5 minutes. Seriously. It makes all the difference in keeping them juicy. While they’re resting their delicious selves, sprinkle over the sesame seeds and chopped parsley or green onions. It just makes everything look finished and adds that lovely fresh contrast.
Notes
Nutrition Information:
Yield: 4 servingsAmount Per Serving: Calories: Approximately 300-350 calories per serving
There are no reviews yet. Be the first one to write one.