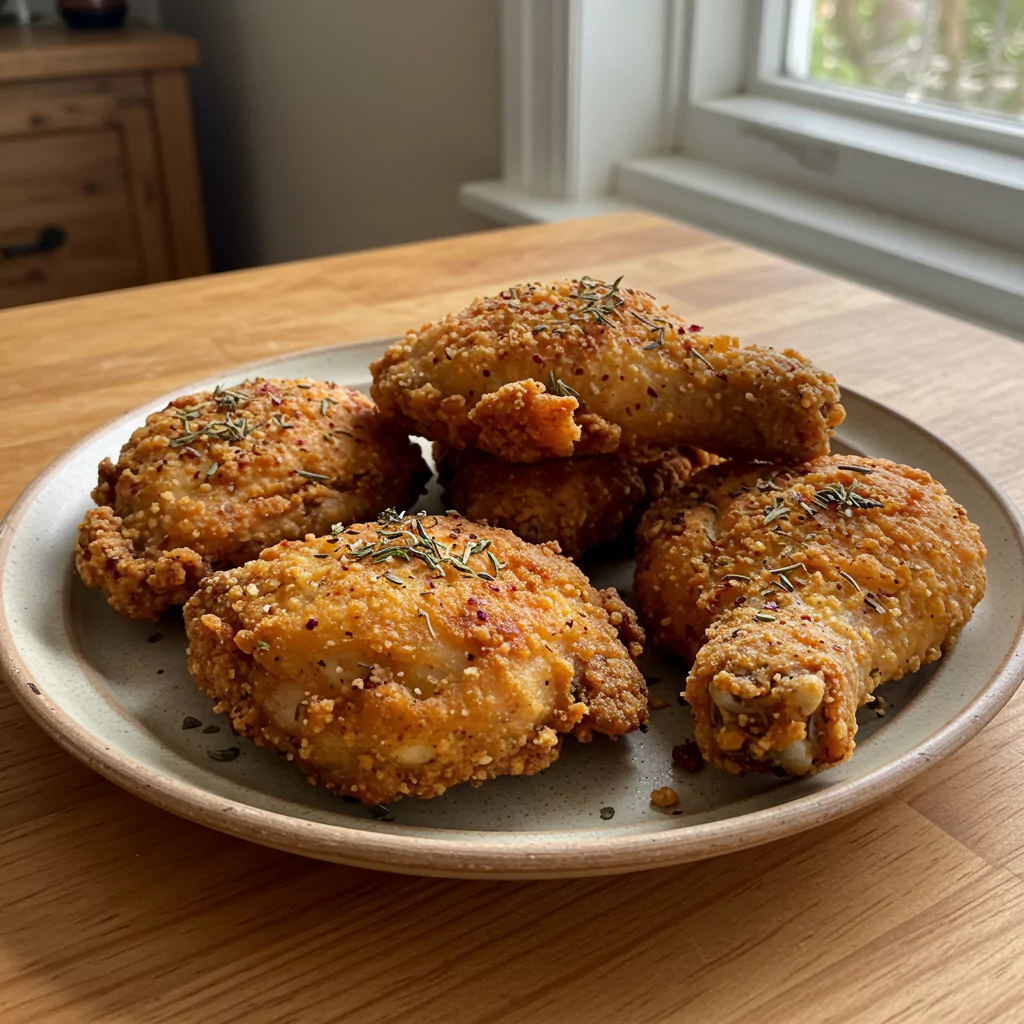
Alright, gather ’round folks, because I have to tell you about this chicken. We’re talking Fried chicken with thyme and sumac, and honestly? It’s kind of life-changing. Picture this: me, late one night, staring into the fridge like it held the secrets to the universe. All I knew was I wanted something amazing, not just boring chicken again. I saw the thyme, then spotted the jar of sumac my cousin gave me… and a little lightbulb went off. What if…?
Let’s just say the first batch was… interesting. Edible, but not it. It took a few more tries – my family might have gently suggested a chicken detox by the end, haha – to nail that perfect crispy crust and get the thyme-sumac balance just right. But oh. my. goodness. When I finally got it? Pure magic. This isn’t just throwing spices on chicken; it’s creating this incredible, zesty, earthy flavor hug wrapped in the crispiest coating imaginable. Seriously, this Fried chicken with thyme and sumac is my secret weapon now for dinners, potlucks, you name it.
Okay, Here’s What You Gotta Grab (Ingredients!)
Ready to make some magic happen? Let’s talk ingredients for this glorious Fried chicken with thyme and sumac. I’m a huge fan of using bone-in, skin-on thighs and drumsticks – they just stay juicier and the skin gets unbelievably crispy. But hey, you do you! Boneless works too, just watch the cooking time.
- The Star: About 3 pounds of chicken pieces. Thighs, drumsticks, wings – whatever makes you happy. If you can find air-chilled chicken, grab it! It seems to help with crispiness.
- The Marinade: 2 cups of buttermilk. This stuff is liquid gold for tender chicken.
- No buttermilk panic! Just pour 2 tablespoons of lemon juice or plain white vinegar into 2 cups of regular milk. Give it a stir, wait 5-10 mins, and boom – instant buttermilk substitute. Easy peasy.
- The Crispy Coat: 2 ½ cups of all-purpose flour. Simple, effective.
- The Herbs & Spices (Where the magic lives!):
- 2 generous tablespoons of dried thyme. That lovely, comforting, slightly woodsy scent? Yes, please.
- 1 ½ tablespoons of ground sumac. Look for the bright reddish-purple stuff! It’s got this amazing lemony tang that just wakes everything up.
- 1 tablespoon of paprika (I love smoked paprika here, but sweet is great too).
- 1 tablespoon of garlic powder. Non-negotiable, obviously.
- 1 teaspoon of onion powder. Adds that savory depth.
- 1 ½ tablespoons of kosher or sea salt (maybe start with 1 tbsp if you’re watching salt, you can always add more later).
- 1 tablespoon of freshly cracked black pepper. Freshly cracked makes a difference, trust me!
- ½ teaspoon of cayenne pepper – Totally optional, but awesome if you like a tiny bit of warmth. Add more if you’re brave!
- For Frying: A good amount (like 4-6 cups) of neutral oil – vegetable, canola, peanut all work great. Enough to fill your pan about halfway up the chicken.
Let’s Talk Timing (It’s Worth It!)
Okay, real talk – making killer Fried chicken with thyme and sumac isn’t a 15-minute job. But it’s SO much less hassle than you might think, and the payoff is huge!
- Getting Ready (Hands-on): About 20-25 minutes. Mixing the brine, whisking the flour stuff, getting the chicken coated. Pretty quick!
- The Magic Soak (Hands-off): This is the brining time. Give it at least an hour in the fridge, but honestly, 2-4 hours (or even popping it in the fridge overnight before you leave for work) makes a world of difference for juicy, flavorful chicken. Please don’t skip this if you can avoid it!
- Sizzle Time: Around 20-25 minutes per batch. You’ll probably need to fry in two batches unless you have a massive fryer.
- Grand Total: You’re looking at maybe 45-50 minutes of actual work, plus that chill time for the brine.
Seriously, think about how long you wait for takeout sometimes. You could be pulling crispy, homemade Fried chicken with thyme and sumac off the stove by then! It feels surprisingly doable for something this delicious.
How to Make This Amazing Fried Chicken with Thyme and Sumac (Step-by-Step!)
Alright, apron on? Music playing? Let’s do this! Frying chicken is easier than you think, promise.
Step 1: Give That Chicken a Buttermilk Spa Day
Grab a big bowl. Whisk together the buttermilk, about 1 teaspoon of your salt, and maybe ½ teaspoon of black pepper. Dunk your chicken pieces right in there, making sure they’re all nicely submerged. Cover it up tightly (plastic wrap is your friend) and let it hang out in the fridge. Like I said, at least an hour, but longer (up to overnight) is even better! This is where the tenderness happens.
Step 2: Mix Up the Flavor Dust
While the chicken’s relaxing, let’s make the coating. Find a shallow dish – a pie plate or even a baking dish works perfectly. Dump in the flour, thyme, sumac, paprika, garlic powder, onion powder, the rest of the salt (start with 1 tbsp), the rest of the black pepper, and the cayenne if you’re using it. Whisk it all together really well. You want every pinch of flour to have some of that amazing flavor. Sniff it – smells good, right? That’s the smell of future deliciousness!
Step 3: Let’s Get Dredging! (The Fun Messy Part)
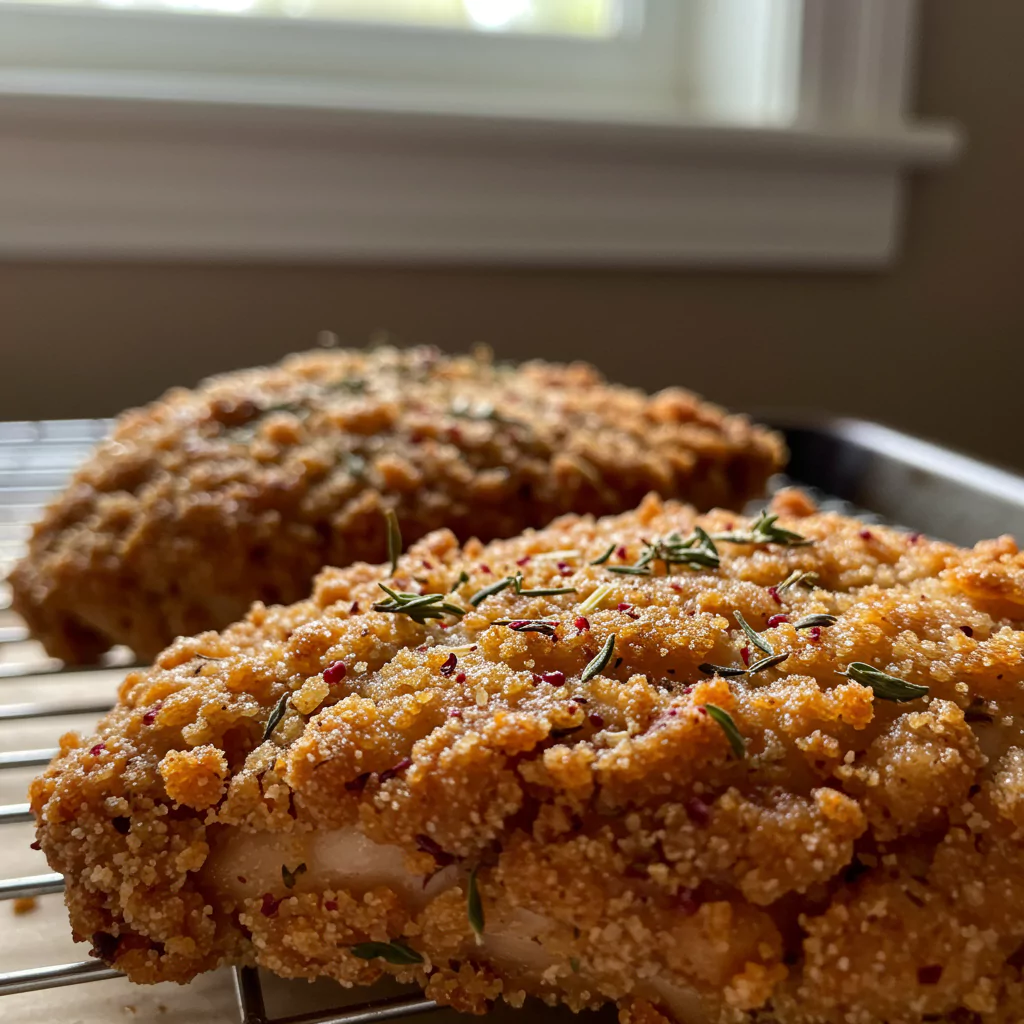
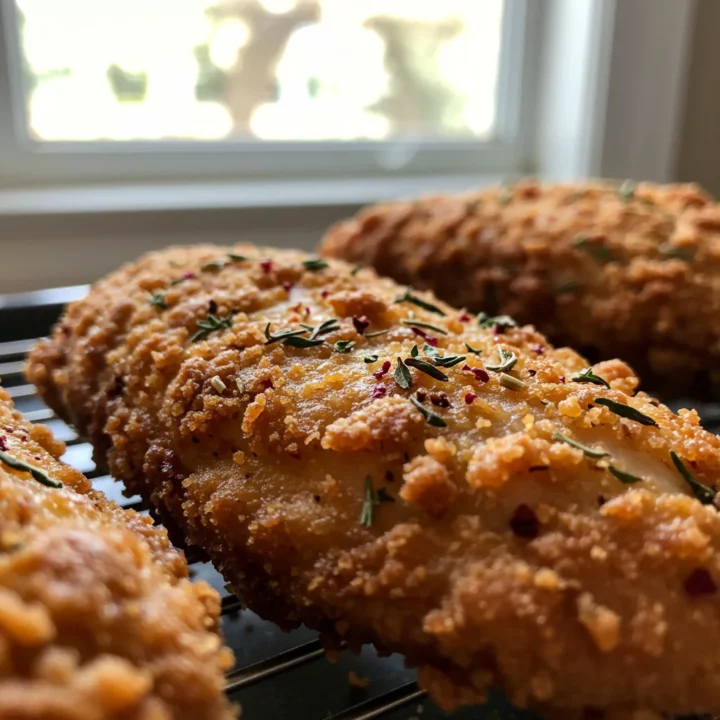
Okay, set up your station near the stove. Pull the chicken out of the buttermilk, let the excess drip off for a second (no need to rinse!). Now, one piece at a time, really press it into that flour mixture. Get it all coated – lift any skin flaps, get in the crevices. Want ridiculously crispy chicken? Here’s my trick: After the first coating, dunk it back in the buttermilk super quickly, let it drip again, then press it back into the flour mixture for a second coat. Yes, it’s an extra step, but the crunch is unreal! Lay the coated pieces on a wire rack over a baking sheet. Let them sit for 10-15 minutes – this helps the coating stick like glue when it hits the hot oil.
Step 4: Heat Up the Hot Tub (Carefully!)
Pour your oil into a sturdy, heavy pot (a Dutch oven is perfect) or a deep cast-iron skillet. Aim for about 1.5 to 2 inches deep. Crank the heat to medium-high and let it heat up to 350°F (175°C). A thermometer is your best friend here for getting it right, seriously. No thermometer? Drop a tiny pinch of the flour mix in – if it sizzles like crazy right away, you’re probably good to go. Be careful with hot oil! Keep kids and pets away, and never walk away while it’s heating or frying.
Step 5: Fry ‘Til Golden Brown and Delicious!
Using tongs (not your fingers!), gently lower 3 or 4 pieces of chicken into the hot oil. Don’t crowd the pan! If you put too many in at once, the oil temp will drop, and you’ll get sad, greasy chicken instead of crispy perfection. Let them sizzle away for about 10-12 minutes per side. You’re looking for a beautiful deep golden brown color. Flip ’em carefully halfway through. The safest bet is checking with an instant-read thermometer – stick it in the thickest part (avoiding bone) – it should read 165°F (74°C). Adjust the stove heat if needed to keep the oil around that 350°F sweet spot. The smell in your kitchen right now should be incredible!
Step 6: Drain, Rest, Repeat
Once a piece is perfectly golden and cooked through, use your tongs to lift it out, letting the extra oil drip back into the pot for a second. Place it on a clean wire rack set over a baking sheet. Please, please use a wire rack, not paper towels! Paper towels trap steam and make the bottom soggy – we worked too hard for that crispiness to let it die! Let the chicken rest for 5-10 minutes before you dive in. This lets the juices settle back into the meat. Bring the oil back up to 350°F and repeat with the next batch until all your amazing Fried chicken with thyme and sumac is cooked.
Recipes You May Like

What to Eat WITH Your Amazing Fried Chicken with Thyme and Sumac
Okay, the star is ready! But what supporting actors do we need? This Fried chicken with thyme and sumac plays well with so many things:
- The Classics Crew: You just can’t go wrong with creamy mashed potatoes and a tangy coleslaw. It’s a classic for a reason!
- Something Green & Fresh: A simple salad with a bright lemon vinaigrette or even just some sliced cucumbers and tomatoes tossed with olive oil and salt cuts through the richness beautifully.
- Carb Heaven: Fluffy couscous (maybe with some toasted almonds?), roasted potato wedges, or even just some warm, soft bread to mop up any juices.
- Veggie Power: Roasted broccoli or Brussels sprouts get nice and crispy too! Steamed green beans are also great.
- Dip It Good: Honestly, it needs nothing. BUT. A simple dip made with plain yogurt, a squeeze of lemon, minced garlic, and fresh mint? Oh heavens, yes. It’s cool, creamy, and dynamite with the warm, herby chicken. Try it!
My Hot Tip: Make extra! Cold leftover Fried chicken with thyme and sumac is epic for picnics or next-day lunches. No shame in that game.
Storing Leftovers (If You Have Any!)
Miraculously have some Fried chicken with thyme and sumac left over? Here’s the plan:
- Cool Down: Let it cool completely on the wire rack before you even think about putting it away.
- Seal It Up: Pop it into an airtight container.
- Fridge It: It’ll stay good in the fridge for 3-4 days.
- Reheating Magic: The secret to bringing back the crisp? Your oven or air fryer! Set it to about 375°F (190°C). Give the chicken 10-15 minutes in the oven or 5-8 in the air fryer. It’ll be almost as good as fresh. Just promise me you won’t microwave it unless you like rubbery skin!
- Smart Prep: You can totally mix the flour/spice blend way ahead of time and keep it in a jar! Makes weeknight frying feel much faster.
Seriously Though, You HAVE to Make This Fried Chicken with Thyme and Sumac!
Okay, I know I’ve been rambling, but I’m just SO excited about this recipe and I really hope you try it! The way the earthy thyme plays with that bright, almost citrusy tang from the sumac… it’s just special. It elevates regular fried chicken into something totally memorable.
It’s that perfect mix of comforting and exciting. It makes any meal feel a little more special, whether it’s a Tuesday dinner or a Sunday feast. Making this Fried chicken with thyme and sumac always makes me feel like a kitchen rockstar, and I want you to feel that way too!
So, pretty please, give it a shot? And when you do, you HAVE to come back here and tell me all about it in the comments! Did you love it? Did you tweak anything? Add more cayenne? What did you serve it with? I genuinely get so excited hearing how recipes turn out for you guys.
Happy cooking, and enjoy every crispy, juicy bite!
Fried chicken with thyme and sumac
Crispy, juicy chicken coated in a flavorful blend of thyme and sumac. Easy to make at home! Try this recipe today.
Ingredients
- 3 lbs chicken (thighs, drumsticks, etc.)
- 2 cups buttermilk
- 2 ½ cups all-purpose flour
- 2 tbsp dried thyme
- 1 ½ tbsp ground sumac
- 1 tbsp paprika
- 1 tbsp garlic powder
- 1 tsp onion powder
- 1 ½ tbsp salt
- 1 tbsp black pepper
- ½ tsp cayenne pepper (optional)
- Frying oil
Instructions
Step 1: Give That Chicken a Buttermilk Spa Day
Grab a big bowl. Whisk together the buttermilk, about 1 teaspoon of your salt, and maybe ½ teaspoon of black pepper. Dunk your chicken pieces right in there, making sure they’re all nicely submerged. Cover it up tightly (plastic wrap is your friend) and let it hang out in the fridge. Like I said, at least an hour, but longer (up to overnight) is even better! This is where the tenderness happens.
Step 2: Mix Up the Flavor Dust
While the chicken’s relaxing, let’s make the coating. Find a shallow dish – a pie plate or even a baking dish works perfectly. Dump in the flour, thyme, sumac, paprika, garlic powder, onion powder, the rest of the salt (start with 1 tbsp), the rest of the black pepper, and the cayenne if you’re using it. Whisk it all together really well. You want every pinch of flour to have some of that amazing flavor. Sniff it – smells good, right? That’s the smell of future deliciousness!
Step 3: Let’s Get Dredging! (The Fun Messy Part)
Okay, set up your station near the stove. Pull the chicken out of the buttermilk, let the excess drip off for a second (no need to rinse!). Now, one piece at a time, really press it into that flour mixture. Get it all coated – lift any skin flaps, get in the crevices. Want ridiculously crispy chicken? Here’s my trick: After the first coating, dunk it back in the buttermilk super quickly, let it drip again, then press it back into the flour mixture for a second coat. Yes, it’s an extra step, but the crunch is unreal! Lay the coated pieces on a wire rack over a baking sheet. Let them sit for 10-15 minutes – this helps the coating stick like glue when it hits the hot oil.
Step 4: Heat Up the Hot Tub (Carefully!)
Pour your oil into a sturdy, heavy pot (a Dutch oven is perfect) or a deep cast-iron skillet. Aim for about 1.5 to 2 inches deep. Crank the heat to medium-high and let it heat up to 350°F (175°C). A thermometer is your best friend here for getting it right, seriously. No thermometer? Drop a tiny pinch of the flour mix in – if it sizzles like crazy right away, you’re probably good to go. Be careful with hot oil! Keep kids and pets away, and never walk away while it’s heating or frying.
Step 5: Fry ‘Til Golden Brown and Delicious!
Using tongs (not your fingers!), gently lower 3 or 4 pieces of chicken into the hot oil. Don’t crowd the pan! If you put too many in at once, the oil temp will drop, and you’ll get sad, greasy chicken instead of crispy perfection. Let them sizzle away for about 10-12 minutes per side. You’re looking for a beautiful deep golden brown color. Flip ’em carefully halfway through. The safest bet is checking with an instant-read thermometer – stick it in the thickest part (avoiding bone) – it should read 165°F (74°C). Adjust the stove heat if needed to keep the oil around that 350°F sweet spot. The smell in your kitchen right now should be incredible!
Step 6: Drain, Rest, Repeat
Once a piece is perfectly golden and cooked through, use your tongs to lift it out, letting the extra oil drip back into the pot for a second. Place it on a clean wire rack set over a baking sheet. Please, please use a wire rack, not paper towels! Paper towels trap steam and make the bottom soggy – we worked too hard for that crispiness to let it die! Let the chicken rest for 5-10 minutes before you dive in. This lets the juices settle back into the meat. Bring the oil back up to 350°F and repeat with the next batch until all your amazing Fried chicken with thyme and sumac is cooked.
Notes
Nutrition Information:
Yield: 4-6 servingsAmount Per Serving: Calories: Approximately 400-500 calories per serving