My Cheesecake Saga & Why This One Stole My Heart
Oh, cheesecake. Where do I even begin? Let me tell you, my journey to a decent cheesecake was… eventful. There were cracks wide enough to lose a fork in, middles that stubbornly refused to set (hello, cheesecake soup!), and at least one near-catastrophe involving a slippery oven mitt (we don’t talk about that one). For ages, I was convinced perfect cheesecake was some kind of mythical beast. But I really wanted that slice of heaven – creamy, tangy, sweet, the whole deal. So, I kept trying, tweaking, and probably driving my family crazy with slightly-off cheesecakes. And then, finally… THIS Lemon Raspberry Swirl Cheesecake Recipe happened. And everything clicked. The bright zesty lemon just sings against the rich, smooth cream cheese, and those gorgeous raspberry swirls? they’re like little bursts of sunshine. It looks fancy I know, but honestly, it’s become my go-to because it works, and it tastes ridiculously good. It’s the kind of dessert that makes people genuinely happy. Ready to make some happiness?
What You’ll Need To Make The Magic Happen
Alright let’s get our ducks in a row. Making this Lemon Raspberry Swirl Cheesecake Recipe is way easier when you’ve got everything ready. Here’s the rundown of what I use, plus a few little notes from my kitchen adventures
For that Crumbly, Buttery Crust:
- Graham Cracker Crumbs: About 121 cups does the trick. I swear by blitzing my own crackers (around 10-12 full ones) – you just get a better texture! But hey if you’re grabbing the box of crumbs, no worries at all. Little twist: sometimes I use digestive biscuits or even shortbread crumbs if I’m feeling adventurous!
- Unsalted Butter: 6 tablespoons, melted down nice and liquidy. Unsalted is my pick so we can perfectly balance the flavors later.
- Granulated Sugar: Just 1/4 cup – enough to add a whisper of sweetness to the base.
For the Star – That Creamy Lemon Filling:
- Cream Cheese: This is the big one! Four 8-ounce blocks (32 oz total). Use the real-deal, full-fat bricks, okay? And for the love of all things creamy, let it sit out on the counter for at least an hour, maybe even two, until it’s properly soft. Cold cream cheese = lumps, and nobody wants a lumpy cheesecake. Softened cream cheese mixes like a dream!
- Granulated Sugar: 121 cups sweetens the deal.
- Large Eggs: You’ll need 4. Let these guys hang out on the counter with the cream cheese to get to room temp. They blend in much better when they aren’t fridge-cold.
- Sour Cream: 1 cup, full-fat is best for texture, and yep, room temp too! It brings moisture and that lovely bit of tang that lemon loves. Full-fat Greek yogurt can step in if needed.
- Heavy Cream: Just a splash, 1/4 cup, also at room temp. Helps make it extra velvety.
- Lemon Zest: Get all the yellow zest off 2 large lemons (should be about 2 tablespoons). A microplane zester makes this super easy and gives you fine little pieces bursting with aroma! This is where that amazing fresh lemon smell comes from.
- Lemon Juice: 1/4 cup and please pleeease use freshly squeezed! The bottled stuff just doesn’t have the same zing. It makes such a difference.
- Vanilla Extract: 1 tablespoon. Use a good quality one if you can – it rounds out all the flavors beautifully.
For Those Pretty-in-Pink Raspberry Swirls:
- Raspberries: 121 cups. Fresh berries are gorgeous, but frozen ones work absolutely perfectly here – don’t even thaw ’em! So easy.
- Granulated Sugar: 1/4 cup, but taste your berries! If they’re super sweet, use a tiny bit less; if they’re tart, maybe a smidge more.
- Cornstarch: 1 tablespoon mixed really well with 1 tablespoon of cold water (this little mix is called a slurry). This is what thickens our sauce so it swirls perfectly instead of just sinking.
- Lemon Juice: Just 1 teaspoon – sounds odd, but it brightens up the raspberry flavor like you wouldn’t believe!

Okay, How Much Time Are We Talking? (The Honest Truth)
Let’s be real: cheesecake isn’t a 30-minute dessert. But don’t let that scare you away from this Lemon Raspberry Swirl Cheesecake Recipe! Most of the time involved is just waiting around (the hardest part, I know!).
- Getting Your Hands Messy (Prep): Plan on about 30-40 minutes for crust-making, filling-mixing, and swirl-prepping. This is your active kitchen time.
- Oven Duty: It needs about 65-75 minutes to bake, PLUS that crucial hour of cooling down slowly in the turned-off oven. Seriously, don’t skip this step!
- Actual Work Time: See? When you break it down, it’s really only 30-40 minutes of focused effort. Totally doable!
- The Chill Factor (Crucial!): This is where patience pays off. It needs minimum 6-8 hours in the fridge to set up completely and let those delicious flavors mingle and deepen. Honestly, overnight is king if you can manage it. The texture is just better.
So, yes, it requires planning, but it’s not hours and hours of slaving away. Think of it as a relaxed weekend project with a seriously delicious reward!
Let’s Get Baking! Your Friendly Guide
Ready to create some cheesecake magic? Let’s walk through this Lemon Raspberry Swirl Cheesecake Recipe step-by-step. No stress, just fun!
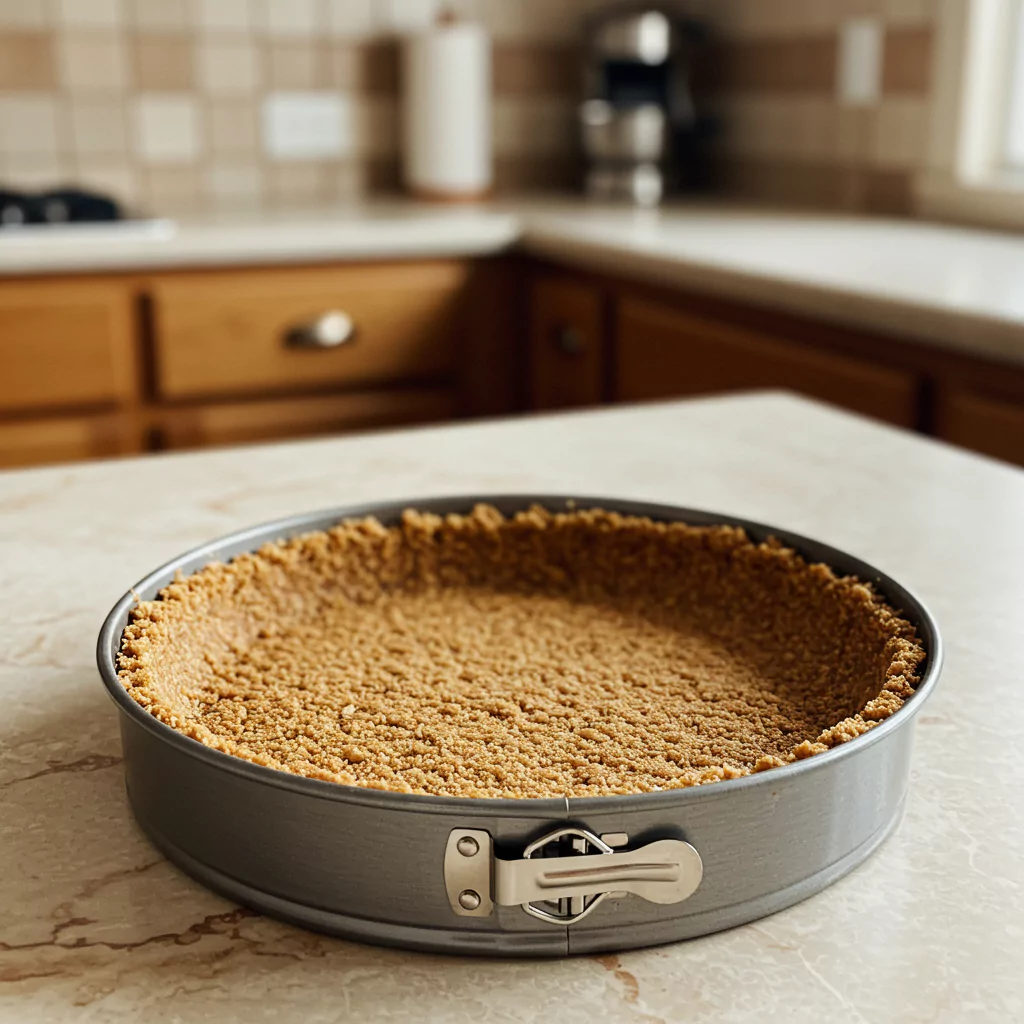
Step 1: Building a Solid Foundation (The Crust!)
First up, get that oven preheating to 350∘F (175∘C). Grab your 9-inch springform pan (the kind with the clip on the side). No need to grease it; the butter in the crust handles that. In a bowl, mix the graham cracker crumbs and the 1/4 cup sugar. Pour in the melted butter and give it a good stir until all the crumbs are moistened – think wet sand consistency. Now, dump this mixture into the pan and press it down firmly and evenly across the bottom and slightly up the sides. Using the flat bottom of a drinking glass really helps pack it tightly. Bake this for 10 minutes. Then, pull it out and let it cool completely on a wire rack while you get started on the rest.
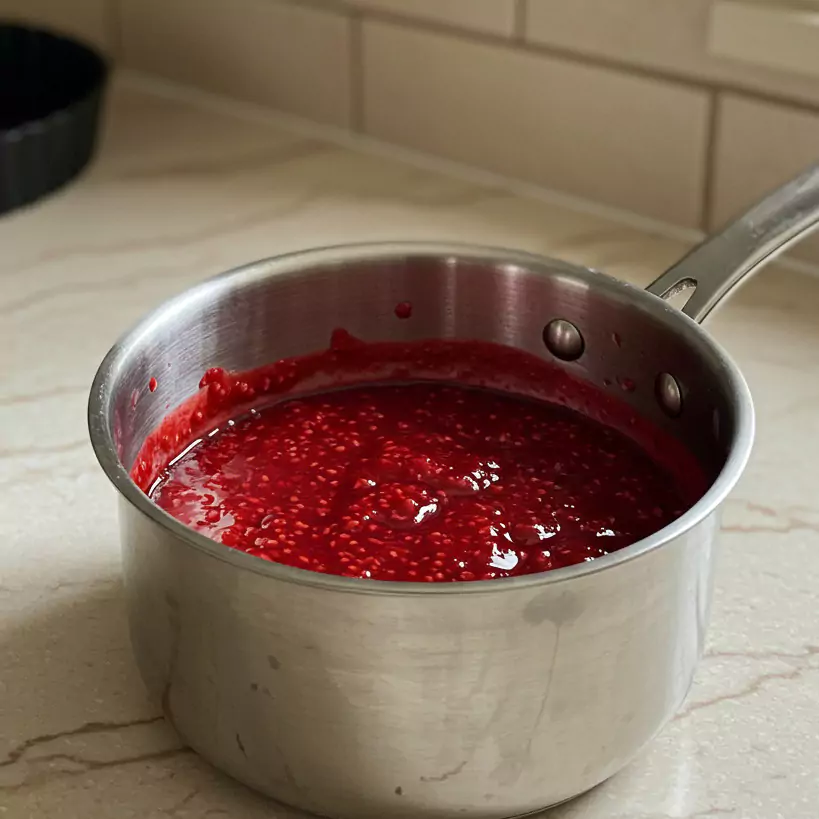
Step 2: Making that Gorgeous Raspberry Swirl
As the crust cools down (and makes your kitchen smell great), let’s make a whirlpool sauce. Berry heart (fresh or frozen!) And a quarter cup of sugar and a teaspoon of lemon juice in a small saucepan. Cook this over medium heat, occasionally stirring until the berries begin to break down and the mixture becomes gentle and publing, perhaps for 5-7 minutes. Stir the cornstarch mixture (a tablespoon of cornstarch + a tablespoon of cold water) quickly to make sure it is smooth, then beat it in the raspberry mixture. Keep whipping and let it boil for an extra minute or two – you’ll see it thickens well. That’s what we want! Remove it from the fire. If the seeds bother you, you can grind them completely through a fine mesh strainer. Me? I usually leave it indoors – it adds a distinctive character! Let this sauce cool completely before using it. Hidden tip: Prepare this sauce the day before and keep it in the fridge!
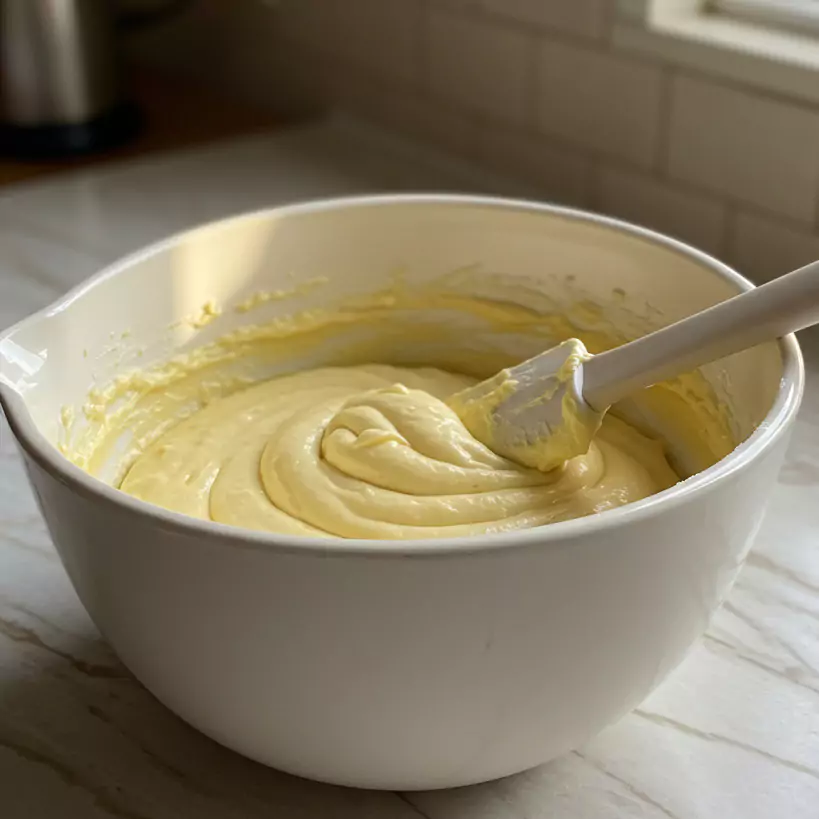
Step 3: Mixing Up the Creamy, Dreamy Lemon Filling
Alright, the main event for our Lemon Raspberry Swirl Cheesecake Recipe! Deep breath. Did you remember to let your cream cheese, eggs, sour cream, and heavy cream come to room temp? YES! This is the secret handshake for smooth cheesecake. In a large bowl (your stand mixer is your best friend here, but hand mixer works too!), beat the very soft cream cheese on medium-low speed until there are absolutely NO lumps. Scrape down the sides and bottom of the bowl a couple of times – lumps love to hide! Gradually add the 121 cups sugar, mixing on low speed just until it’s incorporated. Now, super important: add the room temp eggs one at a time, mixing on LOW speed only until the yellow disappears after each one. If you beat the heck out of it now, you’ll get cracks later. Gently mix in the sour cream, heavy cream, that fragrant lemon zest, the fresh lemon juice, and the vanilla. Mix on low just until combined. Seriously, don’t overdo it! Scrape the bowl one last time, make sure it all looks smooth and luscious, and then STOP. The batter should be thick and gorgeous.
Step 4: Assembly Time – Let’s Get Swirling!
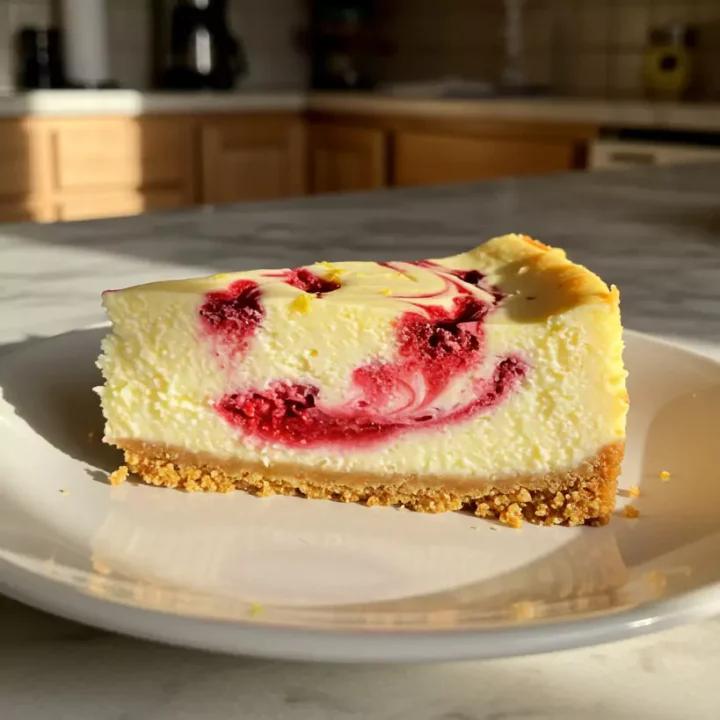
Pour about two-thirds of that glorious lemon batter over your completely cooled crust. Now, take about half of your cooled raspberry sauce and drop spoonfuls of it here and there over the batter. Gently pour the rest of the cheesecake batter on top, trying to cover the raspberry dollops. Spoon the remaining raspberry sauce over this top layer. Now for the fun part! Grab a butter knife or a skewer and gently swirl the raspberry sauce through the top layer of the lemon batter. Think lazy figure-eights or just some gentle back-and-forth lines. The goal is pretty ribbons, not a completely pink cheesecake, so don’t get carried away with the swirling!
Step 5: Giving Your Cheesecake a Bath (Trust Me!)
Okay, the water bath. Sounds fussy, I know, but it’s the KEY to an evenly baked, non-cracked cheesecake. Boil some water. Take two large sheets of heavy-duty aluminum foil and wrap the outside of your springform pan nice and tight. Overlap them and make sure there are no gaps where water could sneak in – we want a watertight boat! Place the foil-lined tray in a larger roasting tin (with sides high enough to hold the water). Carefully pour hot water from the kettle into the roasting tin, around the cheesecake pan, until the water comes about halfway up the sides of the cheesecake pan. Be really careful not to splash any water onto the batter itself! This steamy water bath helps the Lemon Raspberry Swirl Cheesecake Recipe bake gently and prevents it from drying out or cracking. It works!
Step 6: Baking, Cooling, and Deep Breaths
Time for the oven! Carefully slide the whole roasting pan setup (water and all) into your preheated 350∘F (175∘C) oven. Bake it for 65-75 minutes. The magic moment: you’ll know it’s done when the edges look set, maybe slightly puffed, but the center couple of inches still has a distinct wobble when you gently wiggle the pan. It shouldn’t look liquidy, just… jiggly. Perfect! Now, turn the oven completely OFF. Prop the oven door open just a little bit (I use a wooden spoon handle) and just leave the cheesecake in there to cool down slowly for one whole hour. This gradual cooling is another anti-crack weapon in our arsenal! After that hour, carefully lift the cheesecake pan out of the water bath (peel off the foil – careful, steam!) and place it on a wire rack to cool completely on the counter.
Step 7: The Chill Zone – The Final (and Hardest) Step!
Once your beautiful cheesecake is completely cool to the touch (no warm spots!), cover it loosely with plastic wrap. Try to tent it a bit so the plastic doesn’t stick to the glorious surface. Now, slide it into the refrigerator. And here’s where you channel your inner Zen master: It needs to chill for at least 6 hours. Seriously. But if you can possibly wait overnight, DO IT. The texture gets even better, the flavors meld… it’s just sublime the next day. Resist the urge to slice early!
Recipes You May Like
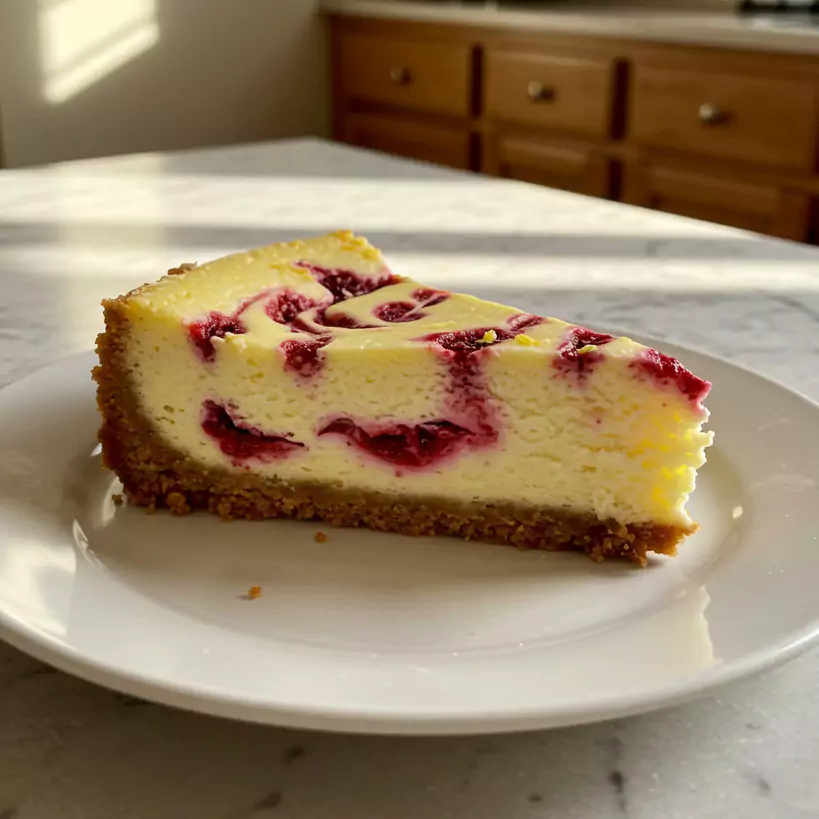
How to Serve This Beauty & Wow Everyone
You did it! Your incredible Lemon Raspberry Swirl Cheesecake Recipe is ready for its close-up! Serving it is almost as fun as eating it. Here are some ideas:
- Au Naturel: Honestly, a simple, clean slice is stunning. Let those swirls be the star!
- Berry Nice: A few fresh raspberries scattered on top or beside the slice always looks gorgeous.
- Zesty Finish: Grate a tiny bit more fresh lemon zest right over the slice just before serving – the smell is amazing!
- Cloud of Cream: A generous dollop of softly whipped cream? Yes, please. Always yes.
- Saucy: If you have any leftover raspberry sauce (or feel like making a quick extra batch), a little drizzle looks super professional.
- My Fave Touch: I love adding a single mint leaf. That little bit of green just makes it pop!
Seriously, bring this out, and watch people’s faces light up. It’s a guaranteed crowd-pleaser.
Storing Leftovers (Assuming There ARE Leftovers!)
Okay, maybe, just maybe, you’ll have some Lemon Raspberry Swirl Cheesecake Recipe left over. If so, here’s how to keep it tasting amazing:
- Fridge is Best: Keep it covered tightly! Either leave it in the pan with some plastic wrap or foil over the top, or move slices into an airtight container. It’ll stay delicious for 4-5 days in there.
- Freeze It? Yes! Cheesecake actually freezes really well. My advice? Freeze it before adding any fresh berries on top. Once it’s fully chilled from the fridge, take off the ring, wrap the cheesecake (whole or in big pieces) really well in plastic wrap, then add a layer of foil. Pop it in the freezer for up to a month or two.
- Thawing Gently: When the craving hits, just move the frozen cheesecake to the fridge and let it thaw overnight. Don’t thaw it on the counter – it can mess with the texture. Add any fresh toppings right before serving.
- Plan Ahead Power Move: Feeling like splitting up the work? Make the crust and the raspberry swirl sauce a day or two ahead! Keep the crust covered at room temp and the sauce in an airtight container in the fridge. Makes baking day feel much more chill!

So, Why Am I Still Obsessed With This Recipe?
I know I’ve gone on and on, but seriously every time I make this Lemon Raspberry Swirl Cheesecake Recipe, I just fall in love all over again. It’s that perfect trifecta: the crisp crust, the ridiculously smooth and creamy filling, and that bright lemon and sweet raspberry combo doing a happy dance in your mouth. It tastes like something incredibly special, but honestly? It’s just about following the steps and trusting the process (and using room temp ingredients!).
Seeing those swirls bake up so beautifully still gives me a little thrill. But the absolute best part? Sharing it. Watching someone take that first bite and seeing their eyes widen a little… that’s pure joy right there. It’s become my go-to recipe for celebrations, or just for making a regular Tuesday feel a bit brighter.
Okay, your turn! I really, really hope this inspires you to give this Lemon Raspberry Swirl Cheesecake Recipe a try. Please, if you do, come back and leave a comment below! Tell me everything! Did you love it? Did you hit any snags? Did you add your own twist? I genuinely get so excited hearing about your baking adventures. Happy baking, my friend!
Lemon Raspberry Swirl Cheesecake Recipe
Bake the ultimate creamy, tangy Lemon Raspberry Swirl Cheesecake Recipe! Get easy tips for perfect swirls & rich flavor. Taste the dream!
Ingredients
- 1 1/2 cups Graham Cracker Crumbs (from about 10-12 crackers)
- 6 tablespoons Unsalted Butter, melted nice and golden
- 1/4 cup Granulated Sugar
- 32 ounces Full-Fat Cream Cheese (four 8-oz blocks), really softened to room temp!
- 1 1/2 cups Granulated Sugar
- 4 Large Eggs, at room temperature
- 1 cup Full-Fat Sour Cream, at room temperature
- 1/4 cup Heavy Cream, at room temperature
- 2 tablespoons Fresh Lemon Zest (from about 2 large lemons)
- 1/4 cup Fresh Lemon Juice (don't use bottled!)
- 1 tablespoon Pure Vanilla Extract
- 1 1/2 cups Fresh or Frozen Raspberries
- 1/4 cup Granulated Sugar (adjust slightly based on berry sweetness)
- 1 tablespoon Cornstarch
- 1 tablespoon Cold Water
- 1 teaspoon Fresh Lemon Juice
Instructions
Step 1: Building a Solid Foundation (The Crust!)
First up, get that oven preheating to 350∘F (175∘C). Grab your 9-inch springform pan (the kind with the clip on the side). No need to grease it; the butter in the crust handles that. In a bowl, mix the graham cracker crumbs and the 1/4 cup sugar. Pour in the melted butter and give it a good stir until all the crumbs are moistened – think wet sand consistency. Now, dump this mixture into the pan and press it down firmly and evenly across the bottom and slightly up the sides. Using the flat bottom of a drinking glass really helps pack it tightly. Bake this for 10 minutes. Then, pull it out and let it cool completely on a wire rack while you get started on the rest.
Step 2: Making that Gorgeous Raspberry Swirl
As the crust cools down (and makes your kitchen smell great), let’s make a whirlpool sauce. Berry heart (fresh or frozen!) And a quarter cup of sugar and a teaspoon of lemon juice in a small saucepan. Cook this over medium heat, occasionally stirring until the berries begin to break down and the mixture becomes gentle and publing, perhaps for 5-7 minutes. Stir the cornstarch mixture (a tablespoon of cornstarch + a tablespoon of cold water) quickly to make sure it is smooth, then beat it in the raspberry mixture. Keep whipping and let it boil for an extra minute or two – you’ll see it thickens well. That’s what we want! Remove it from the fire. If the seeds bother you, you can grind them completely through a fine mesh strainer. Me? I usually leave it indoors – it adds a distinctive character! Let this sauce cool completely before using it. Hidden tip: Prepare this sauce the day before and keep it in the fridge!
Step 3: Mixing Up the Creamy, Dreamy Lemon Filling
Alright, the main event for our Lemon Raspberry Swirl Cheesecake Recipe! Deep breath. Did you remember to let your cream cheese, eggs, sour cream, and heavy cream come to room temp? YES! This is the secret handshake for smooth cheesecake. In a large bowl (your stand mixer is your best friend here, but hand mixer works too!), beat the very soft cream cheese on medium-low speed until there are absolutely NO lumps. Scrape down the sides and bottom of the bowl a couple of times – lumps love to hide! Gradually add the 121 cups sugar, mixing on low speed just until it’s incorporated. Now, super important: add the room temp eggs one at a time, mixing on LOW speed only until the yellow disappears after each one. If you beat the heck out of it now, you’ll get cracks later. Gently mix in the sour cream, heavy cream, that fragrant lemon zest, the fresh lemon juice, and the vanilla. Mix on low just until combined. Seriously, don’t overdo it! Scrape the bowl one last time, make sure it all looks smooth and luscious, and then STOP. The batter should be thick and gorgeous.
Step 4: Assembly Time – Let’s Get Swirling!
Pour about two-thirds of that glorious lemon batter over your completely cooled crust. Now, take about half of your cooled raspberry sauce and drop spoonfuls of it here and there over the batter. Gently pour the rest of the cheesecake batter on top, trying to cover the raspberry dollops. Spoon the remaining raspberry sauce over this top layer. Now for the fun part! Grab a butter knife or a skewer and gently swirl the raspberry sauce through the top layer of the lemon batter. Think lazy figure-eights or just some gentle back-and-forth lines. The goal is pretty ribbons, not a completely pink cheesecake, so don’t get carried away with the swirling!
Step 5: Giving Your Cheesecake a Bath (Trust Me!)
Okay, the water bath. Sounds fussy, I know, but it’s the KEY to an evenly baked, non-cracked cheesecake. Boil some water. Take two large sheets of heavy-duty aluminum foil and wrap the outside of your springform pan nice and tight. Overlap them and make sure there are no gaps where water could sneak in – we want a watertight boat! Place the foil-lined tray in a larger roasting tin (with sides high enough to hold the water). Carefully pour hot water from the kettle into the roasting tin, around the cheesecake pan, until the water comes about halfway up the sides of the cheesecake pan. Be really careful not to splash any water onto the batter itself! This steamy water bath helps the Lemon Raspberry Swirl Cheesecake Recipe bake gently and prevents it from drying out or cracking. It works!
Step 6: Baking, Cooling, and Deep Breaths
Time for the oven! Carefully slide the whole roasting pan setup (water and all) into your preheated 350∘F (175∘C) oven. Bake it for 65-75 minutes. The magic moment: you’ll know it’s done when the edges look set, maybe slightly puffed, but the center couple of inches still has a distinct wobble when you gently wiggle the pan. It shouldn’t look liquidy, just… jiggly. Perfect! Now, turn the oven completely OFF. Prop the oven door open just a little bit (I use a wooden spoon handle) and just leave the cheesecake in there to cool down slowly for one whole hour. This gradual cooling is another anti-crack weapon in our arsenal! After that hour, carefully lift the cheesecake pan out of the water bath (peel off the foil – careful, steam!) and place it on a wire rack to cool completely on the counter.
Step 7: The Chill Zone – The Final (and Hardest) Step!
Once your beautiful cheesecake is completely cool to the touch (no warm spots!), cover it loosely with plastic wrap. Try to tent it a bit so the plastic doesn’t stick to the glorious surface. Now, slide it into the refrigerator. And here’s where you channel your inner Zen master: It needs to chill for at least 6 hours. Seriously. But if you can possibly wait overnight, DO IT. The texture gets even better, the flavors meld… it’s just sublime the next day. Resist the urge to slice early!
Notes
Nutrition Information:
Yield: 10 to 12 servingsAmount Per Serving: Calories: Approximately 600 calories per serving