Oh my, you guys HAVE to hear about these little flavour bombs! I first stumbled upon these beauties at a friend’s BBQ – you know the scene, tons of food, everyone milling around. Tucked away near the desserts were these bright red strawberries, looking all innocent… until I saw they were stuffed. Curiosity piqued, I grabbed one. BAM! Creamy, tangy cheesecake filling inside a perfectly sweet, juicy strawberry. Mind. Blown. It was love at first bite! Of course, I immediately went home and had to figure out how to make them myself. My first couple of attempts were… okay. One batch was a bit too sweet, another the filling wasn’t quite tangy enough. But after some delicious trial-and-error (tough job, I know!), I think I’ve totally nailed it. These cheesecake deviled strawberries are now my secret weapon – they look super impressive but are secretly SO easy. Perfect for when you want to wow people without spending hours in the kitchen.
What You’ll Need for These Cheesecake Deviled Strawberries
Okay, let’s talk groceries. The best part? You don’t need anything weird or fancy to make these amazing cheesecake deviled strawberries. We’re talking simple, fresh ingredients.
- Fresh Strawberries: Grab about a pound of the prettiest strawberries you can find – think maybe 20-25 medium to large ones. Look for berries that feel firm, are red all over (no sad white tops!), and smell sweet. You want ones that look like they’ll hold that yummy filling well.
- Cream Cheese: One 8-ounce block. And please, please use the full-fat stuff! It makes all the difference in texture. Let it sit out on the counter for a bit to soften up – trust me, trying to beat cold cream cheese is a recipe for lumps (and frustration!). Can you substitute? Sure, Neufchâtel works if you want slightly less fat, but it won’t be quite as rich. Vegan cream cheese works too, just pick one you already know tastes good!
- Powdered Sugar: You’ll need about half a cup, but definitely sift it first! It helps make the filling super smooth. I usually start here and taste – you might like it a little sweeter or a little less sweet. You do you! Other options? Maple syrup or agave could work, but they might make the filling a tad runnier, so start with less (like 1/4 cup) and see how it goes.
- Vanilla Extract: A teaspoon of the real deal – pure vanilla extract gives that warm, cozy flavour we all love. Feeling adventurous? A tiny splash of almond extract (like, 1/4 tsp max, it’s potent!) or even some orange zest could be fun twists.
- Lemon Juice (Seriously, don’t skip this!): Just a teaspoon or two of FRESH lemon juice. It sounds like such a small thing, but it cuts the richness perfectly and makes the berries taste even brighter. It’s the secret handshake that makes it taste like real cheesecake.
- Fun Bits for the Top (Optional): Think graham cracker crumbs (my fave for that ‘crust’ vibe!), mini chocolate chips, a fancy chocolate drizzle, some chopped nuts like pecans, or even just a little mint leaf to look pretty.
How Much Time Are We Talking for Cheesecake Deviled Strawberries?
Okay, deep breaths – this isn’t an all-day affair! That’s why I love making these.
- Getting Ready: Budget about 25-30 minutes for washing, hulling (that’s just taking the green tops off and scooping a bit out!), and mixing up the cheesecake filling. If you’re a ninja with strawberries, you might be faster!
- Filling ’em Up: Give yourself maybe 15-20 minutes to actually stuff the strawberries. It’s kinda fun and oddly therapeutic!
- Chill Time (Worth It!): At least 30 minutes in the fridge. Honestly, you could skip this if you’re desperate, but chilling really helps the filling set up a bit, making them easier to handle and taste even better, somehow colder and more refreshing.
- Total Time: So, realistically, you’re looking at maybe 70-80 minutes from start to finish, including that chill time. Wayyy faster than baking a whole cheesecake, right? You get all that deliciousness in basically no time. Perfect for whipping up before people come over!
Let’s Get These Cheesecake Deviled Strawberries Made! (Easy Steps)
Alright, ready to make some magic? Let’s do this!
Step 1: Get Those Berries Ready!
First up, gently wash your strawberries under cool water and pat them super dry with paper towels. Wet berries = slippery berries = harder to handle! Now, let’s get the tops off and make space for the filling. Use a small knife or one of those cool strawberry huller gadgets. Just cut around the stem and scoop out a little cone from the middle. Don’t go crazy – you just need a little pocket, maybe the size of your pinky tip? Quick Tip: If your berries are wobbling, slice a teeny-tiny bit off the very bottom so they stand up straight. Pop your prepped berries onto a plate or tray.
Step 2: Make That Luscious Filling!
Grab a bowl and your softened cream cheese (seriously, room temp is key!). Use an electric hand mixer (or stand mixer) and beat the cream cheese for a minute or two until it’s totally smooth. No lumps allowed! Scrape the bowl down. Now, dump in the sifted powdered sugar, vanilla, and that all-important lemon juice. Start mixing on low (unless you want a sugar snowstorm in your kitchen!) then crank it up to medium. Beat it for another couple of minutes until it looks light, fluffy, and irresistible. Go on, sneak a taste! Need more sugar? Add it. More tang? A tiny bit more lemon. Just right? Perfect!
Step 3: Stuff ’em Silly!
Time to fill ’em up! This is where your cheesecake deviled strawberries really come to life.
- Easiest Way (Piping Bag): Spoon the filling into a piping bag with a fun tip (like a star tip) or just a regular round one. No piping bag? No problem! Use a sturdy zip-top bag. Spoon the filling in, squish it down to one corner, and snip a tiny bit off the corner. Voilà! Instant piping bag. Gently squeeze the filling into each strawberry hollow.
- Spoon Method (Totally Fine!): You can just use a tiny spoon (like for coffee) and carefully spoon the filling in. Might not look as perfect, but they’ll taste just as good!
- My Advice: Don’t try to cram too much filling in. Just fill the hole and maybe add a little swirl on top. It looks cuter and they’re less likely to topple over. Arrange them on your serving dish as you go.
Step 4: Let Them Chill (Literally!)
Once all your cheesecake deviled strawberries are filled and looking pretty, cover them loosely with plastic wrap (don’t squish the tops!) and stick them in the fridge for at least 30 minutes. This little rest helps the filling firm up so they’re not quite so delicate, and everything just tastes better cold.
Step 5: Make ’em Pretty (The Grand Finale!)
Right before you serve them, it’s time to decorate! Go wild! A sprinkle of graham cracker crumbs is classic. A drizzle of melted chocolate? Always a crowd-pleaser. Mini chocolate chips add a nice little crunch. A tiny mint leaf makes them look super fresh. Even just a little extra lemon zest sprinkled over the top looks lovely. Have fun with it!
Recipes You May Like

Serving Up Your Amazing Cheesecake Deviled Strawberries
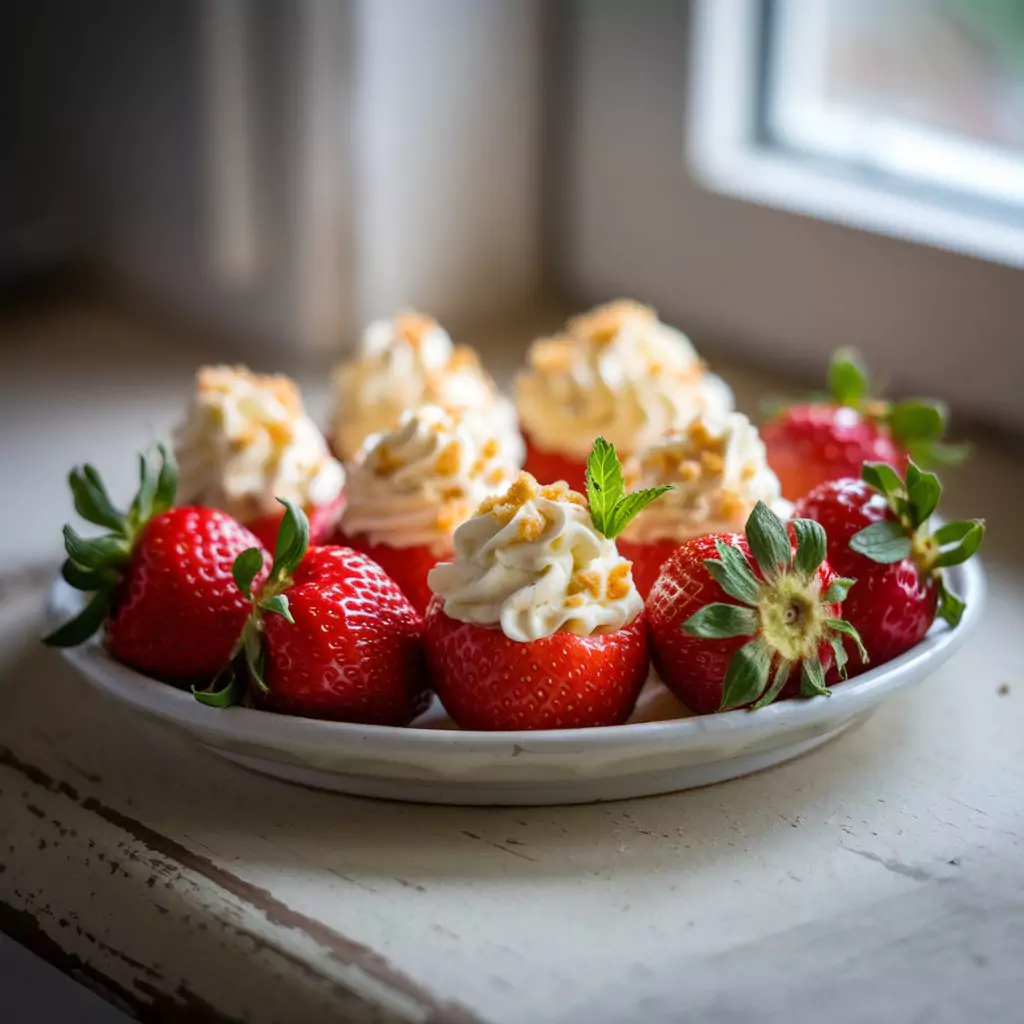
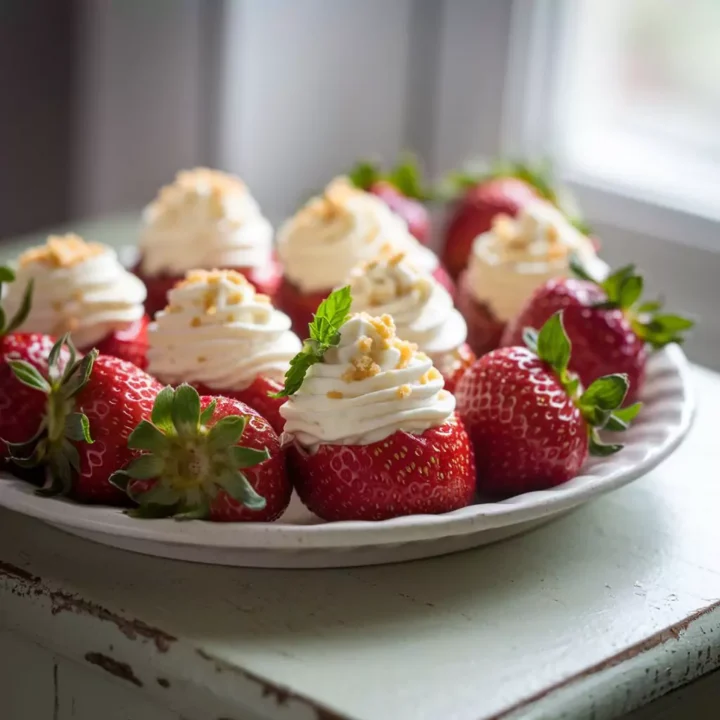
Okay, you made them, now show ’em off! Arrange your cheesecake deviled strawberries on your favorite platter. I think they look amazing on a simple white plate because the red really pops!
- Party Time: Line them up neatly – they look so elegant and are perfect finger food for mingling guests.
- Brunch Star: Add a plate of these to your brunch spread. They’re a sweet surprise next to the usual suspects.
- Just Because: Honestly, sometimes I just make a small batch to have with my afternoon coffee. Why not?
- How I Do It: I almost always go for the graham cracker crumbs because it just feels like cheesecake. A mint leaf is my go-to if I want them to look extra special without much effort.
Storing Leftover Cheesecake Deviled Strawberries (If You Have Any!)
These little guys are definitely at their peak fresh, ideally the day you make them. But if you happen to have leftovers…
- Fridge is Your Friend: Store them in a single layer in an airtight container. Don’t stack them! I learned that the hard way – total squish fest.
- How Long?: They’ll be decent for maybe 1-2 days, tops. After that, the strawberries start to get a bit soft and weepy, and the filling isn’t quite as perky.
- Pro Tip for Parties: You can totally cheat and prep ahead! Wash and hull the berries the day before and keep them in a container in the fridge (maybe line it with a paper towel). Make the filling and keep it in a separate container too (it lasts 2-3 days easily). Then, just fill the cheesecake deviled strawberries an hour or two before serving. So much less stressful!
Honestly, You Just HAVE to Try These Cheesecake Deviled Strawberries!
Okay, maybe I sound like a broken record, but I’m just SO obsessed with these things! Why? Because these cheesecake deviled strawberries are the trifecta: ridiculously easy, they look like you slaved away for hours (you didn’t!), and they taste absolutely incredible. That creamy, tangy filling with the sweet, fresh berry? It’s just chef’s kiss perfection.
They’re my go-to for potlucks, BBQs, fancy-ish dinners, or even just when I need a little mood booster. They just make people happy!
So, please, do yourself a favour and make these cheesecake deviled strawberries! I pinky-promise you’ll love them. And when you make them, pretty please come back here and leave a comment! Tell me how they turned out! Did you add anything fun? What did everyone think? I genuinely love hearing how recipes go in your kitchens! Happy berry stuffing!
Cheesecake Deviled Strawberries
Creamy, tangy cheesecake filling stuffed into sweet strawberries! This easy, no-bake dessert is perfect for parties. Try this delightful treat!
Ingredients
- 1 pound fresh strawberries
- 8 ounces full-fat cream cheese, nice and soft
- 1/2 cup powdered sugar, sifted so it's smooth
- 1 teaspoon pure vanilla extract
- 1-2 teaspoons fresh lemon juice (optional, but adds a nice tang!)
- Optional extras for topping: Graham cracker crumbs, mini chocolate chips, melted chocolate drizzle, chopped nuts, fresh mint leaves
Instructions
Step 1: Get Those Berries Ready!
First up, gently wash your strawberries under cool water and pat them super dry with paper towels. Wet berries = slippery berries = harder to handle! Now, let’s get the tops off and make space for the filling. Use a small knife or one of those cool strawberry huller gadgets. Just cut around the stem and scoop out a little cone from the middle. Don’t go crazy – you just need a little pocket, maybe the size of your pinky tip? Quick Tip: If your berries are wobbling, slice a teeny-tiny bit off the very bottom so they stand up straight. Pop your prepped berries onto a plate or tray.
Step 2: Make That Luscious Filling!
Grab a bowl and your softened cream cheese (seriously, room temp is key!). Use an electric hand mixer (or stand mixer) and beat the cream cheese for a minute or two until it’s totally smooth. No lumps allowed! Scrape the bowl down. Now, dump in the sifted powdered sugar, vanilla, and that all-important lemon juice. Start mixing on low (unless you want a sugar snowstorm in your kitchen!) then crank it up to medium. Beat it for another couple of minutes until it looks light, fluffy, and irresistible. Go on, sneak a taste! Need more sugar? Add it. More tang? A tiny bit more lemon. Just right? Perfect!
Step 3: Stuff ’em Silly!
Time to fill ’em up! This is where your cheesecake deviled strawberries really come to life.
- Easiest Way (Piping Bag): Spoon the filling into a piping bag with a fun tip (like a star tip) or just a regular round one. No piping bag? No problem! Use a sturdy zip-top bag. Spoon the filling in, squish it down to one corner, and snip a tiny bit off the corner. Voilà! Instant piping bag. Gently squeeze the filling into each strawberry hollow.
- Spoon Method (Totally Fine!): You can just use a tiny spoon (like for coffee) and carefully spoon the filling in. Might not look as perfect, but they’ll taste just as good!
- My Advice: Don’t try to cram too much filling in. Just fill the hole and maybe add a little swirl on top. It looks cuter and they’re less likely to topple over. Arrange them on your serving dish as you go.
Step 4: Let Them Chill (Literally!)
Once all your cheesecake deviled strawberries are filled and looking pretty, cover them loosely with plastic wrap (don’t squish the tops!) and stick them in the fridge for at least 30 minutes. This little rest helps the filling firm up so they’re not quite so delicate, and everything just tastes better cold.
Step 5: Make ’em Pretty (The Grand Finale!)
Right before you serve them, it’s time to decorate! Go wild! A sprinkle of graham cracker crumbs is classic. A drizzle of melted chocolate? Always a crowd-pleaser. Mini chocolate chips add a nice little crunch. A tiny mint leaf makes them look super fresh. Even just a little extra lemon zest sprinkled over the top looks lovely. Have fun with it!
Notes
Nutrition Information:
Yield: About 20-25 servingsAmount Per Serving: Calories: Around 39 kcal per stuffed strawberry
There are no reviews yet. Be the first one to write one.