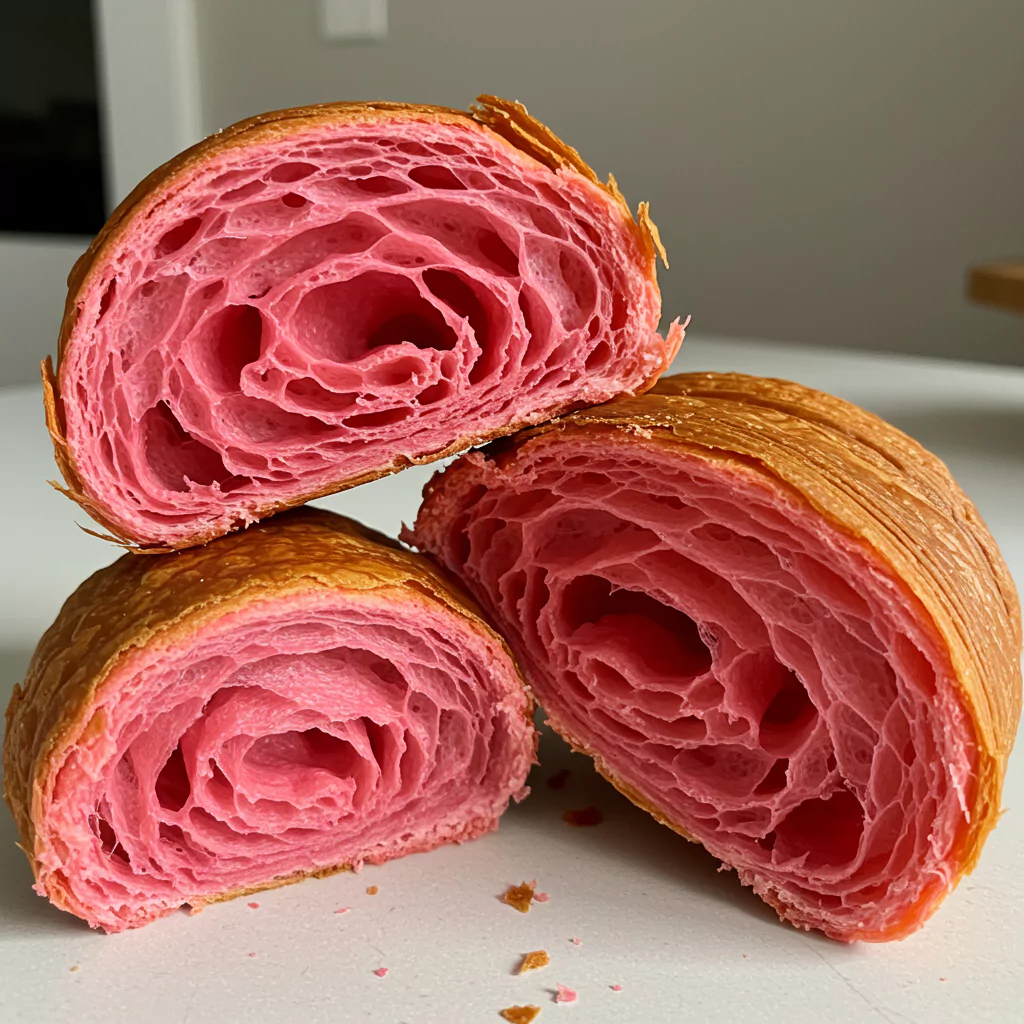
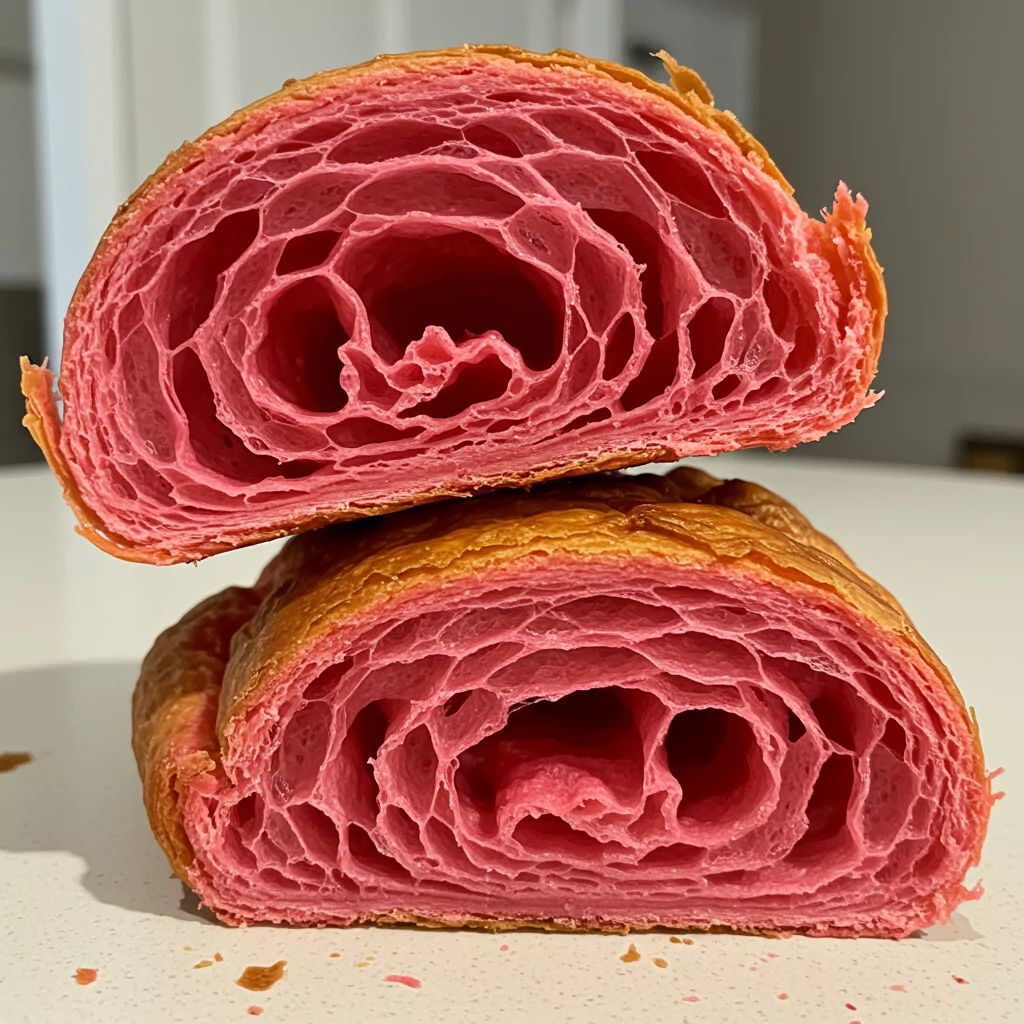
Alright you guys, gather ’round! Let’s talk about something that makes my heart flutter: Baby Pink Croissants Outcome. Yep, those dreamy, buttery, flaky pastries that look like they stepped out of a fairytale bakery. They’ve got that classic golden crunch on the outside, but slice ’em open? Bam! Gorgeous swirls of pink inside. Swoon-worthy, right?
I first tried making these after seeing a picture online that basically screamed “You NEED to bake me!” My first attempt? Let’s just say it involved more butter on the counter than in the dough, haha! But after a few (okay, maybe more than a few) tries, tweaking things here and there, I landed on this method. It works. It gives you that incredible flaky texture, the rich buttery taste, and that stunning pop of pink. Honestly, pulling these off makes you feel like a baking rockstar. They seem fancy, but I promise, with a little patience (and maybe embracing a bit of kitchen mess), you can totally achieve this amazing Baby Pink Croissants Outcome. Let’s bake up some happiness!
What You’ll Need for This Pink Dream
Let’s get our ducks (or ingredients!) in a row. Good quality stuff makes a difference here, especially the butter, but I’ll throw in some ideas if you need to swap things out. We’re aiming for that ultimate buttery, flaky, vibrant Baby Pink Croissants Outcome!
For the Pink Dough Base (Détrempe):
- 500g Bread Flour: Gotta have that strong flour for good layers. All-purpose works if it’s all you’ve got, but bread flour really gives it that chew.
- 140g Water & 140g Milk (Both Lukewarm): Like a nice warm bath for the yeast – gets it going! Whole milk adds a lovely richness. You can use lower fat or plant-based milk, but whole milk is my fave here.
- 55g Granulated Sugar: Just enough sweetness.
- 40g Unsalted Butter (Softened): A little fat in the dough itself makes it tender. Make sure it’s soft, not melty!
- 11g Instant Yeast: The instant kind makes life easier here.
- 10g Salt: Don’t forget salt! It balances everything and keeps the yeast in check.
- Pink Food Coloring (Gel/Paste is BEST): This is our star! Gel or paste gives that oomph without adding extra liquid. Start with 1/2 to 1 teaspoon. If you want to go natural, beetroot powder works, but the pink will be softer, more earthy.
For the Butter Block (Beurrage – aka, the Flake Engine!):
- 280g Unsalted Butter, High-Fat (>82%), COLD: Seriously, splurge on the good stuff if you can. European-style butter has less water, which means more steam, which means FLAKIER layers. Cold, cold, cold!
For the Golden Gloss (Egg Wash):
- 1 Large Egg
- 1 Tablespoon Milk or Water

Timing It Out: The Croissant Two-Step (or Three!)
Real talk: making croissants isn’t quick. It’s a bit of a weekend project, spread over a couple of days. But most of that is just chill time for the dough (literally!). Think of it less like active work and more like… dough meditation?
- Hands-On Time: Maybe 60-90 minutes total, broken up into chunks.
- Fridge Time (The Magic Part!): At least 12 hours, but honestly, 24-36 hours gives you amazing flavor. Don’t rush the chill!
- Puffing Up Time (Proofing): Around 1.5 – 2.5 hours, depends on how warm your kitchen is.
- Baking Glory: A quick 15-20 minutes!
- Total Journey: Plan for 2 days. It sounds like a lot, but it’s mostly waiting, and the payoff for that perfect Baby Pink Croissants Outcome is HUGE.
Let’s Bake Pink! Step-by-Step (The Friendly Guide)
Okay, deep breath! Let’s break down how to get that gorgeous Baby Pink Croissants Outcome. I’ve grouped the steps into phases so it feels less like climbing a mountain, more like a fun hike.
Phase 1: Making the Pretty Pink Dough
First up, let’s make the base dough, the détrempe. Grab your stand mixer bowl (or just a big regular bowl). Pour in the lukewarm water and milk, sprinkle over the sugar and yeast. Give it a little swirl and let it sit for 5-10 minutes. If it gets a bit foamy, awesome – your yeast is alive and kicking! Now, the fun bit – stir in your pink food coloring! Start small, mix it into the liquid. You can always add more. Aim for a nice, vibrant pink – remember it lightens up a bit when baked. Once you’re happy with the color, dump in the flour, the softened butter (not melted!), and the salt. Mix it all on low speed (with the dough hook if you have one) until it just comes together into a shaggy mess. Then, knead it for about 5-7 minutes (either in the mixer or by hand). You want it smooth-ish and pliable, but don’t go crazy like you’re making sourdough. We’re not building massive gluten chains yet. Scrape it out, shape it into a rough flat rectangle (helps it chill faster), wrap it tightly in plastic wrap, and into the fridge it goes! Let it chill for at least 2 hours, but overnight is even better for flavor.
Phase 2: Wrangling the Butter Block
While the dough is having its spa day in the fridge, let’s tackle the butter. Get your cold, high-fat butter. Put it between two sheets of parchment paper. Now, take out some aggression! Pound it with your rolling pin to flatten it and make it a bit more pliable (you want it bendable, not melty or crumbly). Shape it into a neat square, about 7×7 inches. Wrap it back up in the parchment and stick it in the fridge to firm up again. Think ‘cold but workable’.
Phase 3: The First Fold – Layering Begins!
Okay, dough’s chilled, butter’s ready. Lightly flour your counter. Unwrap your pink dough and roll it out into a rectangle, roughly double the size of your butter square (maybe 8×16 inches?). Brush off any excess flour – flour between layers is the enemy of flakiness! Plop your butter block in the center (like a diamond on the rectangle). Fold the dough flaps over the butter, like you’re tucking it into bed. Pinch the seams gently to seal it all in. Now, carefully roll this whole package out into a long rectangle, maybe 8×24 inches. Keep it even! Brush off flour again! Perform a ‘single fold’: Fold the bottom third up, then fold the top third down over that (like folding a business letter). Boom! First set of layers done. Wrap it tightly in plastic wrap and back to the fridge for 1 hour. No cheating on the chill time!
Phase 4: The Second Fold & The Big Chill
Time for round two! Unwrap the chilled dough, place it on your lightly floured surface (usually rotated 90 degrees from the last roll). Roll it out again into that long 8×24 inch rectangle. Brush off the flour! This time, we do a ‘double fold’ (or book fold). Fold both short ends in so they meet almost in the middle (leave a tiny gap). Then fold the whole thing in half like closing a book. More layers! Wrap it up TIGHTLY in plastic wrap. Now, this is important: back into the fridge for a good long rest. Minimum 4-6 hours, but honestly, overnight (or even up to 24 hours) is your best bet for flavor and manageability. This patience is key for the ultimate Baby Pink Croissants Outcome.
Phase 5: Shaping Your Pink Beauties
The moment we’ve been waiting for! Unwrap your glorious, laminated dough block. On a lightly floured surface (seeing a theme here?), carefully roll it out one last time. You want a long, thin rectangle – about 8-9 inches wide and only about 1/6th inch thick (pretty thin!). Work quickly so the butter doesn’t get too warm. Trim the edges with a pizza cutter or sharp knife – this exposes the layers and helps them puff up. Now, cut the rectangle into long, skinny triangles. Think tall triangles, maybe 3-4 inches at the base. Make a little 1cm slit in the middle of the base of each triangle (this helps it curve nicely). Gently stretch each triangle just a tad longer. Starting from the wide base, roll it up towards the pointy tip! Keep it snug but not tight. Tuck the little point underneath the croissant so it doesn’t unroll. Place your little pink creations on baking sheets lined with parchment paper, giving them plenty of space to grow.
Phase 6: The Proofing Puffy Pow-Wow
This is where they get their airy texture! Cover the trays loosely with plastic wrap (you might need to tent it so it doesn’t stick). Find a warm-ish, draft-free spot in your house (around 75-78°F is ideal). Let them hang out and proof for about 1.5 to 2.5 hours. They need to get noticeably puffy, almost doubled in size, and look soft and airy. If you gently jiggle the pan, they should wobble a bit. Watch them closely – under-proofed are dense, over-proofed can collapse.
Phase 7: Final Prep & Baking Glory!
They’re perfectly puffed! Carefully pop the trays into the fridge for 15-20 minutes. Trust me, this little pre-bake chill helps them hold their shape and get extra flaky in the oven’s heat. While they’re chilling, get your oven preheating to 400°F (200°C) convection or 425°F (220°C) conventional. Whisk the egg with a splash of milk or water. Gently brush this egg wash over your chilled croissants – just the tops and sides, try not to let it drip down and seal the layers. Okay, oven’s hot? Slide those trays in! Immediately turn the oven temp down to 375°F (190°C) convection or 400°F (200°C) conventional. Bake for 15-20 minutes, rotating the pans halfway through, until they are a stunning deep golden brown and puffed up like crazy. The smell? Heavenly! Let them cool on a wire rack for at least 15 minutes before you inhale them. You did it! Behold the amazing Baby Pink Croissants Outcome!
Recipes You May Like
How to Serve Your Masterpiece
Honestly, these Baby Pink Croissants Outcome stars are gorgeous just as they are! Warm from the oven is peak perfection.
- Keep it Simple: A smear of good butter, maybe some raspberry jam (pink on pink!). Heaven.
- Sweet Dreams: Slice ’em open (carefully!) and fill with whipped cream and berries. Or Nutella. Nobody’s judging!
- Fancy Brunch: Okay, maybe a little extra, but use them for a Croissant French Toast bake? Yes please!
- Just Because: On a pretty plate, with a hot cup of coffee or tea. Sometimes the best way is the simplest. They look so pretty, they basically decorate themselves!
Storing Your Pink Treasures (If They Last!)
Croissants are best fresh, like, within hours. But if you manage to have leftovers:
- Countertop (Day 1-2): Loosely wrap in foil or keep in a paper bag (plastic bags = soggy croissants, sad!). Reheat for 5 mins in a 350°F (175°C) oven to bring back the crisp.
- Freezer (Longer Term): Let them cool completely. Wrap each one well in plastic wrap, then pop into a freezer bag. They’ll keep for about a month. Thaw slightly, then reheat in the oven (350°F for 5-8 mins). Perfect for preserving that lovely Baby Pink Croissants Outcome texture!
Why I’m Basically Head-Over-Heels for This Recipe
Okay, you can probably tell I’m obsessed with this Baby Pink Croissants Outcome, right? It’s not just because they look ridiculously pretty (though that helps!). It’s the whole process. It feels challenging but doable. It’s the magic of watching butter and dough transform into a thousand flaky layers. It’s the smell filling your house. And yeah, it’s the reaction you get when you casually present a plate of homemade PINK croissants. Baking these just makes me feel good – it’s creative, a bit messy, and the result is pure, edible joy. That pop of pink is just the cherry (or maybe the raspberry?) on top!
Seriously, You HAVE to Try This!
I really, really hope you feel inspired to give these a whirl. Don’t let the multiple stages scare you off. Think of it as a weekend project, take your time, keep things cold, and have FUN with it. Even if your first batch isn’t “perfect,” they’ll still taste amazing (it’s butter and dough, how bad can it be?).
Tell me everything! If you make them, please come back and share your Baby Pink Croissants Outcome in the comments! Did you nail the layers? Did you try a different color? Any funny stories from the process? I genuinely love hearing about your baking adventures. Happy baking, everyone!

Baby Pink Croissants Outcome
Flaky, buttery homemade pink pastry! Get the perfect Baby Pink Croissants Outcome with this fun recipe & simple steps. Bake yours now!
Ingredients
- 500g Bread Flour (the strong stuff works best!)
- 140g Water (just lukewarm, like a baby's bath)
- 140g Milk (whole milk is lovely, also lukewarm)
- 55g Granulated Sugar
- 40g Unsalted Butter (make sure it's nice and soft)
- 11g Instant Yeast
- 10g Salt (don't skip it!)
- 1/2 - 1 teaspoon Pink Food Coloring (gel or paste gives the best pop!)
- For the All-Important Butter Block (Beurrage):
- 280g Unsalted Butter (go for the good high-fat stuff, >82%!), COLD
- 1 Large Egg
- 1 Tablespoon Milk or Water
Instructions
Notes
Nutrition Information:
Yield: 8 to 12 servingsAmount Per Serving: Calories: Roughly 350-450 calories per croissant
There are no reviews yet. Be the first one to write one.