Oh my, you guys, we need to talk about this cake. Seriously. For the longest time, I was on this mission – maybe you’ve been there too? – trying to find the perfect yellow cake. You know, the one that’s not dry, not weirdly heavy, just… perfect. I baked SO many duds. Like, seriously disappointing cakes. But then? Then this Butter Yellow Dream Cake happened. And let me tell ya, it was like the clouds parted and angels sang. Or, you know, just a really, really good cake appeared. I’ve messed around with this recipe more times than I can even remember, adding a pinch of this, tweaking that, until it reached this state of pure bliss. It’s my rockstar recipe now. Birthdays? Yep. Neighbor needs a pick-me-up? Definitely. Just feel like baking on a rainy Sunday? This is the one. What’s the big deal? Well, it just works. It’s surprisingly forgiving, tastes like sunshine and happy memories, and it’s so incredibly moist. You’ll get it once you take that first bite – it truly lives up to the “dream” name!
Ingredients You’ll Need for Your Butter Yellow Dream Cake
Alright, let’s raid the pantry! This cake doesn’t need anything too crazy, mostly the usual suspects, but trust me, they create something magical together.
For the Dreamy Cake Itself:
- All-Purpose Flour (2 ½ cups): Good ol’ flour! Here’s my little tip: don’t just jam your measuring cup into the bag. Spoon the flour into the cup, then level it off flat with a knife. It keeps the cake from getting dense. We want fluffy! (If you happen to have cake flour, you can totally use it for an even more delicate texture – just use 2 ¾ cups instead).
- Granulated Sugar (1 ¾ cups): Sweetness! Gets along beautifully with the butter.
- Baking Powder (1 tablespoon): This guy gives the cake its gorgeous height. Make sure yours hasn’t been hiding in the back of the cupboard since last year – fresh baking powder makes a difference!
- Salt (½ teaspoon): Seems small, but it’s mighty! Salt actually wakes up all the other flavors, especially the sweetness. Don’t leave it out!
- Unsalted Butter (1 cup / 2 sticks): Ah, the star! Use decent butter if you can, and – this is super important – make sure it’s properly softened. Not melted, just soft enough to squish easily. This is key for getting it nice and fluffy with the sugar. Imagine that lovely creamy, yellow butter… yum.
- Large Eggs (4): These need to be room temperature too! Cold eggs just don’t mix in as well. Let ’em hang out on the counter for a bit before you start.
- Whole Milk (1 cup): Room temp again! Makes the cake moist and rich. (Side note: if you have buttermilk, go for it! It adds a subtle tang and makes things even more tender. Totally optional, though).
- Pure Vanilla Extract (2 teaspoons): Please use the real stuff, not the imitation! That warm, gorgeous vanilla scent is half the joy of this cake.
For the Silky Buttercream Frosting:
- Unsalted Butter (1 cup / 2 sticks): Softened, just like for the cake! Makes the frosting smooth as silk.
- Powdered Sugar (4 cups): Sweetness and body for the frosting. If you have a sifter, give it a quick sift to get rid of lumps – makes life easier.
- Heavy Cream or Milk (3-4 tablespoons): Just enough to get it to that perfect, spreadable consistency. Start with 3 tbsp; you can always drizzle in a tiny bit more.
- Pure Vanilla Extract (1 teaspoon): For that classic, irresistible buttercream taste.
- Pinch of Salt: Just a tiny bit! It cuts the sweetness so it’s not too sweet. Trust me on this.
See? Nothing scary! But how these simple things transform into the Butter Yellow Dream Cake? That’s the fun part.
Timing Your Butter Yellow Dream Cake Creation
Okay, let’s be real about how long this takes. Put on some music, pour yourself something nice to drink, make an afternoon of it!
- Getting Stuff Ready (Prep): Takes about 25 minutes, give or take. Measuring, greasing pans, the usual dance. Having everything at room temp actually saves you time here!
- Oven Time (Baking): Plan for 30-35 minutes while your house starts smelling ridiculously good.
- The Waiting Game (Cooling): This is SO important. You gotta let the cakes cool down completely. Like, seriously cool. At least an hour. No cheating! Warm cake + frosting = sad, slippery mess.
- Frosting Party: Maybe 15 minutes or so to whip up that fluffy frosting and get it onto the cake.
Grand Total Time: You’re looking at maybe 2 hours and 15 minutes, start to finish, including that vital cooling time. For a cake made totally from scratch that tastes like it came from a fancy bakery? That’s pretty amazing! It feels way less stressful than some fiddly recipes, and oh-so-much better than a box mix. Making this Butter Yellow Dream Cake is just a genuinely lovely way to spend some time.
Step-by-Step Instructions for Butter Yellow Dream Cake Perfection
Okay, deep breath, you got this! Let’s bake this baby. Just follow along…
Step 1: Prep Like a Pro
First up: oven! Crank it up to 175∘C (350∘F). Now, find two 9-inch round cake pans. Grease ’em up really well, then give ’em a dusting of flour (tap out the extra). My little secret weapon? I trace the bottom of the pan onto parchment paper, cut out the circle, grease the pan, put the paper in, then grease the paper too. It feels like overkill, but trust me, your cakes will practically jump out of the pans later. Set those aside. And yes, I’m saying it again: room temperature butter, eggs, and milk! It really, truly helps everything mix together into a smooth, happy batter.
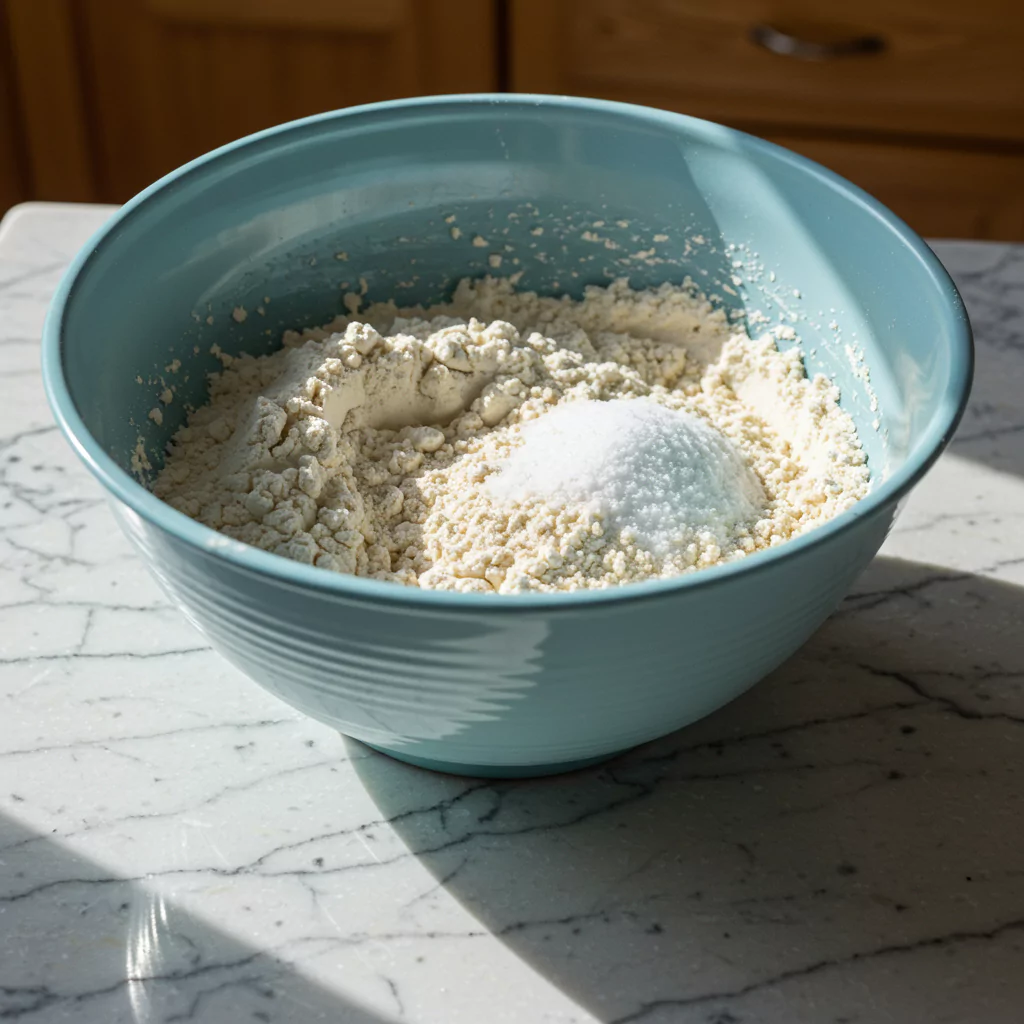
Step 2: Mix the Dry Magic
Grab a big bowl. Dump in the flour, sugar, baking powder, and salt. Just give it a good whisk together for maybe 30 seconds. This mixes everything evenly and helps make the flour a bit lighter. Think fluffy cake thoughts! This easy step helps make sure your finished Butter Yellow Dream Cake has that perfect, even texture.
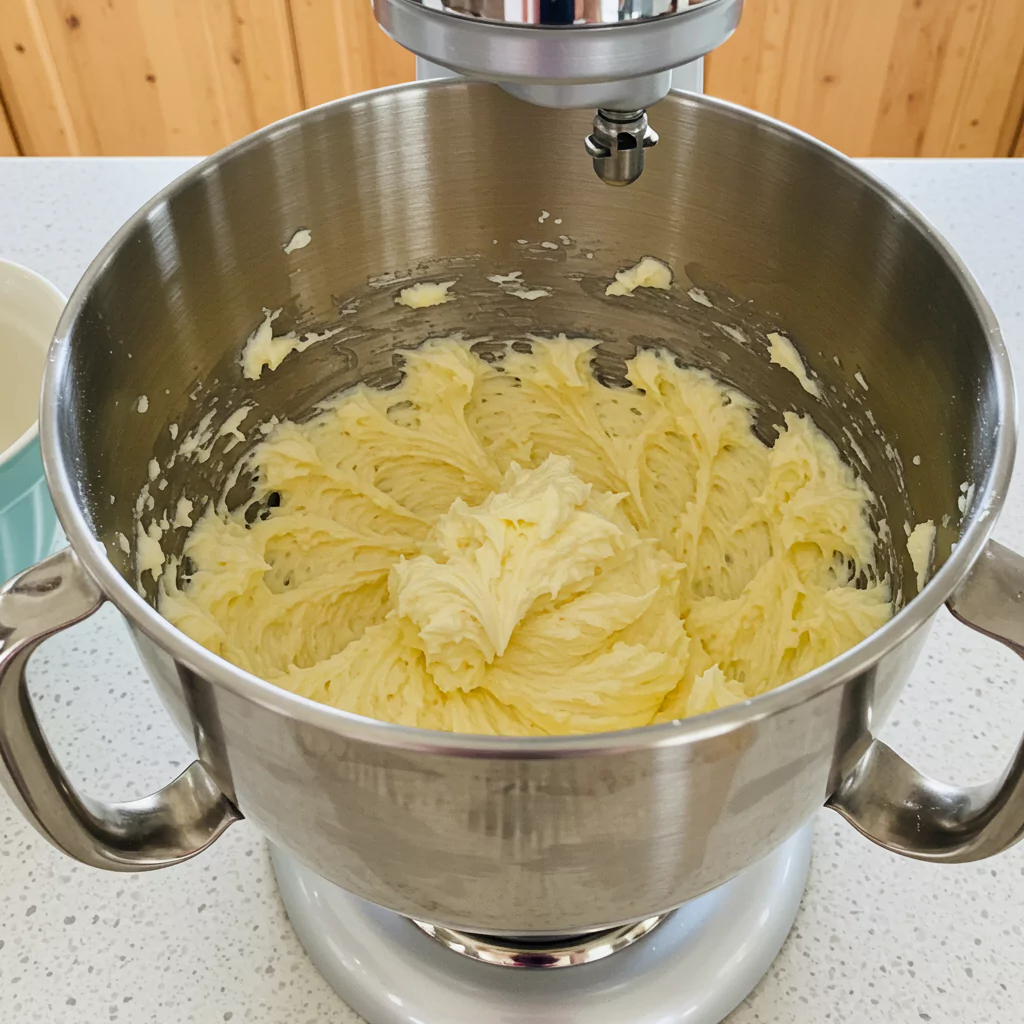
Step 3: Cream Butter and Sugar Bliss
Alright, mixer time! Whether you have a stand mixer (use the paddle attachment) or a trusty hand mixer and a big bowl, toss the softened butter in there. Beat it on medium speed for a minute or two until it looks creamy. Now, keep the mixer running on medium-high and slowly, gradually, pour in the sugar. Let it beat for a good 3, maybe 4 minutes. Stop and scrape down the sides of the bowl with a spatula once or twice. You want it to look really light colored and fluffy – like, noticeably fluffier than when you started. You’re whipping air into it, which means a lighter cake later!
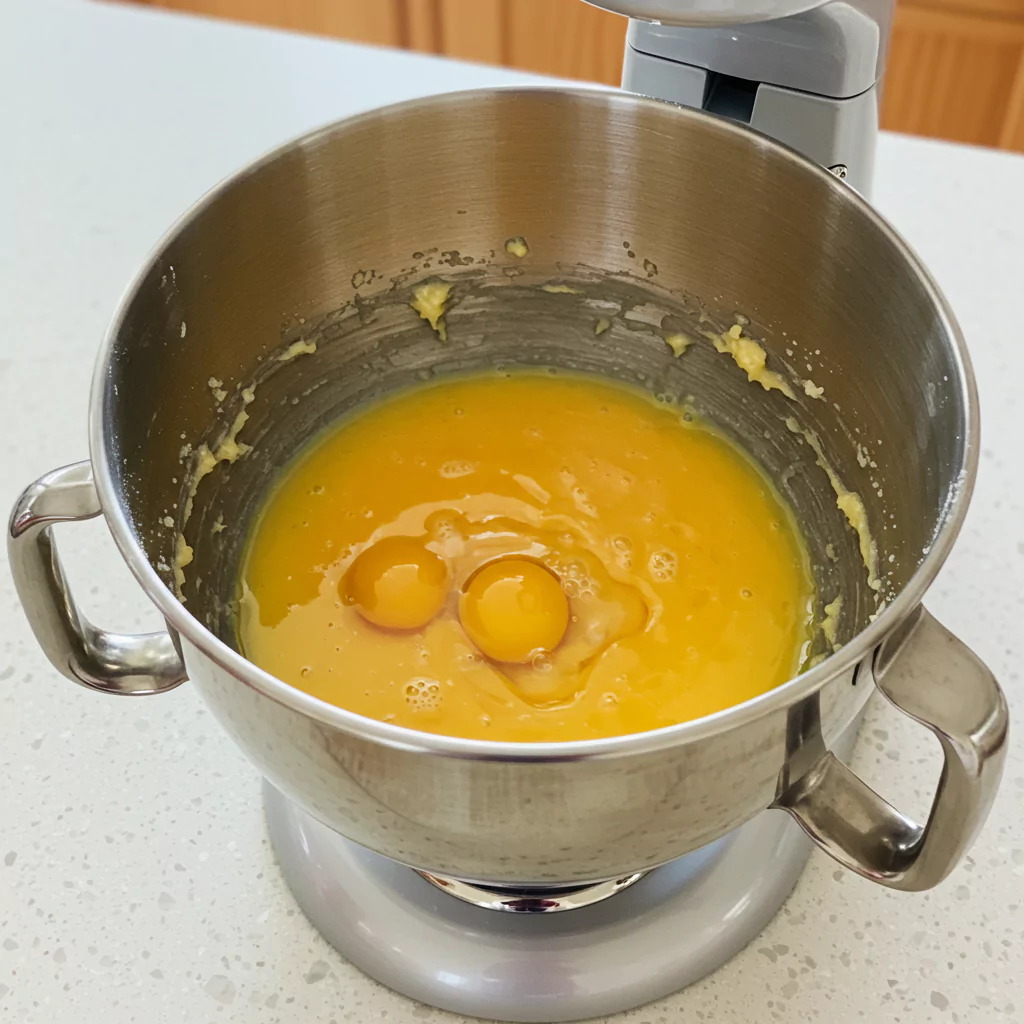
Step 4: Egg-cellent Additions
Time for the eggs (remember? Room temp!). Add them one at a time, letting each one mix in mostly before adding the next. Don’t beat the heck out of it here, just mix until combined. Pour in the vanilla extract with the last egg. Don’t freak out if the mixture looks a little bit lumpy or separated at this point – it’s totally fine and will sort itself out.
Step 5: Alternating Act (Wet & Dry)
This sounds way more complicated than it is, but it’s the secret to a tender cake! Turn your mixer speed way down to low. Add about a third of your flour mixture. Mix just until it disappears into the batter. Now add about half of the milk. Mix just until it’s combined. Repeat: another third of the flour mixture, mix briefly, the rest of the milk, mix briefly. Finally, add the last bit of the flour mixture. Stop mixing the instant you don’t see big streaks of dry flour anymore. Seriously, stop! Give the bowl one final scrape down with your spatula. Over-mixing is the enemy of tender cake! It makes it tough, and we want a soft, dreamy Butter Yellow Dream Cake, right? Right!
Step 6: Bake to Golden Perfection
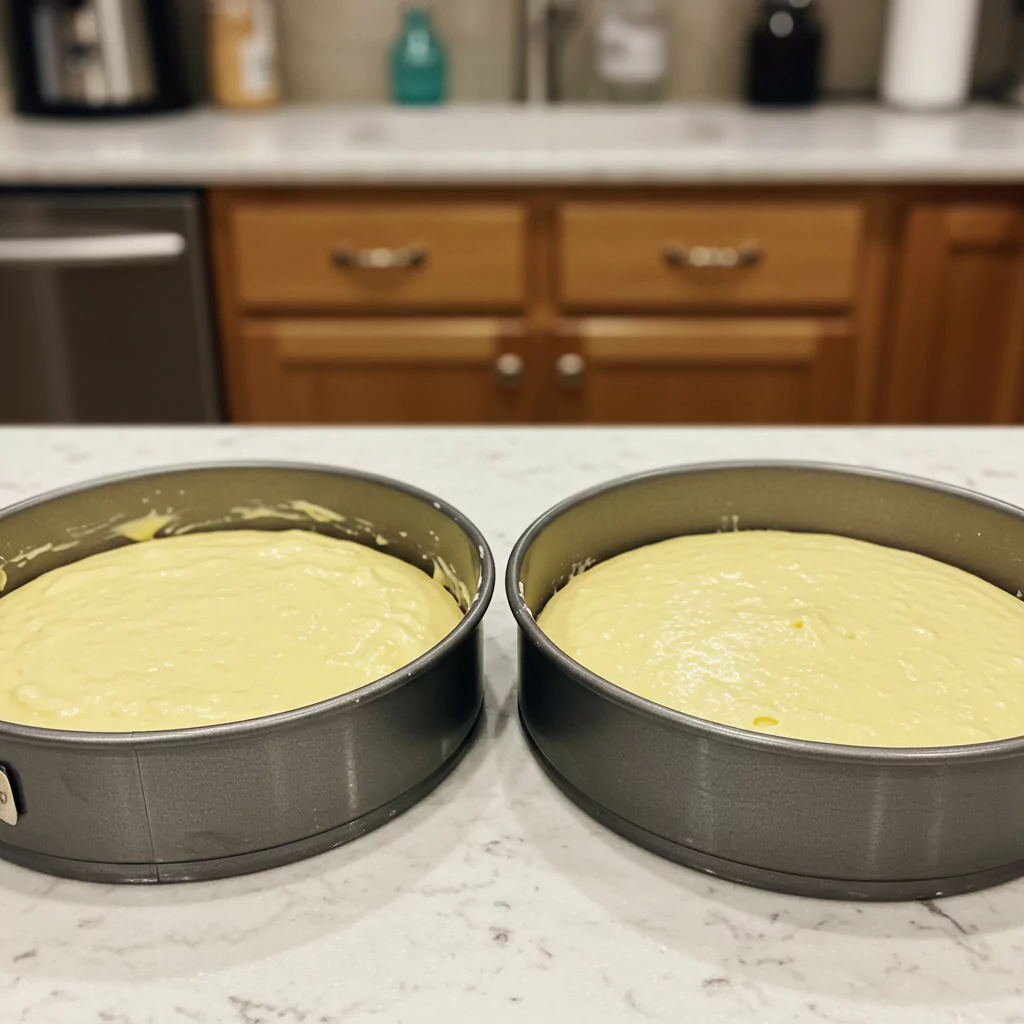
Okay, carefully pour the batter into your prepared pans, trying to divide it evenly between the two. Smooth the tops a little with the back of a spoon or an offset spatula if you have one. Into the hot oven they go! Set a timer for 30 minutes. After 30, check them by gently poking a toothpick or a thin wooden skewer right into the center of one cake. If it comes out clean (no wet batter clinging to it), they’re done! If not, give them another few minutes and check again. The edges should also look lightly golden brown and be just starting to pull away from the sides of the pan. Try SO hard not to open the oven door during the first 20-25 minutes – letting the heat escape can make cakes sad and sunken.
Step 7: Cool It Down
Yay, they’re baked! Let the cakes cool in their pans on a wire cooling rack for about 10-15 minutes. This lets them firm up a bit. Now, carefully flip them out onto the wire rack. Lift the pans off, and peel off the parchment paper circles if you used them. Okay, now comes the hard part: walk away! Let them cool completely. Totally. 100%. This takes at least an hour, maybe longer depending on how warm your kitchen is. Frosting a warm cake is just asking for heartbreak (and melted frosting). Patience, grasshopper!
Step 8: Whip Up the Buttercream Dream
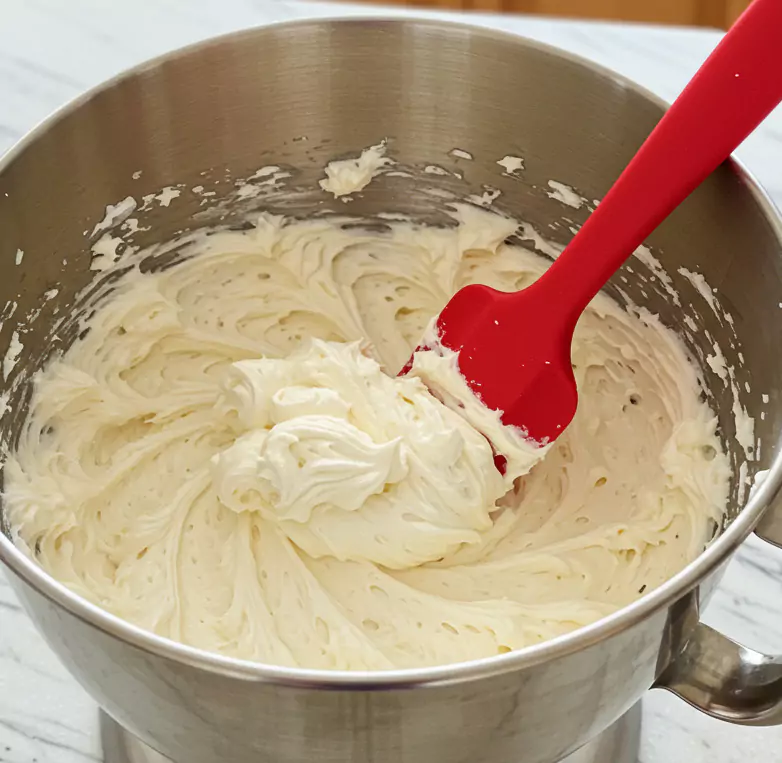
While the cakes are taking their sweet time cooling, let’s make the frosting! Grab a clean bowl and your mixer again. Beat the softened butter on medium speed for a couple of minutes until it’s nice and creamy. Now, start adding the powdered sugar, about a cup at a time, alternating with splashes of the heavy cream (or milk). Pro tip: Turn the mixer speed way down low before you dump the sugar in, unless you enjoy cleaning a fine layer of sugar off every surface in your kitchen! Once all the sugar and cream are in, add the vanilla and the pinch of salt. Now, turn the mixer up to medium-high and let it rip for a good 3 to 5 minutes. It’ll transform into this incredibly light, fluffy, smooth cloud of deliciousness. If it feels too stiff, add another tiny splash of cream. Too thin? Add a bit more powdered sugar. Easy peasy.
Step 9: Assemble Your Masterpiece
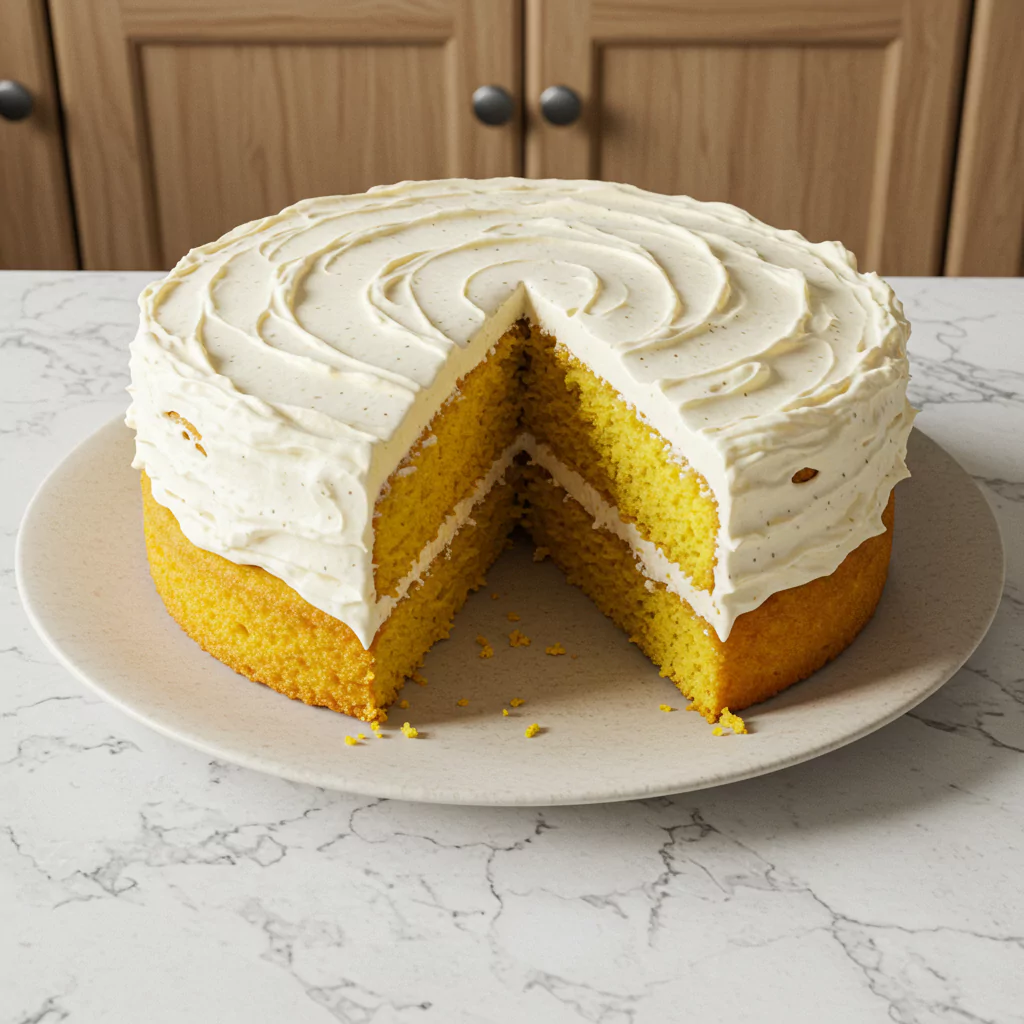
It’s time! Are your cake layers completely cool? Check again! Okay, good. Put one layer, flat-side-up (usually the bottom of the cake as it baked), onto your prettiest plate or cake stand. Scoop a generous blob of frosting onto it and spread it out evenly. Plop the second layer on top, this time right-side-up. Now, take a little bit of frosting and spread a very thin layer all over the entire cake – top and sides. This is your “crumb coat.” It doesn’t have to be pretty; its job is to catch all the loose crumbs. Stick the whole thing in the fridge for maybe 15-20 minutes to let that thin layer firm up. Okay, final step! Bring it out and use the rest of that glorious frosting to cover the cake nicely. Make swoops and swirls with your knife or spatula, make it smooth, whatever makes you happy! Ta-da! Look at your beautiful Butter Yellow Dream Cake!
Recipes You May Like

Serving Suggestions for Your Butter Yellow Dream Cake
Honestly? A slice of this Butter Yellow Dream Cake needs absolutely nothing else. But hey, options are fun!
- Keep it Simple: Just a nice wedge on a plate. Maybe with a fork. Maybe not. Perfect with coffee, tea, or a cold glass of milk.
- Berry Blast: Scatter some fresh berries around the slice – strawberries, raspberries, blueberries look amazing and taste even better. The slight tartness is lovely with the sweet cake.
- Ice Cream Party: Oh yeah. Warm a slice just a little (like 10-15 seconds in the microwave) and top it with a scoop of really good vanilla ice cream. Maybe some caramel sauce if you’re feeling extra decadent. Heaven.
- Birthday Glory: This cake was BORN for birthdays. Cover it in sprinkles! Stick some candles in it! It’s the perfect classic celebration cake. Making this Butter Yellow Dream Cake just feels like a party.
- Crowd Pleaser: Cutting it into smaller squares makes it super easy to serve if you’re taking it somewhere or have a bunch of people over.
My favorite way? Probably the next day, straight from the cake stand on the counter. Maybe for breakfast. Don’t judge! How are you going to enjoy your Butter Yellow Dream Cake?
Storing Tips for Your Butter Yellow Dream Cake
Want to keep the dream alive? Here’s how to store your masterpiece:
- Frosted Cake: The frosting acts like a delicious seal, keeping the cake moist! Just cover it well (a cake dome or an airtight container works best) and leave it on the counter. It should stay yummy for 3-4 days. If your kitchen is really hot, you can put it in the fridge, but please, please let it come back to room temperature before serving! Cold cake = kinda dry and sad cake.
- Unfrosted Layers: Baked the layers ahead? Smart! Once they’re totally cool, wrap each one tightly in plastic wrap, then maybe foil too. They’ll keep fine on the counter for a day, or you can freeze them like this for up to a couple of months. Thaw them overnight in the fridge before you plan to frost.
- Freezing Leftovers: Yes, you can freeze slices! Wrap individual slices really well in plastic wrap, then foil, and tuck them into a freezer bag. They’re best within a month or so. Thaw on the counter for a bit or give ’em a quick (like 15-20 second) zap in the microwave.
Storing it right means your Butter Yellow Dream Cake stays delicious down to the last crumb!
Why I’m Utterly Obsessed With This Butter Yellow Dream Cake
Okay, clearly I have strong feelings about this cake! Haha! It’s just… reliable. It’s comforting. It tastes like sunshine and nostalgia and pure, simple happiness. Every time I make it, I fall in love all over again.
For me, it nails the big three:
- Moisture King: Seriously, it stays moist for days. No dry, crumbly disappointment here.
- Buttery Goodness: That flavor! It’s rich but not heavy, perfectly buttery, with that lovely vanilla warmth.
- Dreamy Texture: It’s so soft and tender, it practically melts in your mouth.
Plus, it looks way fancier than it actually is to make. It uses normal ingredients you probably have, and the results are just consistently amazing. It’s the kind of recipe that makes you feel like a baking genius, even if you’re just starting out. It’s my happy place in cake form.
You just have to try this Butter Yellow Dream Cake. Make it this weekend! Make it for absolutely no reason at all! Fill your house with that incredible baking smell and treat yourself.
Okay, your turn! If you bake this, please pop back and tell me everything in the comments below! I genuinely love hearing how it went for you. Did you add sprinkles? Did your family devour it? Any fun stories? Let me know! Happy Baking!

Butter Yellow Dream Cake
Bake the ultimate moist, homemade Butter Yellow Dream Cake! Easy recipe for a classic yellow cake with silky vanilla buttercream. Bake it today!
Ingredients
- 2 ½ cups All-Purpose Flour (spooned & leveled!)
- 1 ¾ cups Granulated Sugar
- 1 tablespoon Baking Powder (make sure it's fresh!)
- ½ teaspoon Salt (balances the sweetness!)
- 1 cup (2 sticks) Unsalted Butter (softened to room temp - super important!)
- 4 Large Eggs (room temp too!)
- 1 cup Whole Milk (yep, room temp!)
- 2 teaspoons Pure Vanilla Extract (the good stuff!)
- 1 cup (2 sticks) Unsalted Butter (softened!)
- 4 cups Powdered Sugar (sifted if lumpy)
- 3-4 tablespoons Heavy Cream or Milk (start with less!)
- 1 teaspoon Pure Vanilla Extract
- Pinch of Salt
Instructions
Step 1: Prep Like a Pro
First up: oven! Crank it up to 175∘C (350∘F). Now, find two 9-inch round cake pans. Grease ’em up really well, then give ’em a dusting of flour (tap out the extra). My little secret weapon? I trace the bottom of the pan onto parchment paper, cut out the circle, grease the pan, put the paper in, then grease the paper too. It feels like overkill, but trust me, your cakes will practically jump out of the pans later. Set those aside. And yes, I’m saying it again: room temperature butter, eggs, and milk! It really, truly helps everything mix together into a smooth, happy batter.
Step 2: Mix the Dry Magic
Grab a big bowl. Dump in the flour, sugar, baking powder, and salt. Just give it a good whisk together for maybe 30 seconds. This mixes everything evenly and helps make the flour a bit lighter. Think fluffy cake thoughts! This easy step helps make sure your finished Butter Yellow Dream Cake has that perfect, even texture.
Step 3: Cream Butter and Sugar Bliss
Alright, mixer time! Whether you have a stand mixer (use the paddle attachment) or a trusty hand mixer and a big bowl, toss the softened butter in there. Beat it on medium speed for a minute or two until it looks creamy. Now, keep the mixer running on medium-high and slowly, gradually, pour in the sugar. Let it beat for a good 3, maybe 4 minutes. Stop and scrape down the sides of the bowl with a spatula once or twice. You want it to look really light colored and fluffy – like, noticeably fluffier than when you started. You’re whipping air into it, which means a lighter cake later!
Step 4: Egg-cellent Additions
Time for the eggs (remember? Room temp!). Add them one at a time, letting each one mix in mostly before adding the next. Don’t beat the heck out of it here, just mix until combined. Pour in the vanilla extract with the last egg. Don’t freak out if the mixture looks a little bit lumpy or separated at this point – it’s totally fine and will sort itself out.
Step 5: Alternating Act (Wet & Dry)
This sounds way more complicated than it is, but it’s the secret to a tender cake! Turn your mixer speed way down to low. Add about a third of your flour mixture. Mix just until it disappears into the batter. Now add about half of the milk. Mix just until it’s combined. Repeat: another third of the flour mixture, mix briefly, the rest of the milk, mix briefly. Finally, add the last bit of the flour mixture. Stop mixing the instant you don’t see big streaks of dry flour anymore. Seriously, stop! Give the bowl one final scrape down with your spatula. Over-mixing is the enemy of tender cake! It makes it tough, and we want a soft, dreamy Butter Yellow Dream Cake, right? Right!
Step 6: Bake to Golden Perfection
Okay, carefully pour the batter into your prepared pans, trying to divide it evenly between the two. Smooth the tops a little with the back of a spoon or an offset spatula if you have one. Into the hot oven they go! Set a timer for 30 minutes. After 30, check them by gently poking a toothpick or a thin wooden skewer right into the center of one cake. If it comes out clean (no wet batter clinging to it), they’re done! If not, give them another few minutes and check again. The edges should also look lightly golden brown and be just starting to pull away from the sides of the pan. Try SO hard not to open the oven door during the first 20-25 minutes – letting the heat escape can make cakes sad and sunken.
Step 7: Cool It Down
Yay, they’re baked! Let the cakes cool in their pans on a wire cooling rack for about 10-15 minutes. This lets them firm up a bit. Now, carefully flip them out onto the wire rack. Lift the pans off, and peel off the parchment paper circles if you used them. Okay, now comes the hard part: walk away! Let them cool completely. Totally. 100%. This takes at least an hour, maybe longer depending on how warm your kitchen is. Frosting a warm cake is just asking for heartbreak (and melted frosting). Patience, grasshopper!
Step 8: Whip Up the Buttercream Dream
While the cakes are taking their sweet time cooling, let’s make the frosting! Grab a clean bowl and your mixer again. Beat the softened butter on medium speed for a couple of minutes until it’s nice and creamy. Now, start adding the powdered sugar, about a cup at a time, alternating with splashes of the heavy cream (or milk). Pro tip: Turn the mixer speed way down low before you dump the sugar in, unless you enjoy cleaning a fine layer of sugar off every surface in your kitchen! Once all the sugar and cream are in, add the vanilla and the pinch of salt. Now, turn the mixer up to medium-high and let it rip for a good 3 to 5 minutes. It’ll transform into this incredibly light, fluffy, smooth cloud of deliciousness. If it feels too stiff, add another tiny splash of cream. Too thin? Add a bit more powdered sugar. Easy peasy.
Step 9: Assemble Your Masterpiece
It’s time! Are your cake layers completely cool? Check again! Okay, good. Put one layer, flat-side-up (usually the bottom of the cake as it baked), onto your prettiest plate or cake stand. Scoop a generous blob of frosting onto it and spread it out evenly. Plop the second layer on top, this time right-side-up. Now, take a little bit of frosting and spread a very thin layer all over the entire cake – top and sides. This is your “crumb coat.” It doesn’t have to be pretty; its job is to catch all the loose crumbs. Stick the whole thing in the fridge for maybe 15-20 minutes to let that thin layer firm up. Okay, final step! Bring it out and use the rest of that glorious frosting to cover the cake nicely. Make swoops and swirls with your knife or spatula, make it smooth, whatever makes you happy! Ta-da! Look at your beautiful Butter Yellow Dream Cake!
Notes
Nutrition Information:
Yield: 12-16 servingsAmount Per Serving: Calories: approx. 450 calories per serving
There are no reviews yet. Be the first one to write one.