Okay, Story Time: How These Wraps Basically Saved My Sanity
Look, I’m not gonna lie. Some recipes feel like they require a culinary degree and a sous chef. This ain’t one of ’em. These cheesy garlic chicken wraps? They were born from pure, unadulterated “what on earth am I making for dinner?!” panic. You know that feeling, right? It’s 6 PM, you’re starving, the fridge looks depressingly empty, and the energy to chop seventeen different vegetables just isn’t there.
I had one of those Tuesdays. Work had been a beast, I felt like I could nap for a week, and my stomach was staging a protest. Ordering pizza was this close to happening. But then, a little fridge archaeology unearthed some leftover cooked chicken (score!), a slightly sad-looking block of cheese (still usable!), a couple of tortillas clinging to life, and my saving grace – garlic. Because let’s be honest, garlic is the superhero of the kitchen.
My tired brain started whirring. Chicken + Cheese + Garlic + Tortilla = Potential? The first try? Edible, but kinda forgettable. Maybe attempt #2, with a bit more garlic (because, duh)? Getting warmer! It honestly took maybe four or five rounds of tinkering – playing with spices, figuring out the mystical art of melting cheese without torching the tortilla, getting that garlic hit just right – before the magic happened. And when it did? BAM. Dinner dilemma: solved.
Suddenly, I wasn’t just making food; I was making these ridiculously tasty, gooey, garlicky pockets of happiness that felt way fancier than they had any right to be, considering the minimal effort. They shot straight to the top of my “emergency awesome meal” list. These cheesy garlic chicken wraps pack a serious flavor punch, give you that satisfying cheese-pull moment we all live for, and come together faster than you can decide what to watch on Netflix. So yeah, ready to ditch the delivery apps and make something truly yum? Let’s do this!
Grab Your Gear: The Cheesy Garlic Chicken Wrap Treasure Map
Alright, let’s talk ingredients. Nothing too wild here, but grabbing decent stuff definitely makes these cheesy garlic chicken wraps go from “good” to “OMG, amazing.” We’re aiming for flavor fireworks!
Your Mission Essentials:
- The Bird: About 1 pound (roughly 450g) of boneless, skinless chicken. Breasts are great, but honestly, thighs are my secret weapon here – they just stay juicier and have more flavor. Dice ’em up!
- The Blankets: 4-6 large flour tortillas. Burrito size is your friend for easier rolling. Whole wheat totally works if that’s your jam! Just make sure they feel soft, not stiff.
- The Hero: 4-6 big cloves of fresh garlic, minced. And I mean, minced. Don’t skimp! If you worship garlic like I do, maybe toss another one in. Shhh, it’s our secret. Fresh is king here, trust me.
- The Gooey Gold: 1.5 – 2 cups shredded cheese. I’m a sucker for a sharp cheddar and mozzarella blend – cheddar brings the zing, mozzarella brings that glorious stretch! But hey, Monterey Jack, Colby, a Mexican fiesta blend? Go wild! Use what makes you happy.
- Sizzle Power: 2-3 tablespoons of butter or olive oil. Butter gives it that rich, decadent vibe, but olive oil is great too. Sometimes I live dangerously and use both.
- Spice Magic:
- 1 tsp Paprika (Smoked paprika? Even better. Adds that little somethin’ somethin’.)
- 1 tsp Dried Oregano or a good Italian Seasoning blend
- 1/2 tsp Onion Powder (the unsung hero of the spice rack)
- Salt and Black Pepper – taste as you go, but don’t be shy!
- Bonus Flair (Totally Optional, but Nice!):
- A blob of sour cream or plain Greek yogurt (mix it in or save it for dipping – yum!)
- A little squeeze of fresh lemon juice right at the end (wakes everything up!)
- Chopped fresh parsley or chives (makes it look fancy and adds a fresh bite!)
Quick Swaps if You Need ‘Em:
- Chicken Out? Try cooked shrimp! Or for a veggie vibe, seasoned chickpeas or even crumbled, sautéed tofu could be cool.
- Cheese Choices: Provolone melts like a dream, Swiss adds nuttiness, a little parm sprinkle adds salty goodness. Raid your cheese drawer!
- Wrap Alternatives: Low-carb wraps work, or for a super light feel, use big lettuce leaves like iceberg or butter lettuce instead of tortillas.
Time Check: Faster Than You Can Say “I’m Hungry!”
Seriously, one of the best parts? These things are FAST. Like, surprisingly fast for how satisfying they are.
- Chop & Spice Time: ~15 minutes. Put on some music, maybe pour a glass of something nice (non-alcoholic, of course!), it’ll fly by.
- Sizzle & Grill Time: ~20 minutes. This is where the magic smells start happening!
- Grand Total: Around 35 minutes, give or take.
Thirty-five minutes! That’s probably less time than it takes to endlessly scroll through food delivery apps, debate toppings, and wait for the doorbell. Think about it – you get a hot, homemade, ridiculously tasty meal faster. More time to chill, chat, or you know, actually eat your cheesy garlic chicken wraps while they’re perfect. That’s a huge win in my book.
Let’s Get Cookin’: Your Step-by-Step Guide to Wrap Heaven
Okay, deep breath. You got this. It’s super straightforward, promise!
Step 1: Get Your Chicken Ready
Dice up that chicken into little bite-sized nuggets. Toss ’em in a bowl. Now, shower them with the paprika, oregano/Italian seasoning, onion powder, salt, and a good grind of black pepper. Get your hands in there (or use a spoon, whatever feels right) and mix it all up so every piece feels loved and seasoned. Little Tip: If you have an extra 5-10 minutes, just let the chicken hang out with the spices. It’s like a mini-marinade that bumps up the flavor.
Step 2: Sizzle That Chicken
Get your skillet nice and hot over medium-high heat with a swirl of butter or oil. Once it’s shimmering (that’s the signal!), gently lay your chicken pieces in. Try not to dump them all in one pile – give ’em some space to brown properly. Let them cook for about 5-7 minutes, giving them a stir now and then, until they’re looking golden and delicious and definitely cooked through (no pink bits!). Scoop the chicken out onto a plate and try not to eat it all right now.
Step 3: Unleash the Garlic Power!
Turn the heat down to medium. Add the rest of your butter or oil to the skillet. Now, the star: your minced garlic. Toss it in and stir it around for just 30-60 seconds. You’ll smell it almost instantly – that amazing, warm, toasty garlic aroma. Crucial: Keep your eyes peeled! You want fragrant, not burnt. Burnt garlic is sad garlic. This smell? This is the soul of your cheesy garlic chicken wraps.
Step 4: Reunion in the Pan
Quickly slide that cooked chicken back into the skillet with its garlicky friend. Stir everything together like they’re old pals catching up. Make sure all the chicken gets coated in that yummy garlic butter. If you’re feeling fancy and using lemon juice or parsley, toss it in now. Give it a final stir, kill the heat, and just take a second to breathe that in. Awesome, right?
Step 5: Build Your Masterpiece
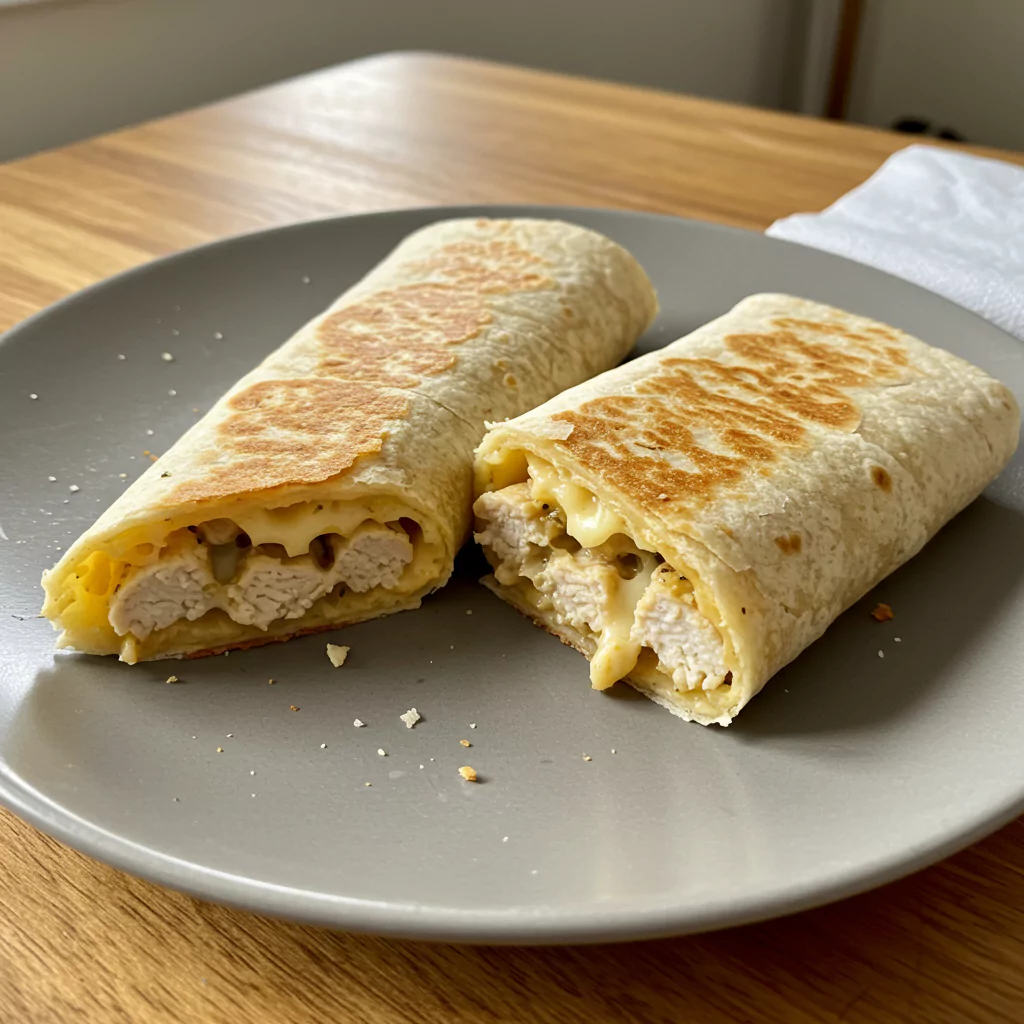
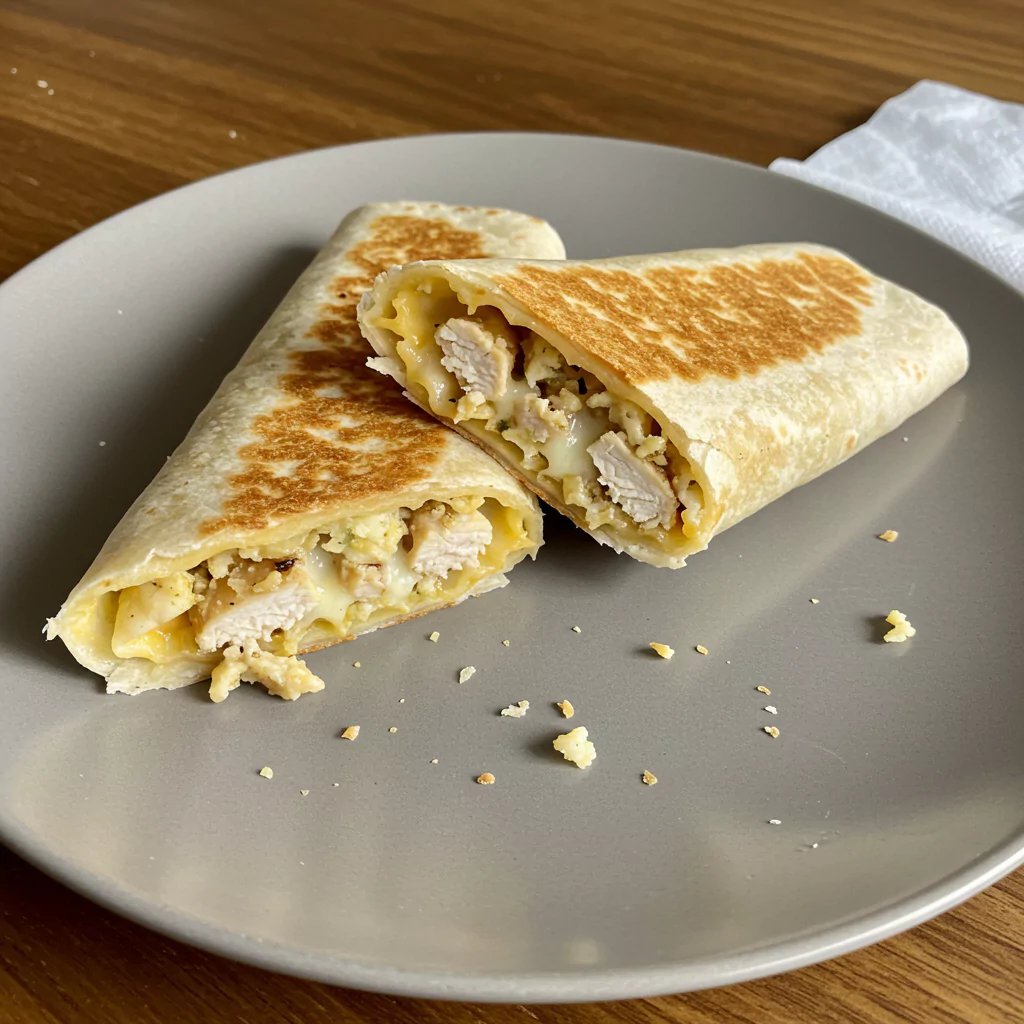
Time to assemble! Lay out your tortillas. A quick zap in the microwave (like 10 secs) or a flash in a dry pan makes them soft and cooperative. Spoon a good amount of that incredible chicken mixture onto the bottom part of each tortilla. Don’t be stingy! Then, let it rain cheese! Pile it on. Remember the name: cheesy garlic chicken wraps. Embrace the cheese. Folding 101: Tuck in the sides first, then roll it up snugly from the bottom, burrito-style. Keep it tight!
Step 6: Golden, Crispy, Melty Perfection
Last step! You can wipe out the skillet (or grab a clean one) and place the wraps seam-side down over medium heat. Let them sizzle for 2-4 minutes per side. You’re looking for a beautiful golden-brown crust and, most importantly, that cheese inside getting all melty and wonderful. A panini press also works like a charm. Or, pop ’em under the broiler for a super quick minute or two – but watch them like a hawk, they can go from golden to burnt fast! The goal: crispy outside, gooey inside. Pure bliss.
Want a Lighter Bite? Easy Peasy Swaps!
Craving these wraps but trying to keep things on the lighter side? Totally doable without sacrificing flavor! These cheesy garlic chicken wraps are surprisingly flexible.
- Go Lean: Stick with chicken breast – it’s naturally lower in fat.
- Fiber Up: Grab those whole wheat or maybe even spinach tortillas instead of plain white flour.
- Yogurt Power: Use plain Greek yogurt instead of sour cream for dipping or mixing in. Same tang, more protein!
- Cheese Check: You can definitely use a bit less cheese, or choose something like part-skim mozzarella or provolone. Still melts beautifully!
- Veg Out: Why not sauté some finely chopped onions, bell peppers, mushrooms, or even wilted spinach with the chicken or garlic? Adds nutrients, texture, and makes the filling go further.
- Air Fryer Fan? Give the assembled wraps a light spritz of cooking spray and pop them in the air fryer (around 375°F/190°C) for 5-8 minutes, flipping once. Super crispy!
How to Serve ‘Em Up (Besides Straight Into Your Mouth)
While eating them standing over the stove is a valid option (no judgment!), here are a few other ways to enjoy your glorious cheesy garlic chicken wraps:
- The Diner Dream: Crispy fries (sweet potato fries = heaven) or some crunchy onion rings on the side. Classic.
- A Bit of Green: A simple salad with a tangy vinaigrette is perfect to balance the richness. Just some lettuce, tomato, cucumber – easy!
- Dip Dip Hooray: Ranch is always a winner. Extra garlic butter? Absolutely. Maybe a smoky chipotle aioli? Or just that Greek yogurt? Options!
- Soup’s On: Half a wrap alongside a steaming bowl of tomato soup is like a warm hug on a chilly day.
- Lunchbox Legend: These are surprisingly good cold or gently reheated. Slice ’em in half to make them easy to pack and eat. Your coworkers will be jealous.
- Party Time! Slice the wraps into bite-sized pinwheels, stick a toothpick in ’em, and arrange them on a platter. Watch them disappear! Seriously, a tray of these cheesy garlic chicken wraps is always a hit.
Saving Leftovers (If You Have Any!)
Let’s be real, sometimes these cheesy garlic chicken wraps vanish instantly. But if you have leftovers, here’s how to keep them happy:
- Chill Out: Let them cool down completely first (important!), then tuck them into an airtight container in the fridge. They’ll be good for 2-3 days.
- Reheat Right: Microwaving works, but you lose the crispness. The best way? Pop ’em back in a dry skillet over medium-low heat, use a toaster oven, or (my fave) the air fryer at around 350°F (175°C) for a few minutes. They’ll crisp right back up! A regular oven works too, maybe loosely tented with foil.
- Prep Smarter: Cook the garlic chicken filling ahead of time! Keep it in the fridge for up to 3 days. When hunger strikes, just reheat the filling, grab your tortillas and cheese, and assemble/grill fresh wraps in minutes. Genius, right?
- Freezer Thoughts: You can freeze the finished wraps, but the tortilla can get a bit weird when thawed. Honestly, it’s way better to freeze just the cooked chicken filling. Thaw it in the fridge, then make fresh wraps. Tastes much better!
Okay, Real Talk: Why I’m Basically Obsessed with These Wraps
Maybe I sound like a broken record, but I just gotta say it again – these wraps are the real deal. Here’s why they live rent-free in my head (and my meal rotation):
- FLAVOR! Bold garlic, savory chicken, gooey cheese… it just works. So satisfying.
- So Dang Easy: No fancy techniques, no weird ingredients. If you can chop and stir, you can make these.
- Warp Speed: That 35-minute timeframe is not a joke. Perfect for impatient cooks (like me!).
- Make ‘Em Yours: Feel free to mess with the cheese, add veggies, spice ’em up – they’re forgiving!
- Everyone Loves Them: Seriously. Picky eaters? Hungry teenagers? Foodie friends? They all seem to dig ’em. Less dinner-time drama is always good.
For me, making these cheesy garlic chicken wraps isn’t just cooking; it’s like deploying my secret weapon against weeknight stress. It’s that little victory of making something delicious and comforting without breaking a sweat. It’s that first bite where the crispy tortilla gives way to hot, cheesy, garlicky goodness. Ahhh.
Your turn! Go forth and wrap! I seriously hope you try these. They’re simple, they’re fast, and they taste ridiculously good.
Don’t be shy – tell me how it goes! Did you make them? Did you add something amazing? Did you burn the garlic just a little bit (it happens!)? Let me know all about your cheesy garlic chicken wraps experience in the comments below! And hey, if you’re digging the easy chicken vibe, you might wanna check out my [Link to another relevant recipe, e.g., Super Speedy Lemon Chicken Skillet] recipe next! Happy cooking, friends!
Recipes You May Like

Cheesy Garlic Chicken Wraps
Easy cheesy garlic chicken wraps recipe! Quick garlic butter chicken & melty cheese in warm tortillas. Perfect weeknight dinner solution. Try it!
Ingredients
- Around 1 lb (about 450g) boneless, skinless chicken (thighs are extra juicy, but breasts work great too!), diced up
- 4-6 large flour tortillas (burrito size works best for rolling!)
- 4-6 big cloves of fresh garlic, minced nice and fine (don't be shy!)
- 1.5 - 2 cups shredded cheese (a mix of sharp cheddar & mozzarella is amazing for flavor and pull, but use your fave!)
- 2-3 tablespoons butter or olive oil (or a mix!) for cooking
- 1 tsp Paprika (smoked gives it a lovely depth!)
- 1 tsp Dried Oregano or Italian Seasoning blend
- 1/2 tsp Onion Powder
- Salt and Black Pepper (to your taste – season generously!)
- Optional helpers: A dollop of sour cream or Greek yogurt, a squeeze of fresh lemon juice, chopped fresh parsley or chives.
Instructions
Step 1: Get Your Chicken Ready
Dice up that chicken into little bite-sized nuggets. Toss ’em in a bowl. Now, shower them with the paprika, oregano/Italian seasoning, onion powder, salt, and a good grind of black pepper. Get your hands in there (or use a spoon, whatever feels right) and mix it all up so every piece feels loved and seasoned. Little Tip: If you have an extra 5-10 minutes, just let the chicken hang out with the spices. It’s like a mini-marinade that bumps up the flavor.
Step 2: Sizzle That Chicken
Get your skillet nice and hot over medium-high heat with a swirl of butter or oil. Once it’s shimmering (that’s the signal!), gently lay your chicken pieces in. Try not to dump them all in one pile – give ’em some space to brown properly. Let them cook for about 5-7 minutes, giving them a stir now and then, until they’re looking golden and delicious and definitely cooked through (no pink bits!). Scoop the chicken out onto a plate and try not to eat it all right now.
Step 3: Unleash the Garlic Power!
Turn the heat down to medium. Add the rest of your butter or oil to the skillet. Now, the star: your minced garlic. Toss it in and stir it around for just 30-60 seconds. You’ll smell it almost instantly – that amazing, warm, toasty garlic aroma. Crucial: Keep your eyes peeled! You want fragrant, not burnt. Burnt garlic is sad garlic. This smell? This is the soul of your cheesy garlic chicken wraps.
Step 4: Reunion in the Pan
Quickly slide that cooked chicken back into the skillet with its garlicky friend. Stir everything together like they’re old pals catching up. Make sure all the chicken gets coated in that yummy garlic butter. If you’re feeling fancy and using lemon juice or parsley, toss it in now. Give it a final stir, kill the heat, and just take a second to breathe that in. Awesome, right?
Step 5: Build Your Masterpiece
Time to assemble! Lay out your tortillas. A quick zap in the microwave (like 10 secs) or a flash in a dry pan makes them soft and cooperative. Spoon a good amount of that incredible chicken mixture onto the bottom part of each tortilla. Don’t be stingy! Then, let it rain cheese! Pile it on. Remember the name: cheesy garlic chicken wraps. Embrace the cheese. Folding 101: Tuck in the sides first, then roll it up snugly from the bottom, burrito-style. Keep it tight!
Step 6: Golden, Crispy, Melty Perfection
Last step! You can wipe out the skillet (or grab a clean one) and place the wraps seam-side down over medium heat. Let them sizzle for 2-4 minutes per side. You’re looking for a beautiful golden-brown crust and, most importantly, that cheese inside getting all melty and wonderful. A panini press also works like a charm. Or, pop ’em under the broiler for a super quick minute or two – but watch them like a hawk, they can go from golden to burnt fast! The goal: crispy outside, gooey inside. Pure bliss.
Notes
For a lighter version, use Greek yogurt, whole wheat wraps, and less cheese (but let’s be real—cheese is joy).
These freeze best before wrapping. Just make the garlicky chicken mix, freeze that, then build fresh wraps later.
Reheat wraps in a skillet, oven, or air fryer for max crispiness. Microwaving works in a pinch but loses the crunch.
Want to meal prep? Make the filling ahead and wrap when you're ready to eat—fresh and fast.
Nutrition Information:
Yield: 4 to 6 servingsAmount Per Serving:Calories: Approximately 600-650 kcal per wrap
There are no reviews yet. Be the first one to write one.