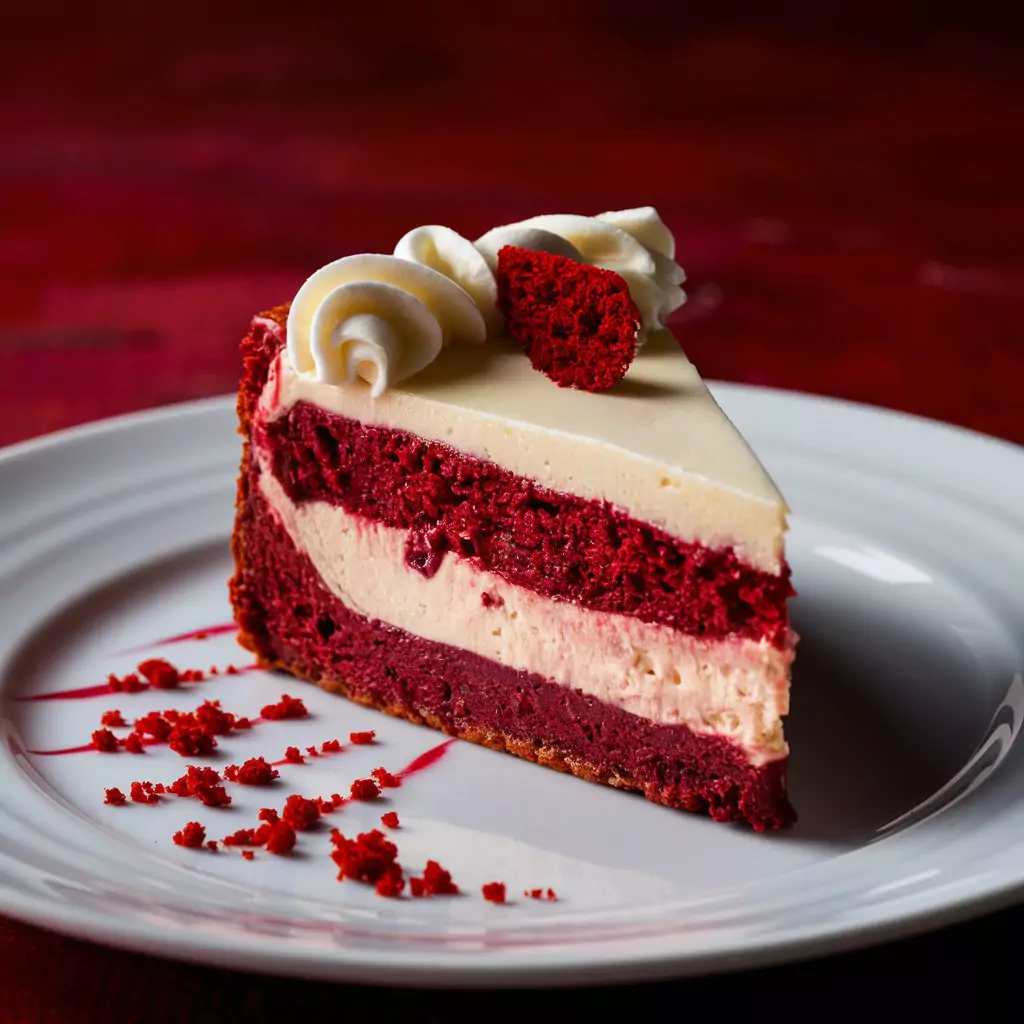
Red Velvet Cheesecake: The Ultimate Guide to Baking Perfection
Let’s be honest – cheesecakes can be intimidating! I nearly fainted the first time I attempted one, and I’m not alone. A recent baking survey showed that almost 80% of home bakers feel the same way. But here’s the thing – this Red Velvet Cheesecake might look like something from a fancy bakery window, but I promise you can make it in your kitchen (even if you’ve had baking disasters before – we’ve all been there!).
I stumbled upon this recipe during lockdown when I was experimenting with combining my two favorite desserts. The rich crimson layers against that creamy cheesecake? Pure magic on a plate. Trust me, your friends will be begging for the recipe – mine certainly did!
Ingredients List
For the Red Velvet Cake Base:
- 1½ cups all-purpose flour (I’ve used cake flour when I want to feel fancy, and it does make it lighter!)
- 3 tablespoons unsweetened cocoa powder (Dutch-processed if you have it – it gives that deeper chocolate vibe)
- 1 teaspoon baking soda
- ½ teaspoon salt
- 1 cup granulated sugar
- ½ cup unsalted butter, softened (My vegan friend uses plant-based butter and swears it works just as well)
- 2 large eggs, room temperature (Don’t skip bringing them to room temp – learned that the hard way!)
- 1 cup buttermilk (No buttermilk? No problem! Add 1 tablespoon vinegar to regular milk and let it sit for 5 minutes)
- 2 tablespoons liquid red food coloring (I’ve started using beet powder for a more natural option)
- 1 teaspoon vanilla extract (The real stuff makes a difference, I promise)
- 1 teaspoon white vinegar
For the Cheesecake Layer:
- 24 ounces cream cheese, softened (That’s 3 standard blocks – and yes, reduced-fat works if you’re watching calories)
- 1 cup granulated sugar
- 3 large eggs, room temperature
- 1 teaspoon vanilla extract
- ¼ cup sour cream (This is my secret weapon for extra creaminess)
- 2 tablespoons all-purpose flour
For the Cream Cheese Frosting:
- 8 ounces cream cheese, softened
- ¼ cup unsalted butter, softened
- 2 cups powdered sugar, sifted (Don’t skip sifting unless you enjoy lumpy frosting!)
- 1 teaspoon vanilla extract
Timing
Let me break down the time commitment so you can plan accordingly:
Prep Time: About 45 minutes (I usually put on a podcast to make it fly by) Baking Time: 80 minutes (Perfect for catching up on your favorite show) Cooling Time: 4 hours minimum (Overnight is better – I know it’s hard to wait!) Total Time: Around 6 hours, but most of that is just waiting while the magic happens
Pro tip: I usually make this the day before I need it. Less stress, better flavor!
Step-by-Step Instructions

Step 1: Prepare Your Equipment
Preheat your oven to 325°F. Now for the springform pan prep – this is super important! Grease that 9-inch pan like your dessert depends on it (because it does), then line with parchment paper. Here’s a step I learned the hard way: wrap the outside with heavy-duty aluminum foil. We’re talking double layers, making sure there are no gaps or tears. Nothing ruins a perfect cheesecake faster than a water-logged bottom!
Step 2: Create the Red Velvet Base
In one bowl, whisk together your dry ingredients – flour, cocoa powder, baking soda, and salt. In another bowl (your biggest one), beat the butter and sugar until it’s fluffy – give it a good 3-4 minutes. Don’t rush this! This is where the magic starts.
Now add your eggs one at a time. When I first started baking, I didn’t understand why this mattered – trust me, it does! Then mix in the food coloring, vanilla, and vinegar. Your mixture will be this gorgeous crimson color that’s absolutely Instagram-worthy.
Now comes the zen part – alternating between adding your dry ingredients and buttermilk. Start and end with the dry stuff. Pour this vibrant batter into your prepared pan and spread it evenly with a spatula. I usually tap the pan gently on the counter to release any air bubbles.
Step 3: Pre-Bake the Cake Layer
Slide that beautiful creation into the oven for about 20-25 minutes. Here’s the tricky part – you want it partially baked but not completely done. The toothpick test should reveal just a few moist crumbs. The first time I made this, I overbaked this layer and ended up with a drier base. Learn from my mistakes!
While it’s cooling for 10 minutes, you can get started on the next layer.
Step 4: Prepare the Cheesecake Mixture
Grab your mixer again for the cream cheese – beat it until it’s silky smooth. No lumps allowed! Add sugar and mix just until incorporated. Then add eggs one at a time on low speed.
The biggest secret to crack-free cheesecake? Don’t overmix! I learned this after my first three attempts looked like the Grand Canyon on top. Gently mix in the vanilla, sour cream, and flour until just combined.
Step 5: Combine the Layers
Pour your cheesecake mixture over the partially cooled red velvet layer. Now for the water bath – this was intimidating to me at first, but it’s actually simple.
Place your foil-wrapped springform pan in a larger roasting pan. Carefully pour hot water into the roasting pan until it reaches halfway up the sides of your springform. This gentle, moist heat is the difference between a professional-looking cheesecake and a cracked mess.
Step 6: Bake the Combined Dessert
Bake for 55-60 minutes. You’re looking for that slightly jiggly center – think Jell-O, not liquid. Then – and this is crucial – turn off the oven, crack the door open, and just let it be for an hour. I use a wooden spoon to prop the door open slightly.
I once rushed this step and watched in horror as my beautiful cheesecake cracked before my eyes. Patience pays off!
Step 7: Prepare the Frosting
While your cheesecake is cooling, beat the cream cheese and butter until smooth. Gradually add powdered sugar and vanilla. I like to refrigerate my frosting for about 30 minutes to firm it up a bit before using.
Step 8: Assemble and Decorate
Once your masterpiece has cooled completely (I usually can’t wait and do this the next morning), carefully remove it from the springform pan. This is always a breath-holding moment for me!
Spread your frosting over the top and sides. For that bakery-worthy finish, I like to sprinkle some reserved red velvet cake crumbs around the edge. Sometimes I add white chocolate shavings if I’m feeling extra fancy.
Nutritional Information
I know, I know – nobody makes Red Velvet Cheesecake to be healthy! But if you’re curious (or counting), here’s the breakdown per slice (assuming you cut it into 12 pieces, which requires serious willpower):
- Calories: 450 per slice
- Total Fat: 28g
- Saturated Fat: 16g
- Cholesterol: 125mg
- Sodium: 320mg
- Total Carbohydrates: 45g
- Dietary Fiber: 1g
- Sugars: 35g
- Protein: 7g
Healthier Alternatives for the Recipe
After making this cheesecake approximately one million times (slight exaggeration), I’ve experimented with some lighter options:
- Swap regular cream cheese for Neufchâtel cheese – it has 33% less fat but still tastes amazing
- Replace half the sugar with monk fruit sweetener – my diabetic aunt couldn’t tell the difference
- Use Greek yogurt instead of sour cream for a protein boost
- Try whole wheat pastry flour in the cake base – it adds a subtle nuttiness that works surprisingly well
- Replace butter with avocado oil or coconut oil if you’re watching your cholesterol
Just between us – the original version is still my favorite for special occasions!
Serving Suggestions
Want to take your Red Velvet Cheesecake to the next level? Here’s what I do:
Serve it with fresh berries – the tartness cuts through the richness perfectly. A dollop of lightly sweetened whipped cream and a mint leaf makes it look like it came from a five-star restaurant.
Coffee is the perfect pairing, but if you’re serving it for a special occasion, a small glass of port wine is magical. (My in-laws were seriously impressed when I did this at Christmas!)
For parties, I sometimes make mini versions in a muffin tin with liners – they’re adorable and perfect for portion control (theoretically, anyway).
Common Mistakes to Avoid
Let me save you from the cheesecake fails I’ve experienced:
- Overmixing the batter – this isn’t a cake where you want to beat air into it. Think gentle folding, not vigorous whipping.
- Using cold ingredients – I’ve ruined perfectly good cheesecakes this way. Set everything out at least an hour before you start.
- Skipping the water bath – I thought this was an optional fancy step. It’s not.
- Peeking during baking – every time you open that oven door, the temperature drops dramatically. Resist the temptation!
- Rushing the cooling process – I know it’s hard to wait, but your patience will be rewarded.
Storing Tips for the Recipe
Your Red Velvet Cheesecake will keep in the refrigerator for up to 5 days. Just cover it well so it doesn’t absorb other food odors. (Though in my house, it rarely lasts more than 2 days!)
For longer storage, you can freeze individual slices – wrap them in plastic wrap, then foil, and they’ll keep for up to 2 months. I do this regularly and thaw slices overnight in the fridge when I need a midnight cheesecake fix!
Here’s a little secret – this cheesecake actually tastes better on day two, when all the flavors have had time to meld together. Perfect for make-ahead dinner parties!
Conclusion
There you have it – a Red Velvet Cheesecake that combines two beloved classics into one show-stopping dessert. The contrast between the vibrant cake and creamy cheesecake layers isn’t just gorgeous to look at; it’s a flavor combination that’ll have everyone asking for seconds.
I’d absolutely love to hear how yours turns out! Drop a comment below with your experience or any questions. If you snap a photo that captures all that red velvet beauty, tag us on social media! And don’t forget to subscribe for more recipes that make you look like a baking genius (even if you’re still figuring it all out – I certainly am!).
Recipes You May Like
FAQs
Why did my cheesecake crack?
Ugh, the dreaded crack! Usually happens from overmixing (incorporating too much air), baking at too high a temperature, or cooling too quickly. The water bath is your best friend here, I promise.
How can I tell when my cheesecake is done?
The center should jiggle slightly when you gently shake the pan – think Jell-O consistency, not liquid. The edges should be more set and perhaps slightly puffed. It will continue to firm up as it cools, so don’t wait until it’s completely firm in the oven.
Can I make this Red Velvet Cheesecake without food coloring? Absolutely! I’ve used 2 tablespoons of beet powder with great results. The color is slightly different – more of a reddish-brown than bright red – but still beautiful and more natural.
Can I make this Red Velvet Cheesecake ahead of time? Not only can you, but you should! I always make mine a day ahead. Those hours in the fridge let the flavors develop, and the texture gets even silkier.
Is it necessary to use a springform pan? In my experience, yes. I tried using a regular cake pan once, and let’s just say that extracting the cheesecake intact was… challenging. The springform makes life so much easier, and they’re not expensive. Definitely worth the investment if you plan to make cheesecakes more than once!

Red Velvet Cheesecake
Indulge in Red Velvet Cheesecake with this easy guide! Tips, rich flavors, and creamy layers await. Perfect baking made simple. Try it now!
Ingredients
- For the Red Velvet Cake Base:
- 1½ cups all-purpose flour – just your regular pantry staple!
- 3 tablespoons unsweetened cocoa powder – I love Dutch-processed for that extra chocolatey kick.
- 1 teaspoon baking soda – keeps it nice and fluffy.
- ½ teaspoon salt – a little goes a long way.
- 1 cup granulated sugar – sweetens the deal.
- ½ cup unsalted butter, softened – or swap in plant-based butter if you’re feeling adventurous!
- 2 large eggs, room temperature – trust me, room temp makes a difference.
- 1 cup buttermilk – no buttermilk? Mix 1 tablespoon vinegar with regular milk and wait 5 minutes.
- 2 tablespoons liquid red food coloring – or try beet powder for a natural twist.
- 1 teaspoon vanilla extract – real vanilla is worth it every time.
- 1 teaspoon white vinegar – gives that classic red velvet tang.
- For the Cheesecake Layer:
- 24 ounces cream cheese, softened – that’s 3 blocks, and reduced-fat works too!
- 1 cup granulated sugar – keeps it sweet and simple.
- 3 large eggs, room temperature – don’t skip the warming step!
- 1 teaspoon vanilla extract – adds that cozy flavor.
- ¼ cup sour cream – my go-to for extra creaminess.
- 2 tablespoons all-purpose flour – helps it hold together perfectly.
- For the Cream Cheese Frosting:
- 8 ounces cream cheese, softened – the frosting star!
- ¼ cup unsalted butter, softened – blends so smoothly.
- 2 cups powdered sugar, sifted – sift it or regret it, folks!
- 1 teaspoon vanilla extract – ties it all together.
Instructions
- Get Your Gear Ready: Preheat your oven to 325°F. Grab a 9-inch springform pan, grease it well, and line it with parchment paper. Wrap the outside with two layers of heavy-duty foil – no water sneaking in here!
- Mix the Red Velvet Base: Whisk flour, cocoa, baking soda, and salt in a bowl. In a big bowl, beat butter and sugar until fluffy (3-4 minutes – don’t skimp!). Add eggs one by one, then stir in food coloring, vanilla, and vinegar. Alternate adding dry mix and buttermilk (start and end with dry). Pour into the pan and tap to pop any bubbles.
- Bake the Base: Pop it in the oven for 20-25 minutes. It’s ready when a toothpick has a few moist crumbs – not fully baked yet! Let it cool for 10 minutes.
- Whip Up the Cheesecake Layer: Beat cream cheese until smooth (no lumps!). Add sugar, then eggs one at a time on low speed. Gently mix in vanilla, sour cream, and flour – don’t overdo it!
- Layer It Up: Pour the cheesecake mix over the cooled red velvet base. Set the pan in a roasting pan, and add hot water halfway up the sides for a water bath.
- Bake the Whole Thing: Bake for 55-60 minutes until the center jiggles like Jell-O. Turn off the oven, crack the door (prop it with a spoon), and let it sit for 1 hour.
- Make the Frosting: Beat cream cheese and butter until creamy. Slowly add sifted powdered sugar and vanilla. Chill it for 30 minutes if you like it firmer.
- Finish It Off: Once cooled (I wait overnight), remove from the pan. Spread frosting on top and sides, then sprinkle with crumbs or white chocolate shavings for flair.
Notes
Nutrition Information:
Yield: 12 servingsAmount Per Serving: Calories: 450 calories per slice