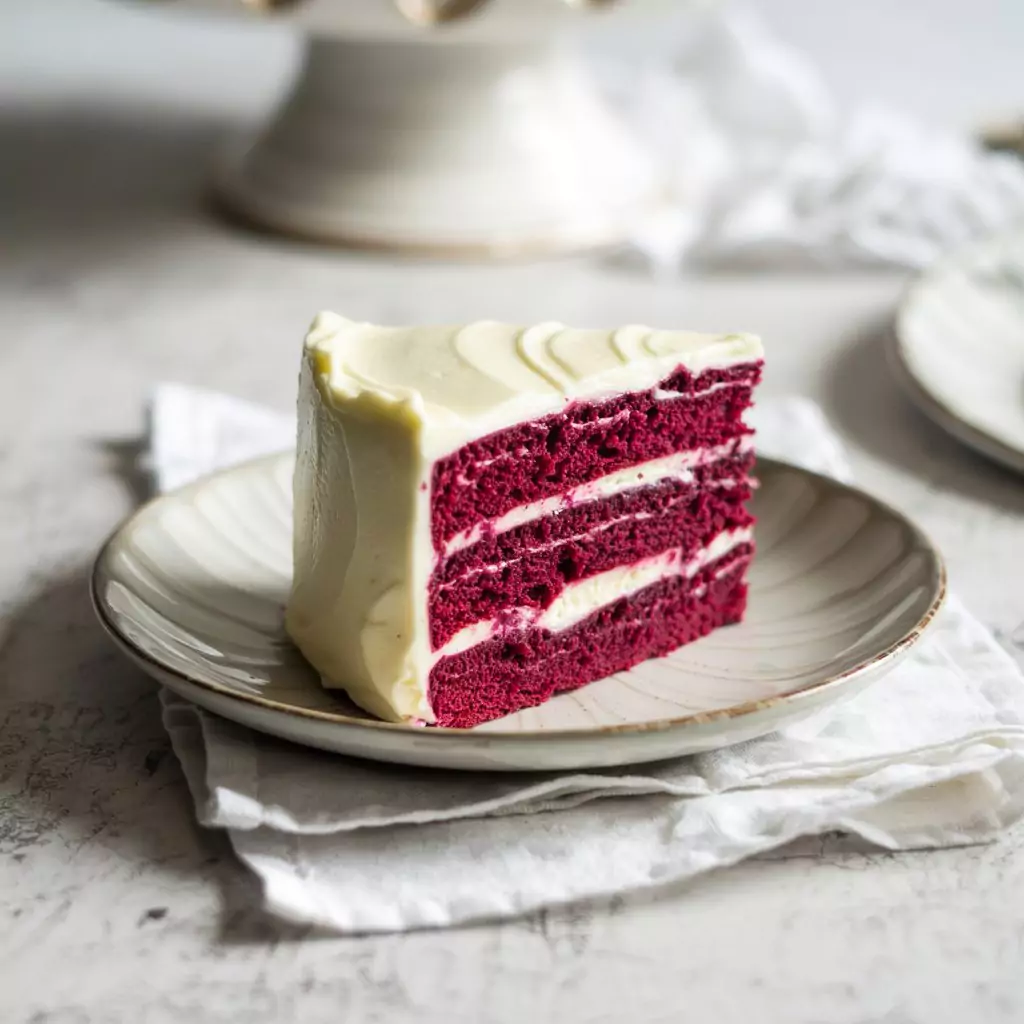
The #1 Best Purple Velvet Cake Recipe: Proven Perfection

So, you know how sometimes you just want to bake something that makes people go “WHOA”? That was me. Scrolling, scrolling, bored with the usual suspects. Red velvet? Love it, but kinda predictable, right? Then I saw it – purple velvet. My brain practically short-circuited with excitement. Purple! Cake! YES!
Finding the idea online was one thing, but actually making a good purple velvet cake recipe? Oh boy. That was an adventure. My first attempt? Let’s just say ‘muddy lavender’ is being generous. And kinda dry. Womp womp. But I was hooked on the idea. So, I kept at it. Picture me, covered in flour, muttering about cocoa ratios and buttermilk levels. I think it took five tries? Maybe six? One version was legit grey. GREY! But finally, tweaking this and that, I hit the jackpot. This recipe.
And listen, it’s not just a pretty face (though, hello gorgeous!). This cake is ridiculously, unbelievably moist. It’s got that perfect velvet cake tang, just a whisper of chocolate, and the crumb? Sooo soft. It’s become my go-to whenever I want to bring something extra. Birthdays, holidays, Tuesdays… And the best part? It looks like you slaved for hours, but honestly? It’s not that hard. You can totally do this, pinky swear.
Stuff You Need for This Awesome Purple Velvet Cake Recipe
Alright, let’s raid the pantry! Good quality stuff helps, but honestly, don’t stress too much. Let’s bake!
For the Cake Batter:
- Flour: 2 ½ cups (around 300g) of regular all-purpose. Nothing fancy needed. Sifting is great if you have the patience, makes it lighter!
- Sugar: 1 ½ cups (300g) granulated. Sweetness!
- Cocoa Powder: Just 2 tablespoons – the unsweetened kind. We want a hint of chocolate, not full-on chocopalooza.
- Baking Soda: 1 teaspoon. Make sure it’s not ancient! Old baking soda = sad, flat cake. (Ask me how I know…)
- Salt: ½ teaspoon. Seriously, don’t skip it. It wakes up all the other flavours.
- Eggs: 2 large ones. If you can remember, pull ’em out of the fridge maybe 30 mins before you start. Room temp eggs just mix in better, trust me.
- Oil: 1 cup (240ml) vegetable or canola. This is my secret weapon for moist cake. Forget butter in the batter for this one, oil is where it’s at for that velvety texture.
- Buttermilk: 1 cup (240ml). Again, room temp if possible! Gives it tang and tenderness. PANIC BUTTON: No buttermilk? Just pour 1 tablespoon of white vinegar or lemon juice into a measuring cup, then fill the rest of the way to 1 cup with regular milk. Stir it, let it sit for 5-10 mins while you grab other stuff. Boom, instant buttermilk-ish magic.
- White Vinegar: 1 teaspoon. I know, sounds bonkers in a cake! But it gives the baking soda an extra little ‘oomph’ for lift. Science is cool, right?
- Vanilla Extract: 2 teaspoons. Use the good stuff if you have it, but whatever you’ve got works.
- Purple Gel Food Coloring: Okay, this is key! Start with 1 teaspoon, maybe 1.5. Gel is way better than liquid ’cause it’s super concentrated. Mix it in, see how you feel. Want it more vibrant? Add a tiny bit more. Remember it bakes a little darker! Aim for a purple that makes you happy.
For the Cream Cheese Frosting (aka The Best Part):
- Cream Cheese: 8 oz block (226g). Needs to be SOFT. Like, leave it on the counter for an hour or two. Cold cream cheese = lumpy frosting sadness. Full fat tastes best, just sayin’.
- Butter: ½ cup (113g / 1 stick) unsalted. Also needs to be soft! Are you sensing a pattern? Soft fats = smooth frosting!
- Powdered Sugar: 4 cups-ish (480g). Sift it if you can be bothered – avoids those little sugar pebbles. You can add a bit less or more depending on how sweet you like your frosting. You do you.
- Vanilla Extract: 1 teaspoon. Always more vanilla.
- Salt: Just a pinch! Cuts the sweetness perfectly. Don’t skip this either!
How Long Is This Gonna Take? (The Real Deal)
Okay, let’s manage expectations. It’s baking, not magic. But it’s totally doable without losing your entire day!
- Mixing & Prepping: Maybe 30 mins? Depends how distracted you get by your phone (guilty!).
- Bake Time: 30-35 minutes. Perfect window to wash some of the bowls or doomscroll.
- Cooling/Frosting: This is the killer. You need to let the cakes cool completely. Like, REALLY cool. At least an hour, maybe more. Frosting warm cake is just asking for a sticky, melty disaster zone. Then frosting takes maybe 15-20 mins?
- Total Time: So yeah, around 2 hours total-ish, but a lot of that is hands-off waiting time. Totally reasonable for a cake this impressive! You could bang this out on a lazy Sunday afternoon, easy.
Okay, Let’s Bake! Your Step-by-Step Guide
Ready? Deep breath. You got this. Follow these steps for the most amazing purple velvet cake recipe ever.
Step 1: Oven & Pans – Get ‘Em Ready!
Crank that oven up to 350°F (175°C). Find two 9-inch round cake pans. Grease ’em like your life depends on it (butter, spray, whatever) and toss a little flour in there, tap it around, dump the excess. Pro tip? Draw circles on parchment paper using the pan bottom, cut ’em out, stick ’em in the bottom. No sticking anxiety here!
Step 2: Dry Ingredients Huddle Up
Grab your biggest mixing bowl. Dump in the flour, sugar, cocoa powder, baking soda, and salt. Give it all a good whisk together. Takes like 30 seconds and makes a difference!
Step 3: Wet Ingredients Mix & Mingle
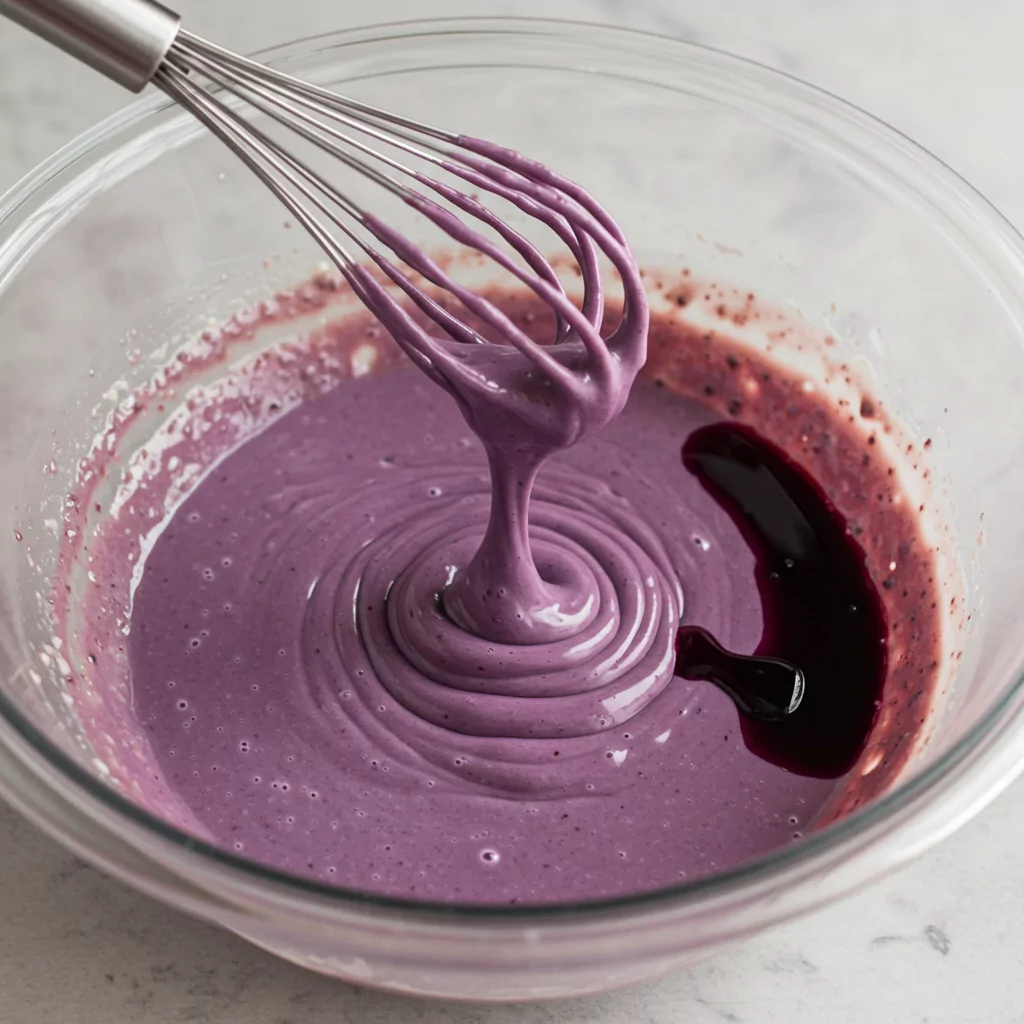
In another bowl (sorry, dishes!), whisk the eggs, oil, buttermilk, vinegar, and vanilla together. Now – the colour! Squeeze in about 1 teaspoon (maybe a bit more) of that purple gel. Whisk it up! How does it look? Needs more punch? Add a tiny bit more gel and mix again. Get it to a purple you love! It should look like vibrant purple paint.
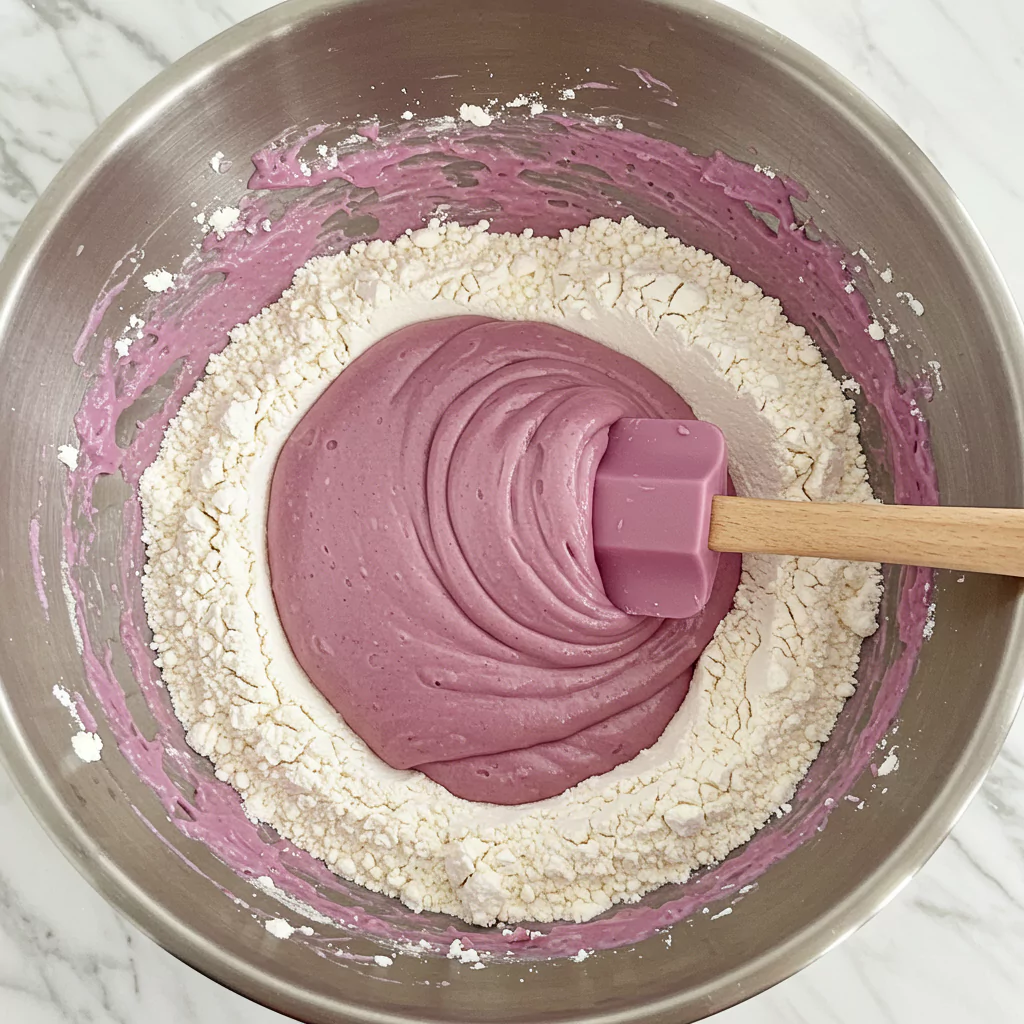
Step 4: Combine! (But Gently!)
Pour the colourful wet stuff into the bowl with the dry stuff. Mixer on LOW, or just use a whisk. Mix just until you don’t see any more white flour streaks. Scrape the bowl down once. Seriously. Stop mixing. Walk away if you have to! Over-mixing is the #1 enemy of tender cake. We want velvet, not rubber!
Step 5: Bake Time!
Okay, carefully pour the batter, dividing it as evenly as you can between your two prepared pans. Smooth the tops a little if you want. Into the hot oven they go! Set a timer for 30 minutes. Check with a toothpick then – if it comes out clean (or with just a few moist crumbs clinging), they’re done! If still wet, give ’em another few minutes, but keep an eye on ’em. Your house should smell incredible right about now.
Step 6: Cool Down! (Seriously, Wait!)
Get those beauties out of the oven! Let them hang out in their pans on a wire rack for like 10-15 minutes. Then, very carefully (use oven mitts!), flip ’em out onto the wire rack to cool. And now… you wait. They need to be completely cool. No cheating! Go watch an episode of something. Scroll Instagram. Whatever. Just don’t touch ’em with frosting yet!
Step 7: Whip Up That Dreamy Frosting
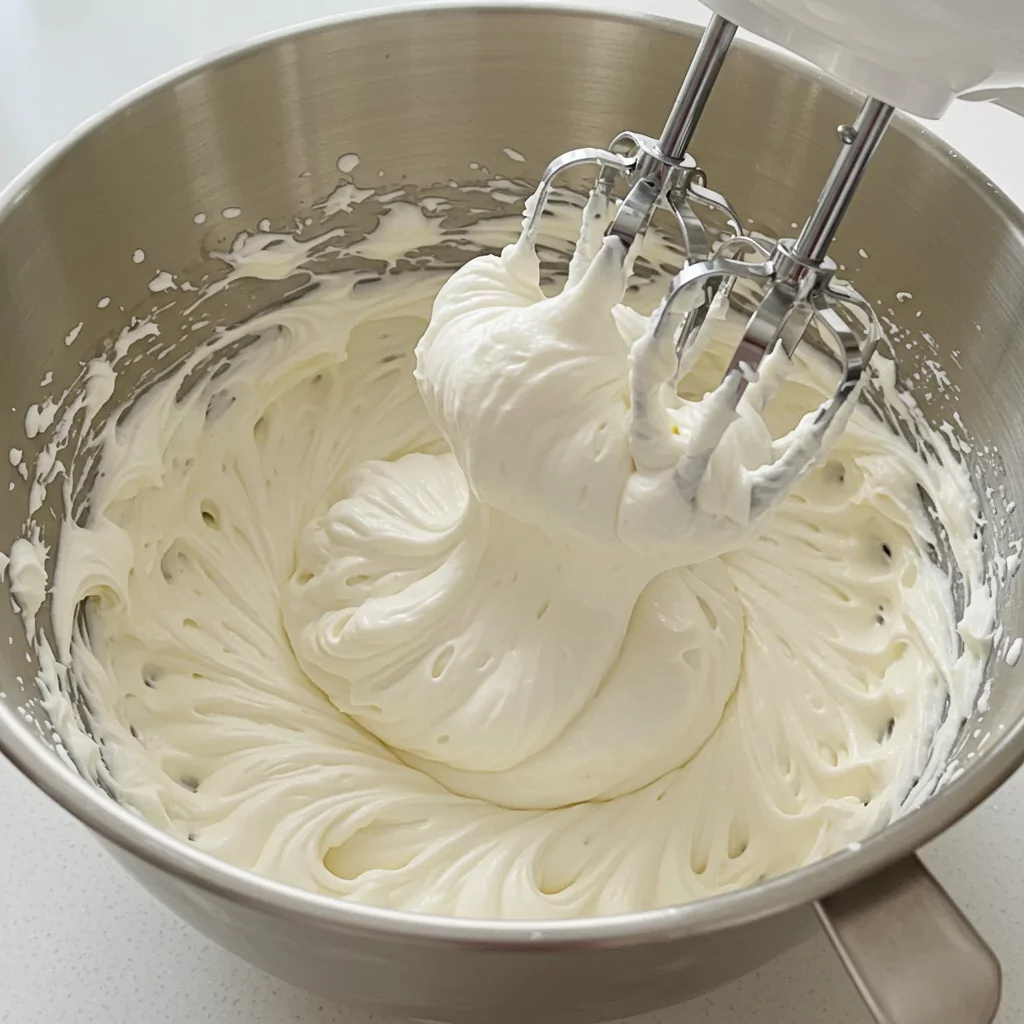
While the cakes are cooling (see? productive waiting!), let’s make the frosting. Grab another big bowl (I know, I know, sorry!). Toss in the softened cream cheese and softened butter. Beat ’em together with your mixer until they’re totally smooth and creamy, like no lumps at all. Now, add the powdered sugar – maybe a cup at a time – mixing on low speed first unless you want a sugar cloud in your kitchen. Once it’s mostly mixed in, add the vanilla and the pinch of salt. Now, crank the mixer to medium-high and let it whip for a good 2 minutes. It should get lighter and fluffier. Okay, NOW you can lick the beaters. It’s mandatory.
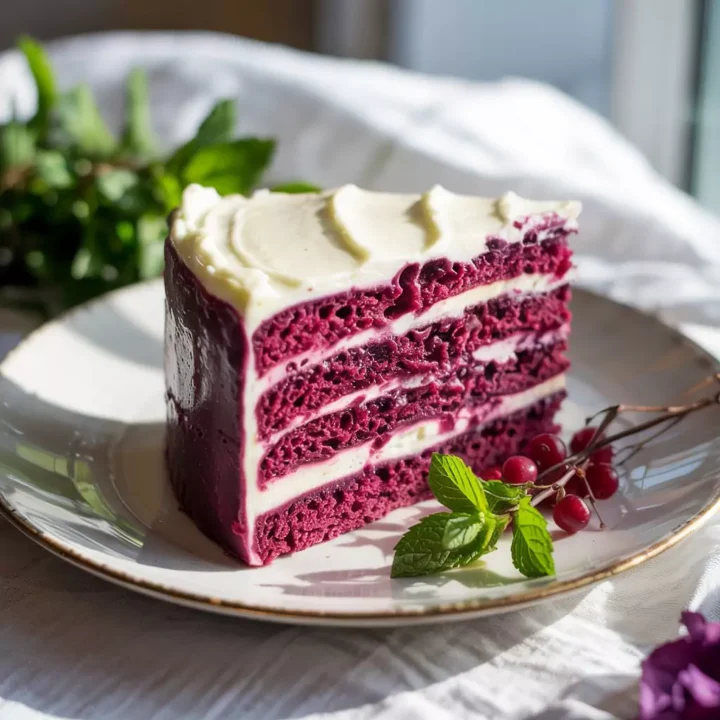
Step 8: Assembly! Let’s Build This Beauty!
Are the cakes COOL? Like, really cool? Okay. Put one layer on your serving plate. Slap on a good thick layer of frosting – be generous! Spread it out. Carefully place the second cake layer on top. Now frost the whole darn thing – top and sides. Make it smooth, make it swoopy, make it rustic – whatever makes you happy! There are no frosting police here.
Wanna Lighten It Up? (Or Just Play Around?)
Look, this cake is amazing as is, but if you wanna experiment or maybe feel slightly less decadent (why tho?), here are thoughts:
- Less Sugar? You can probably cut back the sugar in the cake by maybe 1/4 cup without total disaster, but it might change the texture a bit. Frosting is easier to adjust – just add less powdered sugar to taste.
- Applesauce Trick: Swap half the oil for unsweetened applesauce. Cuts fat, adds moisture, but yeah, the cake might be a tad denser. Still good!
- Yogurt Boost: If you love tang, try swapping a few ounces of the cream cheese in the frosting for thick Greek yogurt. Adds protein too!
- Flour Swaps: Gluten-free? A good 1-to-1 blend should work okay (follow the package!). Whole wheat pastry flour could work for some whole grains, but expect a heartier texture.
- Natural Vibes: Beetroot powder can give colour, but it’s more pinky/magenta and might taste faintly… earthy? Worth a try if you hate artificial colours, but manage your expectations!
How to Serve This Purple Awesomeness
Dude, this purple velvet cake recipe basically serves itself, it looks so cool. But if you wanna be extra:
- Berries! Raspberries especially look stunning against the purple and white. Blueberries too!
- Choco-holic: A little drizzle of melted white or dark chocolate? Shavings? Never a bad idea.
- Fancy Florals: Edible flowers (pansies are cute!) if you wanna feel like a food blogger.
- Simple Dust: Honestly, sometimes just a little poof of powdered sugar right before serving is perfectly elegant.
- My Fave Way: A big slice, maybe slightly cool from the fridge, with a steaming mug of coffee. Heaven. Or standing at the counter eating it directly off the plate, no judgment!
Storing the Goods (If It Lasts!)
Okay, assuming tiny cake-eating gremlins don’t devour this purple velvet cake recipe instantly:
- Fridge is Your Friend: That cream cheese frosting means it needs to live in the fridge. Get it in an airtight container, or wrap it really well. It’ll be good for 3-4 days easily. Maybe hide it at the back? Just kidding! (Mostly.)
- De-Chill Before Eating: Take it out of the fridge maybe 20-30 minutes before you plan to serve it. Cold cake = kinda stiff. Room temp cake = perfection.
- Freeze Power: Yes! Bake the layers, cool ’em completely, wrap ’em TIGHTLY in plastic wrap then foil, and freeze ’em for up to 2 months. Thaw overnight in the fridge, then frost like normal. Genius!
- Frosted & Frozen? You can freeze the whole frosted cake or slices too! Wrap it like it’s going to the arctic. Thaw in the fridge. Frosting might get a tiny bit weepy, but who cares, it’s still cake!
Seriously, Why Am I THIS Obsessed?
Okay, bottom line? Making this purple velvet cake recipe just makes me HAPPY. It feels creative and fun. And the reactions? When people see that bright purple inside? Priceless! It’s unexpected and delightful.
Plus, it tastes ridiculously good. Moist, tangy, sweet, perfect frosting… it hits all the right notes. And knowing that I made this cool-looking, delicious thing feels pretty darn good. It’s proof that you don’t need to be a pro baker to make something awesome.
You HAVE to try it. Seriously. Make it for someone’s birthday, make it for a rainy day, make it just because cake is always a good idea. You will not regret it.
And PLEASE tell me if you make it! I genuinely love hearing how it went! Did you change anything? Did everyone freak out over the colour? Drop a comment below – let’s talk cake disasters and triumphs! Share your pics!
Go forth and bake! You’ve got this!
Recipes You May Like
purple velvet cake recipe
Easy, moist purple velvet cake recipe with tangy cream cheese frosting! Get tips for vibrant color & perfect results every time. Try it!
Ingredients
- 2 ½ cups (300g) all-purpose flour – just the regular kind you’ve got in the pantry
- 1 ½ cups (300g) granulated sugar – sweet and simple
- 2 tablespoons unsweetened cocoa powder – a little hint of magic
- 1 teaspoon baking soda – make sure it’s fresh so your cake rises happy
- ½ teaspoon salt – gotta balance that sweetness
- 2 large eggs – let them sit out for a bit if you can
- 1 cup (240ml) vegetable or canola oil – keeps it so moist, trust me
- 1 cup (240ml) buttermilk – or DIY it with milk + 1 tablespoon vinegar/lemon juice, let it sit 5-10 mins
- 1 teaspoon white vinegar – a little kick for fluffiness
- 2 teaspoons vanilla extract – real stuff if you’ve got it, but fake works too
- 1-1.5 teaspoons purple gel food coloring – gel’s the key for that bold purple vibe
- 8 oz (226g) cream cheese – softened, leave it out for an hour or two
- ½ cup (113g / 1 stick) unsalted butter – softened, let it hang with the cream cheese
- 4 cups (480g) powdered sugar – sift it if you’re feeling fancy, adjust if it’s too sweet
- 1 teaspoon vanilla extract – because everything’s better with vanilla
- Pinch of salt – just a tiny bit to cut the sugar rush
Instructions
Step 1: Boss Your Oven & Pans Around
Get that oven heating up to 350°F (175°C). Grab two 9-inch round pans. Grease 'em up good (I like Baker's Joy spray, lazy person hack) or use butter/flour. Definitely recommend cutting out parchment paper circles for the bottom. Seriously saves so much headache later.
Step 2: Dry Stuff Dump & Whisk
Big bowl time. Dump in the flour, sugar, cocoa, baking soda, salt. Whisk it all together like you mean it. Get rid of any lumps. Takes 30 seconds. Do it.
Step 3: Wet Ingredients Party Time!
Separate bowl. Whisk the eggs, oil, buttermilk (or your fake buttermilk!), vinegar, and vanilla. Now for the main event: the PURPLE. Squeeze in that gel color. Start with 1 or 1.5 teaspoons. Whisk whisk whisk. Is it vibing? Does it scream PURPLE? Add another tiny drop if needed, but don't go wild. Mix 'til it's one glorious colour.
Step 4: The Merge! (Handle With Care!)
Pour the colourful wet stuff into the dry stuff bowl. Mixer on LOWEST speed, or use a whisk/spatula. Mix just until the flour disappears. Scrape the bowl once to make sure no flour is hiding. Okay, STOP. Seriously. Back away from the mixer. Overmixing = tough cake. We want tender, velvety goddess cake, okay? Don't ruin it now!
Step 5: Bake It 'Til You Make It!
Divide that gorgeous batter evenly between your pans. Try to eyeball it fairly. Smooth the tops a tiny bit. Gently slide 'em into the hot oven. Set timer for 30 mins. Go! After 30, poke the center of one cake with a toothpick. Does it come out clean? Or with a few moist crumbs (that's okay!)? Awesome, they're done. Still looks wet? Give 'em 3-5 more minutes and check again. Don't overbake!
Step 6: COOL DOWN. I MEAN IT.
Okay, carefully take the pans out (they're hot!). Let them sit on a wire rack for 10-15 minutes. No longer! Then, get brave, put the rack on top, and flip 'em over! Lift the pans off. Now... walk away. They need to cool. COMPLETELY. To room temperature. Don't even THINK about frosting them while they're warm. Go fold laundry. Call your mom. Do anything but frost warm cake.
Step 7: Frosting Glory! (Try Not to Eat It All)
While you're waiting (see? efficiency!), make the frosting. Big bowl again. Toss in the SOFT cream cheese and SOFT butter. Beat 'em with your mixer 'til they're super smooth, like completely lump-free. Now, dump in the powdered sugar (hopefully sifted!), maybe a cup at a time, mixing on LOW unless you enjoy cleaning sugar off your ceiling. Once it's mostly in, add the vanilla and salt. NOW crank the mixer to medium-high. Let it whip for like 2 full minutes. It'll get lighter, fluffier... irresistible. Okay fine, lick the beaters. You earned it.
Step 8: The Grand Finale! Build Your Cake!
Are the cakes COOL? Touch them. No warmth? Okay, proceed. One layer on the plate/stand. Pile on a generous blob of frosting (like, half an inch thick?). Spread it out. Gently place the second layer on top. Now use the rest of the frosting for the top and sides. Get arty! Smooth it perfectly (good luck!) or make pretty swirls with your spatula or the back of a spoon. Imperfect is charming!
Notes
Nutrition Information:
Yield: 12-14 slicesAmount Per Serving: Calories: ~550 calories per slice