
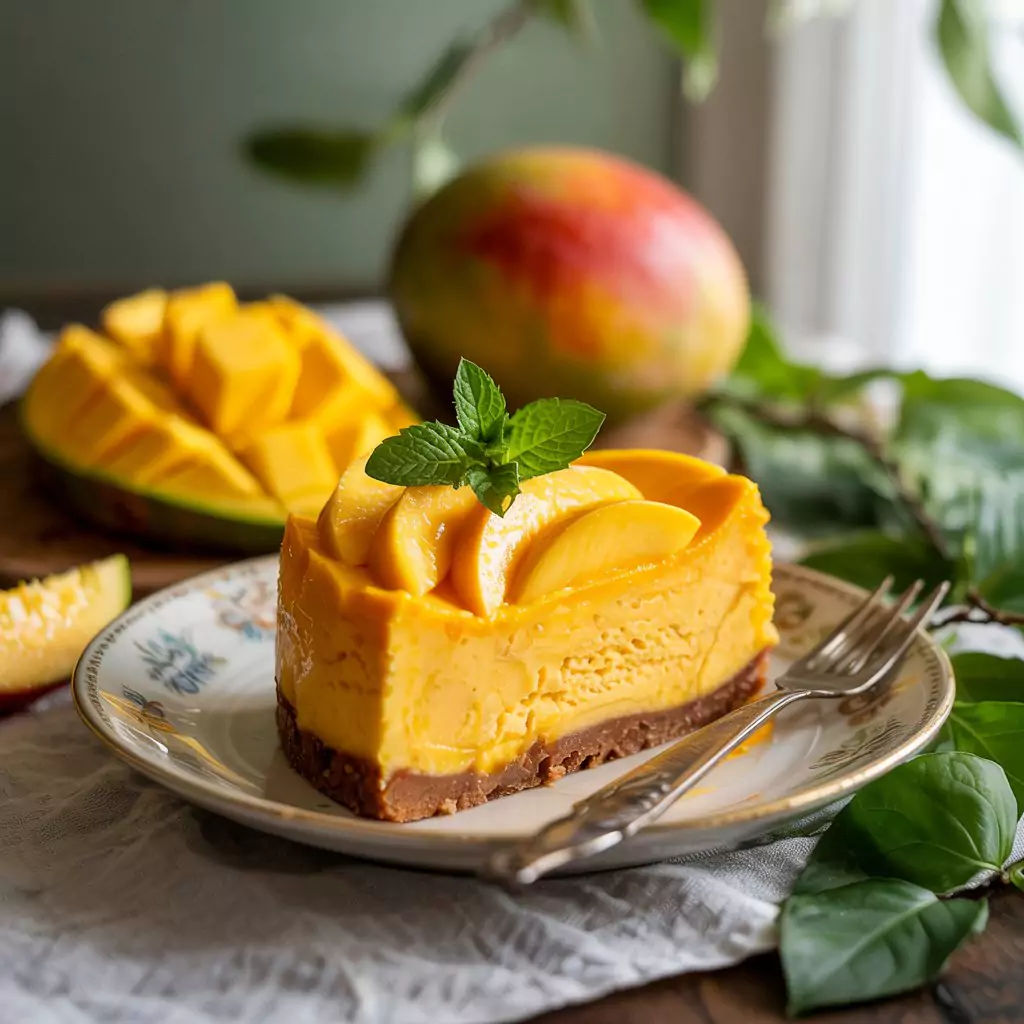
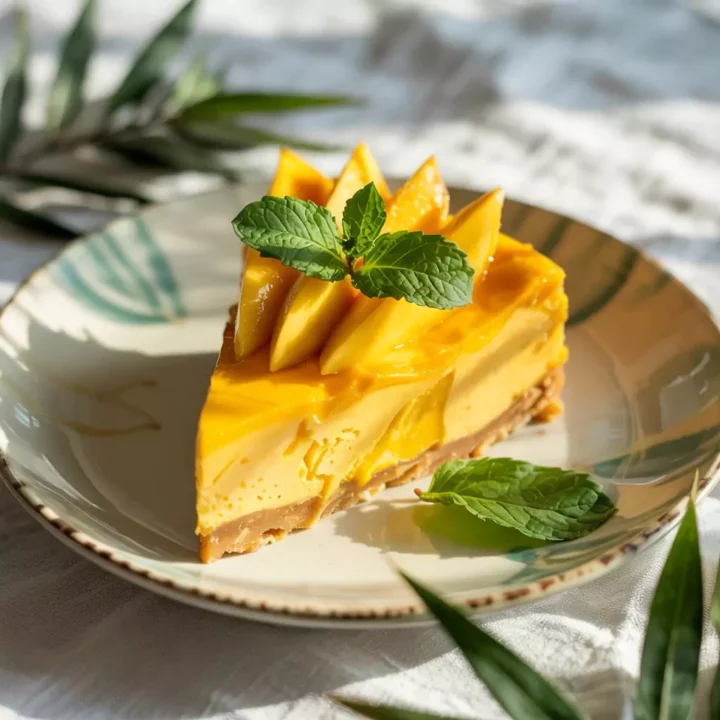
Tropical Mango Cheesecake Recipe: A Slice of Summer Heaven

Guys, I need to tell you about this tropical mango cheesecake recipe that has literally taken over my life. No joke, I first made it three summers ago when my AC broke down during that ridiculous heatwave (remember that?). I was sweating buckets but had promised dessert for my sister’s birthday, and she LOVES mango anything.
The first version was a total disaster – way too soft in the middle and the mango flavor was barely there. My family ate it anyway because they’re nice like that, but I knew it needed work. I’m not kidding when I say I made this thing EIGHT different times. My downstairs neighbor Tom started pretending he wasn’t home when he heard me knocking, and Sarah across the hall would literally text “Is that another cheesecake experiment?” before opening her door. But attempt number eight? Pure magic. What makes this tropical mango cheesecake so dang special isn’t just that it tastes like actual mangoes instead of that weird artificial flavor. It’s how it somehow manages to be rich but not heavy, sweet without making your teeth hurt, and that color! It’s literally sunshine on a plate. This isn’t some random recipe I found on page 12 of Google results, trust me.
Ingredients List
For the crust (the foundation of all good things):
- 2 cups graham cracker crumbs (I’ve used those Biscoff cookies once when I ran out – game changer!)
- 1/4 cup granulated sugar
- 1/2 cup butter, melted (salted butter works fine if that’s all you have)
- 1 teaspoon vanilla extract
- Pinch of salt (trust me on this one)
For the filling (where the magic happens):
- 3 ripe mangoes (about 2 cups when puréed) – Ataulfo/champagne mangoes are my fave
- 3 packages (8 oz each) cream cheese, room temperature (forget to take them out early? I’ve microwaved for 10 seconds – don’t tell the food police)
- 3/4 cup granulated sugar
- 1/4 cup sour cream
- 3 large eggs
- 2 tablespoons cornstarch
- 1 tablespoon lime juice (lemon works too)
- 1 teaspoon vanilla extract
For the topping (because we eat with our eyes first):
- 1 ripe mango, thinly sliced
- 2 tablespoons mango jam or preserves (apricot jam works in a pinch – I’ve been there)
- Fresh mint leaves (totally optional but makes me feel fancy)
Confession time: I’ve made this with frozen mangoes more times than I can count. Thaw them completely, drain off that extra liquid, and nobody will ever know the difference. I always have a bag in my freezer for mango emergencies!
Timing
Prep time: 30 minutes (includes the time I spend hunting for the springform pan that always hides in the back of the cabinet) Baking time: 50 minutes (perfect for one episode of whatever show I’m binging) Cooling and setting: At least 4 hours (the torture of waiting – I’ve been known to check it every 30 minutes) Total time: Around 5 hours and 20 minutes
Most of this is waiting time, I promise! And compared to my grandma’s traditional cheesecake that takes practically two days, this is relatively quick. I usually make it the night before and let it set overnight – it’s one less thing to stress about when I’m having people over.
Step-by-Step Instructions
Step 1: Get Your Act Together
Crank that oven to 325°F. Then begins the eternal hunt for the springform pan that I SWEAR was in the cabinet yesterday but has apparently decided to play hide and seek. After finding it (check under other pans!), line the bottom with parchment and grease those sides like your life depends on it. Then grab the heavy-duty aluminum foil – not the cheap stuff that tears if you look at it wrong – and wrap the outside of that pan like you’re protecting it from radiation. My first cheesecake water bath leak was traumatic enough to cause trust issues.
Step 2: Make That Crust
Dump those graham cracker crumbs into a bowl with the sugar, melted butter, vanilla, and salt. Mix it all up until it looks like wet sand after the tide goes out. My niece Zoe calls this the “indoor beach” and always wants to stick her little fingers in it. Last Christmas she told everyone she “helps Aunty make sand castles in the kitchen” and my mom gave me the strangest look. When the mixture holds together when you squeeze it, press it into the bottom of your pan – I use the flat bottom of a measuring cup because my fingerprints make it look like the surface of the moon.
Step 3: Mango Madness
Peeling and cutting mangoes is my least favorite kitchen task. I always end up with juice down my arms and somehow in my hair? My method now is to stand over the sink, accept the mess, and move on with life.
Blend those mangoes until they’re silky smooth. You’ll need about 2 cups of that golden goodness. Last summer I used mangoes from the farmer’s market that looked perfect but tasted like wet cardboard, so I added a spoonful of honey and a splash of orange juice to help them out. Life lesson: always taste as you go! And for the love of all things holy, fish out those stringy bits that cling to the pit. First time I made this, I got lazy and left them in – ended up with what looked like hair running through my cheesecake. My brother still brings it up at family dinners. “Remember the hairy cheesecake of 2021?” Thanks, bro.
Step 4: The Creamy Dreamy Part
In your mixer, beat that cream cheese until it’s so fluffy you want to face-plant into it. About 3 minutes on medium speed does the trick. Add the sugar and keep beating until smooth and silky.
Mix in the sour cream, then add eggs one at a time, mixing just until combined after each. My sister-in-law (who went to culinary school) yelled at me once for overbeating this part. Apparently, too much air = cracks. Who knew?
Fold in the mango purée, cornstarch, lime juice, and vanilla just until combined. The lime juice brightens the flavor AND helps preserve that gorgeous color. Science!
Step 5: Into the Oven!
Pour this glorious mixture over your cooled crust. Now for the water bath – which sounds fancy but just means putting your foil-wrapped springform into a larger pan and adding hot water about halfway up the sides.
I’ve splashed myself doing this approximately 600 times. My method now is to put the springform in the larger pan, place it on the oven rack, and THEN pour in the hot water. Game changer.
Bake for 50-55 minutes. You want the edges set but a slight jiggle in the center – kind of like Jell-O, not like pancake batter.
Turn off the oven, crack the door open (I stick a wooden spoon in there), and let it cool inside for an hour. This slow cooling is key to preventing the Grand Canyon of cracks from forming.
Step 6: Final Touches
This is where my patience goes to die – refrigerate for at least 4 hours or overnight. I wish I could tell you I’m super chill about waiting, but that would be a lie. I’m that person who opens the fridge every 20 minutes like some magical cheesecake fairy visited and finished the setting process early. My husband has actually moved his beer to block my view of the cheesecake so I’d stop checking. One time I couldn’t sleep and came downstairs at 2 AM with a spoon “just to see if the edges were set.” Reader, I ate the edge. No regrets.
Before serving, arrange mango slices on top in whatever pattern your heart desires. Some days I do a spiral, other days it’s just a random pile because… life. Warm up that mango jam and brush it over the fruit for that bakery-worthy shine.
Healthier Alternatives for the Recipe
Look, sometimes my jeans get a little tight and I need to dial things back. Here’s what works:
- Neufchâtel cheese (⅓ less fat cream cheese) works shockingly well. I made it for book club and no one knew the difference.
- Greek yogurt instead of sour cream adds a bit of protein. My gym-obsessed brother actually requested this version for his birthday.
- I’ve used monkfruit sweetener when my diabetic aunt visits – start with half the amount as it can taste different.
- For the gluten-sensitive folks in my life, I make the crust with almond flour and dates. Different vibe but still delicious.
- One time I made a vegan version with plant-based cream cheese and coconut cream for my daughter’s friend. It wasn’t identical, but they demolished it anyway!
Serving Suggestions
This cheesecake is a showstopper on its own, but I love serving it with:
- Fresh berries on the side – the tartness cuts through the richness perfectly
- A sprinkle of toasted coconut when I’m feeling tropical (or trying to impress the in-laws)
- A scoop of coconut sorbet for special occasions
- A drizzle of passion fruit syrup if I happen to find some at the fancy grocery store
One summer I served this at a backyard BBQ with little paper umbrellas stuck in each slice, and people still talk about it three years later!
Storing Tips for the Recipe
This tropical mango cheesecake keeps in the fridge for up to 5 days, though it’s never lasted that long in my house! Store it in an airtight container – learned that the hard way after my husband put it uncovered in the fridge and it picked up all the smells of last night’s curry. Not a flavor combo I recommend!
For freezing, I cut individual slices because I have zero self-control around a whole cheesecake. Wrap each piece in plastic, then foil, and freeze for up to 2 months. Perfect for those emergency dessert cravings.
One time I froze slices with the mango topping already on, and it turned into a sad, mushy mess when thawed. Now I freeze just the plain cheesecake and add fresh fruit before serving.
Why I’m Obsessed With This Recipe
This tropical mango cheesecake recipe has literally changed my reputation among friends and family. I went from “oh, she’s bringing cookies again” to “PLEASE tell me you’re bringing that mango cheesecake!”
It’s become my signature dish – the one thing I’m requested to bring to every gathering. My cousin even asked me to make it for her bridal shower instead of the fancy bakery cake they had planned. (I was simultaneously flattered and terrified.)
Have you tried making fruity cheesecakes before? Drop me a comment below – I absolutely LOVE seeing your kitchen adventures! Tag me in your photos because honestly, seeing you make my recipes makes my whole week.
Now go grab some mangoes before they’re out of season and become the dessert hero we all need!
Recipes You May Like
Tropical Mango Cheesecake
Rich, creamy tropical mango cheesecake with a buttery crust and vibrant topping. Easy recipe with tips for perfection. Try it today!
Ingredients
- 2 cups graham cracker crumbs (or try Biscoff cookies for a fun twist—I did once and it was amazing!)
- 1/4 cup granulated sugar
- 1/2 cup melted butter (salted or unsalted, whatever’s in your fridge works)
- 1 teaspoon vanilla extract
- Pinch of salt (just a little sprinkle, trust me, it makes a difference)
- 3 ripe mangoes (about 2 cups puréed—Ataulfo mangoes are my go-to, but any juicy ones will do)
- 3 packages (8 oz each) cream cheese (room temp is best, but I’ve zapped them in the microwave for 10 seconds in a pinch)
- 3/4 cup granulated sugar
- 1/4 cup sour cream
- 3 large eggs
- 2 tablespoons cornstarch
- 1 tablespoon lime juice (or lemon if that’s what you’ve got)
- 1 teaspoon vanilla extract
- 1 ripe mango, thinly sliced (for that pretty finish)
- 2 tablespoons mango jam or preserves (apricot jam works too—I’ve used it when I was out)
- Fresh mint leaves (optional, but they make me feel extra fancy)
Instructions
Notes
Nutrition Information:
Yield: 12 servingsAmount Per Serving: Calories: Approximately 450 calories per slice
Tried This Recipe? Share Your Thoughts!
There are no reviews yet. Be the first one to write one.


